Building a Laravel Chat App with PHP, Vue.js, and PubNub
In recent years, Laravel has grown in popularity among all PHP web frameworks. Laravel’s strict commitment to elegant code and modular design make it appealing to a wide variety of developers, and for programmers, this is great news because they can build reusable modules within the framework guidelines rather than invent their own ways.
So in this blog post, we’ll walk through how to combine Laravel’s capabilities with the power of PubNub
What We’ll Build
First, let’s look at the chat app UI. We have a signup/sign-in screen which controls user access to the app.
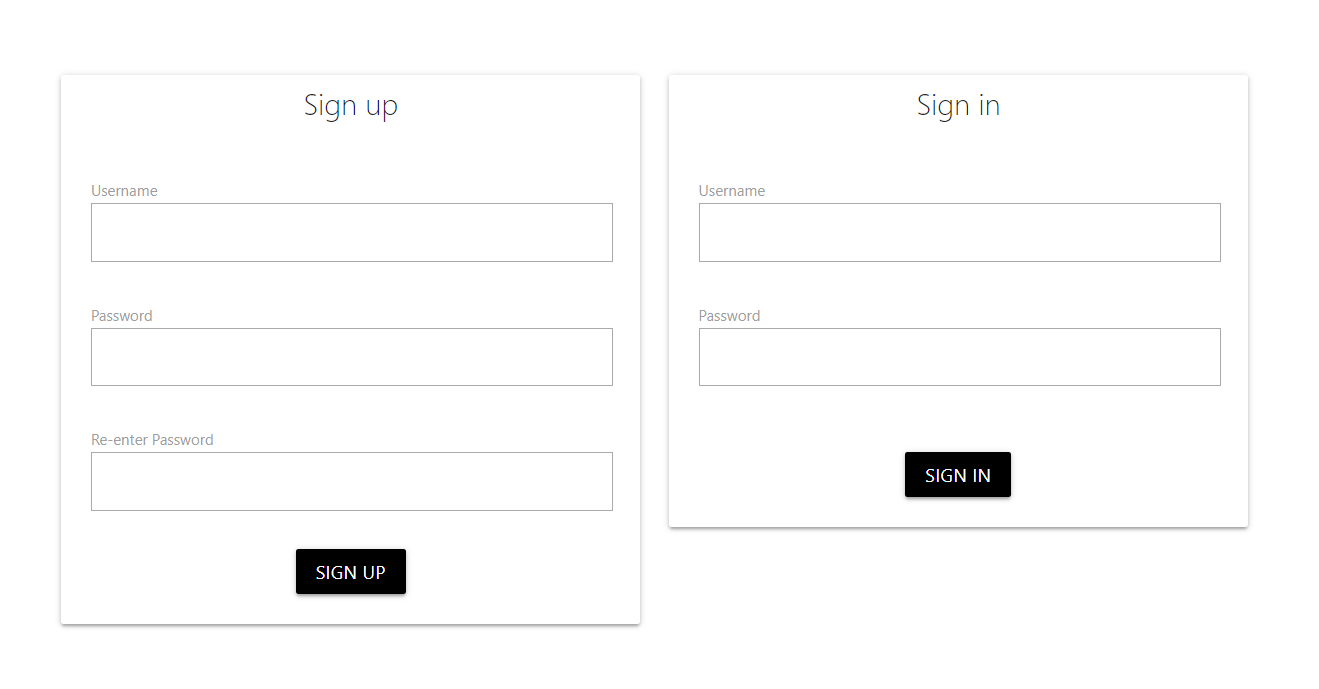
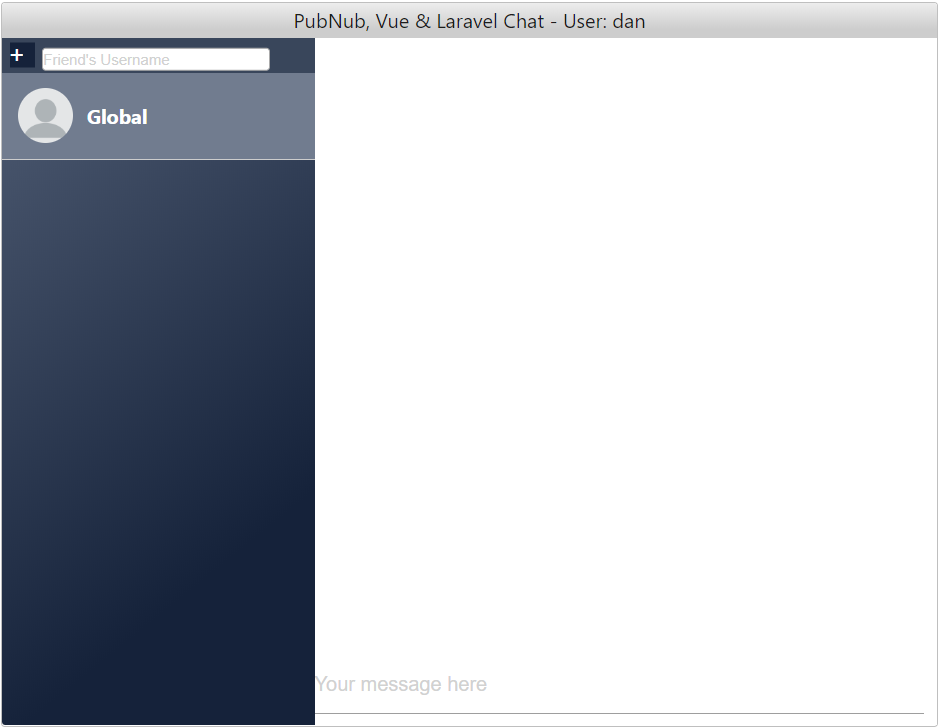
And once the user has signed in, the user has access to the global chat room shared by all signed-in users.
Setup
The chat app has two components. The backend server-side logic, which is implemented using Laravel, and the front-end which is written in Vue.JS.
The backend is where all the chat administrative functions reside. This includes the user signup and signin processes, as well as the one-on-one chat session request initiation. Like any web framework, these functions are implemented as routes within the Laravel framework.
To see this chat app in-action, you should follow the accompanying Laravel, PubNub, Vue.js Chat App GitHub repository to understand this app functionality. The steps for setting up the toolchain and dependencies are provided in the README.
Ensure that you have installed all the software packages as prescribed in the prerequisites section of the README.
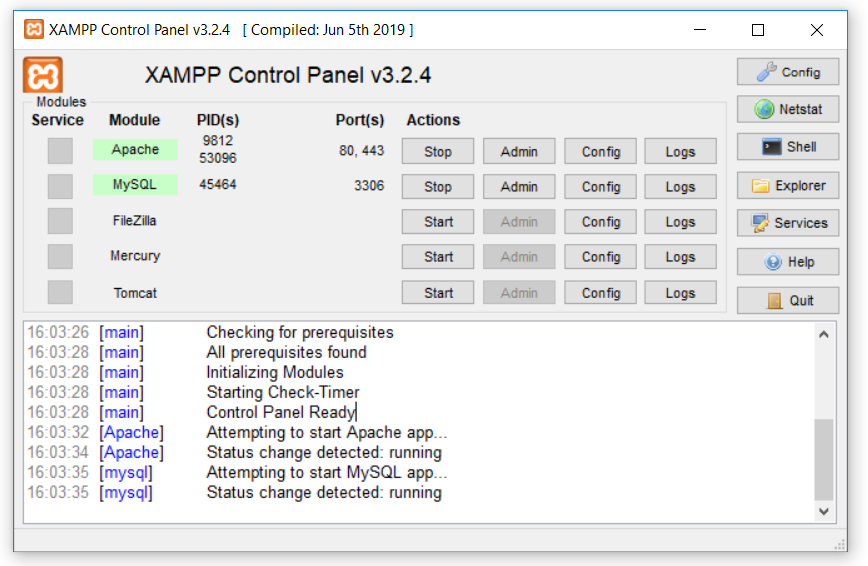
The server-side logic of this chat app is powered by Apache and MySQL. We also use the XAMPP installer which installs the Apache, MySQL as well as PHP runtime. It also provides a control panel to administer the servers and other components of the XAMPP package.
Since this chat app leverages PubNub, you need to sign up for a PubNub account.
Follow the Configuration section of README to ensure that the PubNub keys, server and database is configured.
Chat Admin Functions
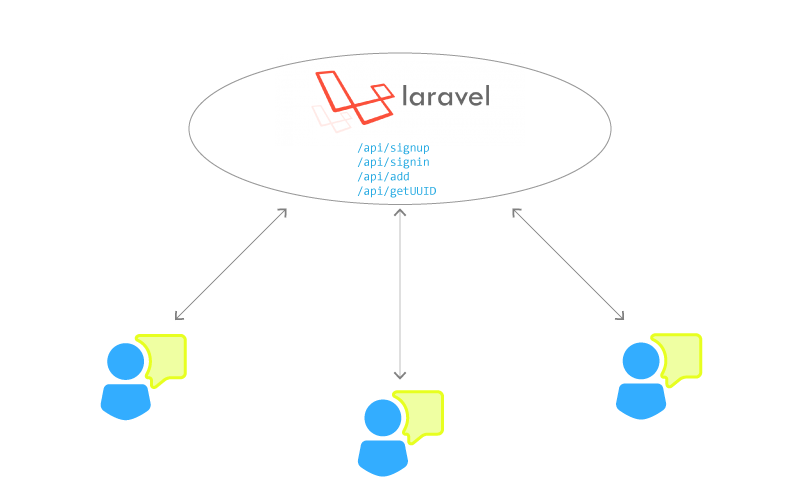
There are three admin functions supported by this chat app:
- Sign Up – Signing up a new user for using the chat app.
- Sign In – Signing in an existing user to the chat app.
- Add – Adding a new one-on-one chat session between two users.
Chat Messaging
All chat communication between the users is powered by PubNub. Since PubNub provides a direct duplex data stream between apps, we do not need Laravel or any other intermediary to handle the chat messages.
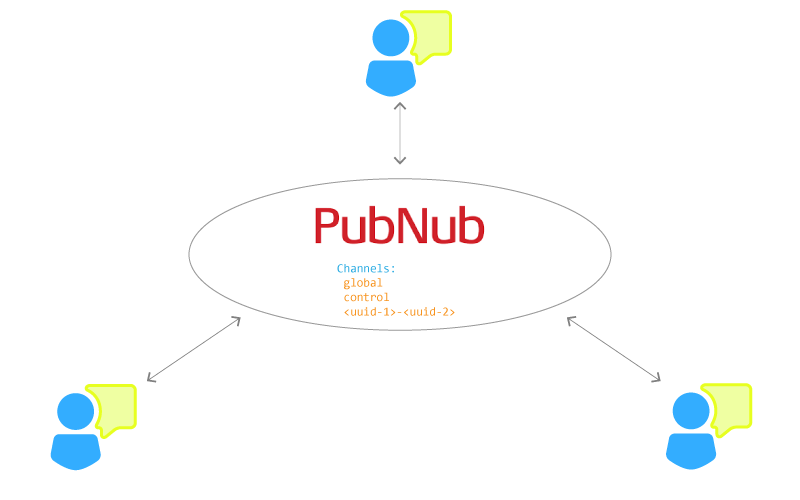
Chat communication is handled through PubNub channels. There are three types of channels supported by this chat app:
- “global”: This is the global channel used for sending and receiving chat messages on the common chat room that is shared by all the users.
- “control”: This is a separate channel which is used to initiate one-on-one chat session between two users.
- <UUID-1>-<UUID-2>: This is a private one-on-one channel between two users. The name of the channel is derived from the UUIDs of the users, starting with the UUID of the initiating user. There can be any number of these channels depending upon the user initiation.
However, note that the PubNub channels are access controlled. Only registered users have access to the global and control channel, whereas the one-on-one channels are accessible to the two users who take part in the one-on-one chat session. This access control is administered through the backend via Laravel.
Let’s have a detailed look at the code implementation of this chat app.
Building Chat Admin Functions in PHP
User Management
For obvious reasons, it is important to moderate the usage of the chat app. Therefore, a user has to follow the sign-up and sign-in process for participating in chat conversations with other users.
Sign Up/Sign In UI Component
Both the sign-up and sign-in forms are part of the same Vue UI component.
Path: LaravelBasicChatApp/resources/js/components/Home.vue
<template>
    <div class = "home">
        <div class = "row">
            <div class="col l2"></div>
            <div class = "col l4">
                <div class = "card" id = "left">
                    <div class = "card-header">
                        <h5 class = "card-title center-align card-heading">Sign up</h5>
                    </div>
                    <div class="card-content">
                        <form @submit.prevent = "signUp">
                            <label for = "username">Username</label>
                            <input type = "text" id = "username" name = "username" v-model = "username" required/><br><br>
                            <label for = "password">Password</label>
                            <input type = "password" name = "password" id = "password" v-model = "password" required/><br><br>
                            <label for = "password_confirmation">Re-enter Password</label>
                            <input type = "password" name = "password_confirmation" id = "password_confirmation" v-model = "passwordConfirmation" required/>
                            <div class="center-align">
                                <p class = "red-text darken-2">
                                    <span v-for = "(error,index) in errors" :key = "index">{{error}}</span><br>
                                </p>
                                <p class = "green-text darken-2" v-if = "validated">Data validated</p>
                                <button type = "submit" class = "btn btn-medium black">Sign up</button>
                            </div>
                        </form>
                    </div>
                </div>
            </div>
            <div class="col l4">
                <div class = "card" id = "right">
                    <div class = "card-header">
                         <h5 class = "card-title card-heading center-align">Sign in</h5>
                    </div>
                    <div class="card-content">
                        <form @submit.prevent = "signIn">
                            <label for = "username_signin">Username</label>
                            <input type = "text" name = "username_signin" id = "username_signin" v-model = "usernameSignin"><br><br>
                            <label for = "password_signin">Password</label>
                            <input type = "password" name = "password_signin" id = "password_signin" v-model = "passwordSignin"><br><br>
                            <div class="center-align" id = "signin-btn">
                                 <p class = "red-text darken-2">
                                    <span v-for = "(error,index) in errorsSignin" :key = "index">{{error}}</span><br>
                                </p>
                                <p class = "green-text darken-2" v-if = "validatedSignin">Data validated</p>
                                <button type = "submit" class = "btn btn-medium black">Sign in</button>
                            </div>
                        </form>
                    </div>
                </div>
            </div>
        </div>
    </div>
</template>
The Signup form triggers the SignUp( ) method which makes a POST HTTP call to the /api/signup endpoint with the username and password for the new user.
signUp() {
            if(this.username && this.password && this.passwordConfirmation) {
                this.errors = []
                if(this.password === this.passwordConfirmation) {
                    this.errors = []
                    let uri = domain + "/api/signup"
                    axios.post(uri,{uuid: this.$uuid.v4(), username: this.username, password: this.password})
                    .then(response => {
                        if(response.data == "success") {
                            this.validated = true
                            this.$router.push({name: 'chat', params: {username: this.username, auth: true}})
                        }
                        else {
                            this.validated = false
                            this.errors.push("Username already exists")
                        }
                    }).catch(err => {
                        console.log("Check your controller logic")
                    })
                }
                else {
                    this.errors.push('Passwords do not match')
                }
            }
            else {
                this.errors.push('Please make sure you\'ve entered all the required fields')
            }
        }
The sign-in form triggers the SignIn( ) method which makes a POST HTTP call to the /api/signin endpoint with the username and password of an existing user.
signIn() {
            if(this.usernameSignin && this.passwordSignin) {
                this.errorsSignin = []
                let uri = domain + "/api/signin"
                axios.post(uri,{username: this.usernameSignin, password: this.passwordSignin})
                .then(response => {
                    if(response.data == true) {
                        this.validatedSignin = true
                        this.$router.push({name: 'chat', params: {username: this.usernameSignin, auth: true}})
                    }
                    else {
                        this.validatedSignin = false
                        this.errorsSignin.push("Please check your credentials")
                    }
                }).catch(err => {
                    console.log(err)
                })
            }
        }
Sign Up & Sign In Handling on the Backend
At the Laravel backend, the /api/signup and /api/signin routes are implemented in UserController.php controller
Path: LaravelBasicChatApp/app/Http/Controllers/UserController.php
The /api/signup endpoint is mapped to signUp( ) function
public function signUp(Request $request) {
        $username = $request->get('username');
        $exists = User::where('username',$username)->first();

        if($exists) {
            return response()->json("failed");
        }
        else {
            $uuid = $request->get('uuid');
            $pubnub = new PubnubConfig($uuid);
            $pubnub->grantGlobal($uuid);
            $password = bcrypt($request->get('password'));
            User::create([
            'uuid' => $uuid,
            'username' => $username,
            'password' => $password
            ]);
            return response()->json("success");
        }
    }
This function registers the new user by saving the username and password in the database along with a newly generated unique UUID. Along with that, it also grants the UUID access to the global & control channel which is shared by all chat users. This is part of the Access Manager feature to ensure that only the authorized UUIDs get access to a PubNub channel.
The /api/signin endpoint is mapped to signIn( ) function:
public function signIn(Request $request) {
        $username = $request->get('username');
        $password = $request->get('password');
        $exists = User::where('username',$username)->first();
        $pubnub = new PubnubConfig($exists->uuid);
        $pubnub->grantGlobal($exists->uuid);
        if($exists) {
            $passwordCorrect = Hash::check($password,$exists->password);
            return response()->json($passwordCorrect);
        }
    }
This function verifies the user credentials for signing into the chat app. it also grants the UUID access to the global & control channels.
The mapping between the controlled functions and API endpoints is defined in api.php.
Path: LaravelBasicChatApp/routes/api.php
New Chat Session
The chat app allows a signed-in user to initiate a one-on-one chat session with another signed-in user.
The UI to initiate one-on-one session is part of the ChatContainer Vue component. We will have a look at the UI part of the code in a little while. However, the backend logic is implemented as part of the /api/add route which is handled by addUser( ) function of UserController.
public function addUser(Request $request) {
        $username1 = $request->get('username');
        $username2 = $request->get('remoteUsername');
        $exists = User::where('username',$username2)->first();
        $callingUser = User::where('username',$username1)->first();
        $uuid1 = $callingUser->uuid;
        if($exists) {
            $uuid2 = $exists->uuid;
            $pubnub = new PubnubConfig($uuid1);
            $pubnub->grantOne($uuid1,$uuid2);
            return response()->json($uuid2);
        }
        else {
            return response()->json("404");
        }
    }
The most important function performed by this function is to grant exclusive channel access to the two users based on their UUIDs. This channel is named by concatenating the UUIDs of both the users, starting with the initiating user followed by the ‘-’ symbol, followed by the remote user.
This exclusive grant ensures that the channel is private to the two users and nobody else can hook into it.
Building Chat Communication Features
All the chat communication is facilitated through the Vue components. Here is how the various UI elements are rendered with the help of Vue.
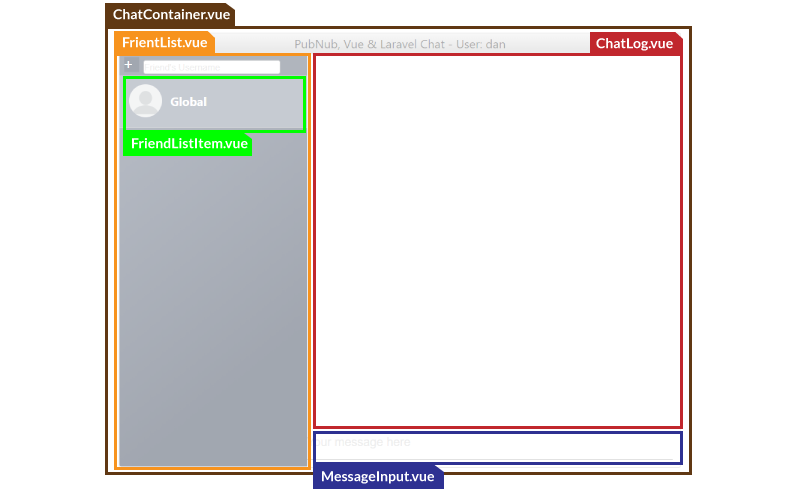
ChatContainer.vue is the top level Vue component that holds all the other components.
Path: LaravelBasicChatApp/resources/js/components/ChatContainer.vue
<template>
  <div class="chat-container">
    <div class="heading">
      <h1>{{ title + username}}</h1>
    </div>
    <div class="body">
      <friend-list :username = "username"></friend-list>
      <div class="right-body">
        <div class="table">
          <chat-log :username = "username" v-chat-scroll></chat-log>
          <message-input :username = "username" :authUUID= "authUUID"></message-input>
        </div>
      </div>
    </div>
  </div>
</template>
There are three major Vue UI components within ChatContainer.vue, FriendList.vue, ChatLog.vue and MessageInput.vue.
All the data related to chat sessions and messages are stored in a centralized Vuex store.
Path: LaravelBasicChatApp/resources/js/store.js
export default new Vuex.Store({
    state: {
        user: {},
        friends: [],
        currentChat: 'global',
        chats: [
          {chatKey: "global", messages: []},
        ]
    },
    getters: {
        getCurrentChatMessages(state) {
           return state.chats.find(chat =>
             	chat.chatKey == state.currentChat
           ).messages
        },
    },
    mutations: {
        setCurrentChat(state, {chatKey}) {
          state.currentChat = chatKey;
        },
        addChat(state,chat)	{
          state.chats.push(chat)
        },
        updateChat(state,payload) {
          state.chats.forEach(chat => {
            if(chat.chatKey == payload.chatKey) {
              chat.messages = payload.messages
            }
          })
        },
        addMessage(state,message) {
          state.chats.forEach(chat => {
            if(chat.chatKey == message.channel) {
              if(chat.messages.length < 15) {
                chat.messages.push(message)
              }
              else {
                chat.messages.shift()
                chat.messages.push(message)
              }
            }
          })
          state.friends.forEach(friend => {
            if(friend.chatKey == message.channel) {
              friend.lastMessage = message.text
            }
          })
        }

    },
    actions: {

    }
 })
This Vuex store contains four state variables:
state: {
    user: {},
    friends: [],
    currentChat: 'global',
    chats: [
        { chatKey: "global", messages: [] },
    ]
}
- user – This variable holds the user-related info (UUID & username) and is populated during the initial creation of ChatContainer component.
- friends – The variable holds the information about the chat sessions, including the global chat as well as one-on-one chat sessions with other users.
- currentChat – This variable holds the PubNub channel for the currently active chat session. The currently active chat session is identified by the selected FriendListItem component within FriendList.vue.
- chats – This variable holds the information about the chat history for each chat session. A maximum of 15 chat messages are stored in the history for each session.
The Vuex store also defined mutation functions for updating the chat session and history.
Sending & Receiving Chat Messages
All the chat message payloads are sent via PubNub channels. Based on the currently selected chat session, the messages are either sent via the “global” channel or the one-on-one chat channel. This information is retrieved from the currentChat state variable in Vuex store.
The MessageInput.vue component is responsible for sending chat messages. It has a <input> field for accepting messages.
Path: LaravelBasicChatApp/resources/js/components/MessageInput.vue
<template>
  <div class="message-input">
    <input type = "text" placeholder="Your message here" @keydown.enter="submitMessage" v-model = "message" class = "messageInput input-field">
  </div>
</template>
The ENTER key down event of this <input> field is mapped to submitMessage( ) which publishes the message in the PubNub channel.
submitMessage() {

        this.$pnPublish({
        	channel: this.currentChat,
        	message: {
          		username: this.username,
          		text: this.message,
              time: Date.now(),
              channel : this.currentChat
        	}
        })

    this.message = '';

    }
The reception of chat payloads is the responsibility of the ChatLog Vue component. There is one instance of ChatLog component for each chat session.
Every time a new chat session is initiated, the ChatLog component comes into play.
Path: LaravelBasicChatApp/resources/js/components/ChatLog.vue
<template>
  <div
    class="chat-log"
    ref="chatLogContainer"
  >

   <message-bubble
      v-for="(message,index) in getCurrentChatMessages"
      :key="index"
      :time="message.time"
      :text="message.text"
      :from="message.username"
    ></message-bubble>
  </div>
</template>
Upon creation, it subscribes to the PubNub channel assigned for its chat session.
created() {
   this.$pnSubscribe({
        channels: [this.currentChat]
  })
}
Subsequently, it fetches the last 15 messages from the PubNub channel’s history to populate the UI.
watch: {
  currentChat: function() {
    let currentChatKey = []
    currentChatKey.push(this.currentChat)
    this.$pnSubscribe({
      channels: currentChatKey
    })
    let mL = []
    Pubnub.getInstance().history({
      channel: currentChatKey,
      count: 15, // how many items to fetch
      stringifiedTimeToken: true, // false is the default
    })
    .then(response => {
      response.messages.forEach(message => {
        mL.push(message.entry)
        this.$store.state.friends.forEach(friend => {
          if(friend.chatKey == this.currentChat) {
            friend.lastMessage = message.entry.text
          }
        })
      })
    })
    this.$store.commit('updateChat',{chatKey: this.currentChat,messages: mL})
    this.incomingMessage =  this.$pnGetMessage(this.currentChat,this.storeMessages)
  }
}
Each chat message displayed in the ChatLog is represented by the MessageBubble.vue component.
Path: LaravelBasicChatApp/resources/js/components/MessageBubble.vue
<template>
  <div class="message-bubble" :class="me">
    <span class="from" :class="isGlobal">{{ from }}</span>
    <br :class="me + ' ' + isGlobal">
    <span class="message-text">{{ text }}</span>
  </div>
</template>
Display Chat Sessions
All the chat sessions of a user are displayed in the FriendList.vue component.
Path: LaravelBasicChatApp/resources/js/components/FriendList.vue
<template>
  <div class="friend-list">
    <div class="new-chat">
      <div class="add-one-one" @click="newChat">+</div>
      <div class="name-input">
        <input v-model="friendUsername" type="text" placeholder="Friend's Username">
      </div>
    </div>
    <friend-list-item
      v-for="(friend, index) of friends"
      :key="index"
      :index="index"
      :name="friend.name"
    ></friend-list-item>

  </div>
</template>
Each chat session is represented by FriendListItem.vue component.
Path: LaravelBasicChatApp/resources/js/components/FriendListItem.vue
<template>
  <div class = "friend-list-item" :class = "selected" @click= "onFocus" :id = "name">
    <img :src ="profileImg" />
    <div class="text">
      <span class="name" :id = "name">{{ name }}</span>
      <span class="lastMessage" :id = "name">{{lastMessage}}</span>
    </div>

  </div>
</template>
The FriendListItem.vue is bound to click event which brings it to focus and marks its chat session as the current session.
methods: {
  onFocus(event) {
    EventBus.$emit('focus-input', event);
    this.$store.commit('setCurrentChat', {chatKey: this.chatKey});
  },

}
The computed properties of the FriendListItem sets the avatar icon and the username of the remote user with whom the chat session is initiated. In the case of global chat, the username is set to “global.”
FriendListItem also has a computed property lastMessage( ) which updates the UI with the last message sent within the chat session.
computed: {
    chatKey() {
      return this.$store.state.friends[this.index].chatKey;
    },
    ...mapState([
        'user','friends','currentChat'
    ]),
    selected() {
      return this.$store.state.currentChat === this.chatKey ? 'selected' : '';
    },
    avatarSrc() {
      return defaultProfileImg
    },
    lastMessage() {
      return this.$store.state.friends[this.index].lastMessage
    }
  }
Add New Chat Session
Every time the user enters the username of another remote user on the input field above the FriendList and clicks on the “+” button next to it, a new chat session is triggered through a sequence of steps.
At first, the app makes an AJAX call to the server to verify the remote user and setup PubNub channel access permissions for the new chat session. This is described in the “New Chat Session” section earlier.
If the remote user is valid then the AJAX call returns its UUID. The FriendList component initiates a new chat by publishing the local username, remote username, and the chatKey. The chat key is the PubNub channel name and is comprised of the local user’s UUID followed by the character ‘-’ followed by the remote user’s UUID.
newChat() {
 let uri = domain + "/api/add"
 if(this.username != this.friendUsername) {
 axios.post(uri,{remoteUsername: this.friendUsername, username: this.username})
 .then(response => {
       if(response.data != "404") {
        // console.log(this.$store.state.friends)
        // console.log(this.alreadyExists(this.friendUsername))
            if(!this.alreadyExists(this.friendUsername)) {
              let friendChannel = this.$store.state.user.uuid + "-" + response.data
              let mL = []
              this.$store.state.friends.push({name: this.friendUsername, chatKey: friendChannel, lastMessage: ''})
              Pubnub.getInstance().history({
                channel: friendChannel,
                count: 15, // how many items to fetch
                stringifiedTimeToken: true, // false is the default
                })
                .then(response1 => {
                  response1.messages.forEach(message => {
                    mL.push(message.entry)
                    this.$store.state.friends.forEach(friend => {
                      if(friend.chatKey == friendChannel) {
                      friend.lastMessage = message.entry.text
                      }
                    })
                 })
              })
               this.$store.commit('addChat',{chatKey: friendChannel, messages: mL})
                this.$pnPublish({
                  channel: 'control',
                  message: {
                    fromName: this.username,
                    toName: this.friendUsername,
                    chatKey: this.$store.state.user.uuid + "-" + response.data
                  }
                })
            }
          }
          let sc = []
          this.$store.state.friends.forEach(friend => {
            sc.push(friend.chatKey)
          })
        this.$pnSubscribe({
          channels: sc
        });
   })
 }
}
On the remote side, the FriendList component subscribes to the “control” channel waiting for any new one-on-one chat requests. The moment a new request is received, it first checks whether the request is intended for itself or not, by matching the username.
Then, it subscribes to the newly formed PubNub channel, retrieves the last 15 messages from the channel history and displays them on the ChatLog along with committing them in the Vuex store.
checkAndAdd(msg) {
    if(msg.message.toName == this.username) {
      let subscribedChannels = []
      this.$store.state.friends.push({name: msg.message.fromName, chatKey: msg.message.chatKey, lastMessage: ''})
      this.$store.state.friends.forEach(friend => {
        subscribedChannels.push(friend.chatKey)
      })
      this.$pnSubscribe({
        channels: subscribedChannels
      });
      let mL = []
      Pubnub.getInstance().history({
        channel: msg.message.chatKey,
        count: 15, // how many items to fetch
        stringifiedTimeToken: true, // false is the default
      })
      .then(response => {
        response.messages.forEach(message => {
          mL.push(message.entry)
          this.$store.state.friends.forEach(friend => {
            if(friend.chatKey == msg.message.chatKey) {
              friend.lastMessage = message.entry.text
            }
          })
        })
      })
      this.$store.commit('addChat',{chatKey: msg.message.chatKey, messages: mL})
      //console.log(this.$store.state.friends)
    }
  }
The initiating user’s chat app also fetches the last 15 messages from history and updates the ChatLog.
The Unfolding Moment: Get, Set, Chat!
Now you are all set to test the chat app. Double-check the configuration steps in README and run through the Installation steps to install the dependencies. Finally, refer the commands under Run section to launch the app.
Here is how the user experience of this app unfolds for two users, sam and dan.
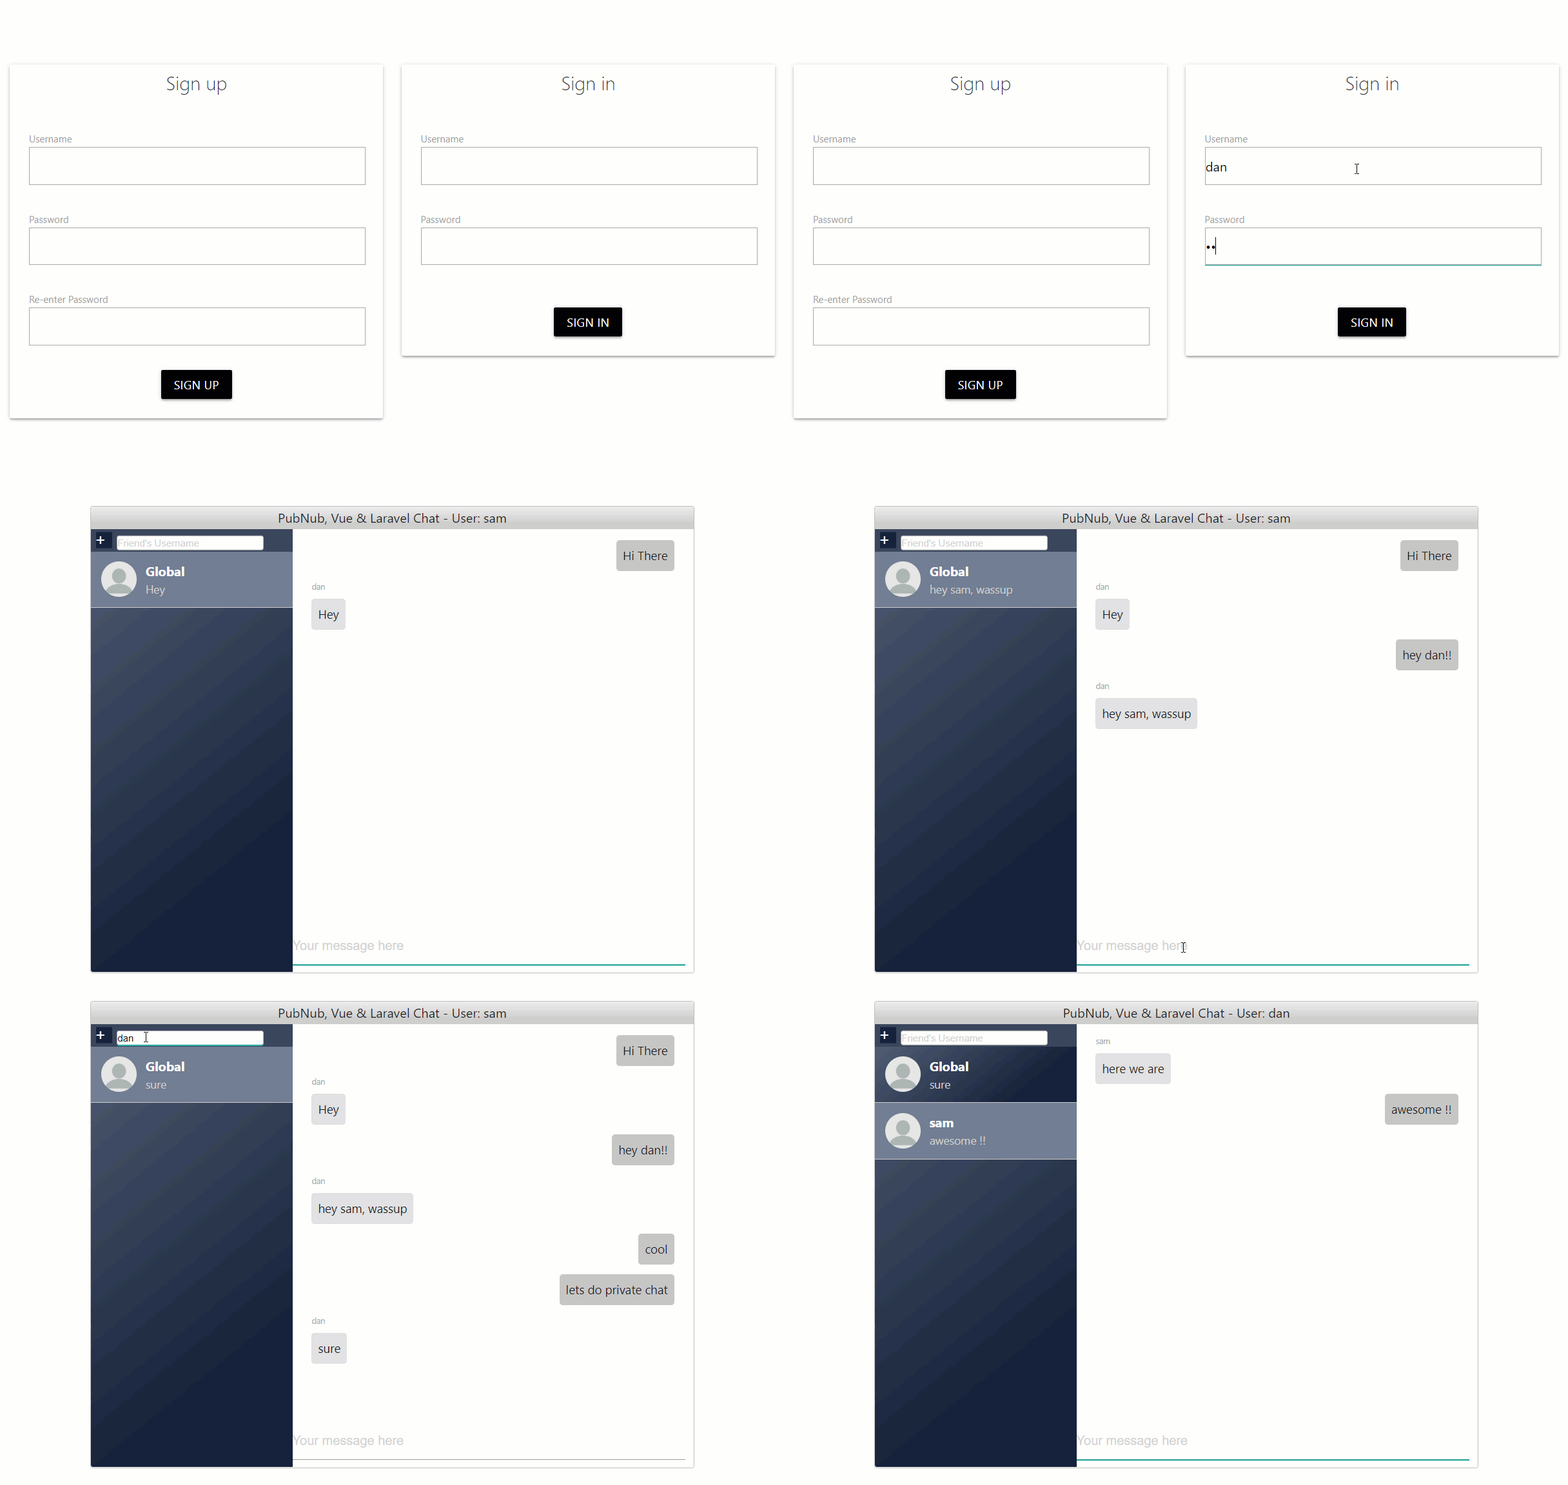
You can fire up multiple browser windows to signup a few users and test it out.
Let us know what you think about this app. We hope this app will give you a good hang on how to integrate Laravel with PubNub. In case you are wondering, this app does not yet support the logout functionality for the users. So maybe this is a good way to enhance the app.
Based on the existing code structure, you can think of implementing a logout feature such that when a user logs out, all the one-on-one sessions the user is part of, also are destroyed. We can’t wait to see you taking up this challenge and would love to hear your achievements with PubNub and Laravel.