Build a Subscriber to Receive and Publish Data w/ Ember.js

In our first part of this tutorial series, we built the broadcaster (publisher) for our broadcast pub/sub app using Ember.js. In this tutorial, we're building the subscriber side, the end-user(s) application that receives the data and publishes it in real time.
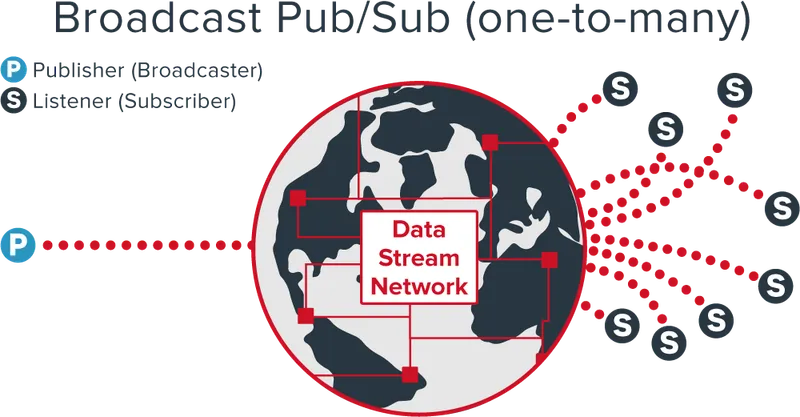
Applications of this sort can transfer custom settings for SVGs. Imagine being able to build game where properties for the graphics are transferred in real time. Skills you learn from this entry could be used for websites viewed on mobile devices, like live blogging platforms. We built a sportscast statistics app, where updates are broadcast to multiple users simultaneously. The options are endless!
Project Overview and Working Demo
The example here is simple. The listener subscribes to the channel. When the properties of the SVG are changed by the broadcaster, the listener hears the message. Once the message is heard, the listener’s SVG properties change. Let’s get a preview of the great things to come!
We have a working demo of the broadcaster (previous tutorial) here, and the subscriber (this tutorial) here. Open up the two links, and send data from the broadcaster to the subscriber in real time.
Part 2: Building the Spectator
Spectator preview:
If this is your first time working with Ember.js, we recommend you take a look at the PubNub Ember SDK page. This guides you through the dependencies and how to set up Ember. It then instructs you how to integrate PubNub into the app. We will breeze by some of the same topics in this blog entry.
Include Libraries

Include JQuery, the PubNub library, Handlebars, Ember.js, the PubNub Ember library, and Bootstrap.
<script src='http://code.jquery.com/jquery-1.10.1.min.js'></script>
<script src='https://cdn.pubnub.com/pubnub.js'></script>
<script src='https://cdnjs.cloudflare.com/ajax/libs/handlebars.js/2.0.0/handlebars.min.js'></script>
<script src="http://builds.emberjs.com/tags/v1.9.0/ember.prod.js"></script>
<script src='http://pubnub.github.io/pubnub-ember/lib/pubnub-ember.js'></script>
<link href='//netdna.bootstrapcdn.com/bootstrap/3.0.2/css/bootstrap.min.css' rel='stylesheet'>
The Structure
Keep it simple for the SVG. Specify the rectangle in the background as well as the circle in the foreground. Specify the height and width for the rectangle, as well as the radius and position for the circle. We bind the color data to the shapes so we can display them with the SVG.
<script data-template-name='application' type='text/x-handlebars'>
  <div class="container">
  <h4>EmberJS Dynamic SVG Display</h4>
  <br />
  <svg>
    <g>
      <rect width=60 height=60 {{bind-attr fill=data.bgColor}} />
      <circle r=20 transform="translate(30,30)" {{bind-attr fill=data.color}} />
    </g>
  </svg>
  </div>
</script>
This is more interesting than applying the colors to a font and background. And it proves that the the broadcaster can specify colors for very different use cases!
Making it all work: The Ember Controller
Now, tie it all together. Create a new Ember application and assign a random user name to each new user in the channel, and initialize PubNub with your own credentials.
To get your unique pub/sub keys, you’ll first need to sign up for a PubNub account. Once you sign up, you can get your unique PubNub keys in the PubNub Developer Dashboard. The Free plan gives you up to 200 MAU or 1 million transactions a month to build, test, and launch your messaging app.
window.Mini = Ember.Application.create();
var user_id = "User " + Math.round(Math.random() * 1000);
Mini.PubNub = PubNubEmber.extend({
  cfg: {
    subscribe_key: 'SUBSCRIBE KEY HERE',
    publish_key: 'PUBLISH KEY HERE',
    uuid: user_id
  }
});
Mini.ApplicationController = Ember.Controller.extend({
  needs:['pubnub:main'],
Specify a channel to subscribe, a data object (to receive colors from the channel), and a user.
channel: 'The EmberJS Dynamic SVG Channel',
data: new Ember.Object(),
user_id: user_id,
Specify an instance of the PubNub service, the channel, and this to make things easy.
init: function() {
  var pn   = this.get('pubnub');
  var chan = this.get('channel');
  var self = this;
Set some default colors for the SVG.
this.get('data').set('color', 'white');
this.get('data').set('bgColor', 'black');
Subscribe to the channel, it should be the same channel to which the broadcaster is publishing.
pn.emSubscribe({ channel: chan });Register for message events so when the broadcaster sends new colors, the SVG updates immediately.
pn.on(pn.emMsgEv(chan), function(payload){
  var state = payload.message;
  self.get('data').set('color', state.color);
  self.get('data').set('bgColor', state.bgColor);
}
Wrapping up
We've now successfully built a broadcasting app with Ember.js!
Want to see the finished product in action? Check out the broadcaster and subscriber demos, open both up (or even a couple of subscribers), and send data from the broadcaster to the subscriber.
We also recently released another broadcast demo, where we built a sportcast app that streams sports statistics, so if AngularJS is more your style, check it out!