Create a Node.js Application with PubNub | ATC Game Part 1
Recently, I took a weekend trip from London City Airport to catch-up with a few friends in the Netherlands. My visit to the airport reminded me of widely publicized, ambitious plans to move the airport's ATC (air traffic control) tower over 80 miles away to the village of Swanwick. The remote ATC workers are expected to use, among other things, a series of cameras, microphones and large displays to remotely direct and advise pilots through London airspace.
Invoking memories of an old flight control game I used to play, I thought it would be a fun project to create my own air traffic control game. I wanted to experiment with PubNub's capabilities, in conjunction with an array of different technologies including React Native. To make it easier to digest and to better illustrate the role of each technology used, this project will be split into three distinct posts each focusing on a different aspect of the game.
The resulting mobile app is a playable but skeleton game that hopefully inspires you to extend and improve it! Feel free to fork my PubNub Airport Game GitHub repository or Tweet me at @luke_heavens with your mods!
Accompanying code available at https://github.com/lukehuk/pubnub-airport
Building an Air Traffic Control Simulation with Node.js and React Native
So what’s the plan? We are going to build a React Native app that allows the player to take on the role of an air traffic controller. They will be required to issue commands to aircraft entering the fictitious airspace, the goal being to help the aircraft to land in real time. Planes will have limited fuel and will need to be directed onto the flight path and cleared for landing. We are going to simulate ATC being remote from the airport. As such, we are going to make a client application representing ATC and then create a server-side application representing the rest of the airport.
As mentioned above, we are going to develop the game over three discrete blogs, each focused on a specific feature and each exploring different technologies. The breakdown is as follows:
- Part 1 – Creating a server-side application to represent an airport. It will use:
- JavaScript
- Node.js
- PubNub Publish/Subscribe
- PubNub Debug Console
- ESLint
Node.js Application Architecture
With pleasantries and introductions complete, let's dive into part 1! This blog post aims to create a server-side application that will represent our airport. We will be making a simple Node.js executable that we can interact with using the PubNub Debug Console (as the UI and remote ATC will be the focus of part 2). The project consists of only four code files. Each file represents a different real-life component as shown in the GIF below:
Prerequisites for a Real-time Node.js Airport
For this project, we will walk through the setup of the development environment. You will, however, need to have access to an IDE to write code and a terminal for performing command-line operations.
Node.js
We are going to create a simple Node.js application for the server-side code. Node provides us with a JavaScript runtime. This means that we can use JavaScript, traditionally used in web browsers, to easily make executable applications. Our first step is to download and install it. You can download it from the Node.js website and I recommend the current version rather than the LTS version.
You can verify the Node installation by typing node --version into your terminal and checking for the version you installed.
NPM
Included with Node.js is NPM (the Node Package Manager) which allows us to add 3rd party dependencies into our projects. You can check NPM is installed with npm --version. If a version is successfully returned then we can go ahead and make our project.
Next, you need to create a directory for the project and open a terminal in this directory. Simply run npm init and walk through the setup questions. You can leave most of these blank if you want.
For this application, we will be using the PubNub and ESLint dependencies. The “pubnub” package will be used for our communication with PubNub and “eslint” is used to keep our code adhering to recommended style guidelines and coding standards. Our 3rd party dependencies can be installed with npm install pubnub and npm install eslint.
You should now find a package.json file – which contains the information you entered during setup if you want to alter it – and a node_modules directory containing the 3rd party code.
ES6
We are going to write our code using the latest ES6 standards which have not been fully integrated into Node yet. It currently requires an additional command line flag during execution to enable some of the features (more on that further down) and requires "type": "module" to be added to our newly created package.json file as a top-level JSON property.
PubNub
The last step of the setup is to get our free PubNub API keys. You need to make an account to get your keys but don’t worry it’s completely free and takes just a few seconds. If you have not done so before, you can do so below:
Coding a Real-time Airport Application with Node.js
As illustrated in the GIF further up, our project consists of four files based on real-world airport components:
- airfield.js
- airspace.js
- broadcaster.js
- navigator.js
We will go through the key concepts, design decisions and review some code snippets below. You can find the complete code for each of these files in my React Native ATC Game GitHub repository.
Airfield
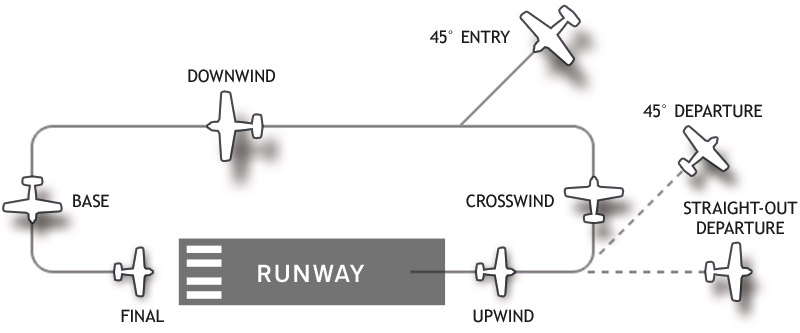
The first file, airfield.js is our entry point into the application. It is responsible for initializing the other files and defines the positions of both the runway and flight pattern. We are basing our game on the ‘left-hand traffic’ flight pattern and will use the official naming terminology in the code. The names for the different parts of the flight pattern can be seen in the diagram below:

Image from pea.com – Accessed Sep 2019
There are a couple of things to note in this file. Firstly, we are using ES6 style imports which means using this in JavaScript:
import * as Airspace from './airspace.js';
As opposed to the ES5 require statements:
var Airspace = require(‘./airspace.js’);
Secondly, coordinates for airfield features are provided as a percentage (i.e. in the range 0 – 100). As we are making a React Native app, our game could be played on devices of varying sizes. Using this range makes it easier to map values direct to styling logic or to apply a scaling factor. Coordinates assume an origin of the top left of the screen to simplify styling logic.
Finally, you need to ensure you have assigned the PUBLISH_KEY and SUBSCRIBE_KEY constants with your PubNub API keys.
Navigator
The file navigator.js simulates a pilot deciding the next location for the aircraft to go. There are four main functions:
- Generating a random start/spawn position (off-screen) –
genStartPosition() - Generating random destination coordinates (on-screen) for use when no ATC commands have been issued –
genStartDestinationPosition() - Producing destination coordinates in response to a command from ATC –
determineDestinationFromAction() - Determining which action to take next when a destination has been reached –
determineNewAction()
To generate a starting position we randomly choose points on an ellipse centered in the middle of the airfield.
To generate random destination coordinates, we pick two random numbers between 0-100.
The final two functions use switch statements to return the correct destination coordinates and new actions respectively.
Broadcaster
The broadcaster.js file, which is powered by PubNub, acts as our input/output layer. It allows us to listen for ATC commands and also broadcast plane data. The file contains constants at the top for configuring PubNub channels and provides the following functionality:
- Initialization of PubNub
-
const pubnub = new PubNub({
 publishKey: config.publishKey,
 subscribeKey: config.subscribeKey
});
-
- Subscription to the ATC command channel
-
pubnub.subscribe({
 channels: [ATC_SUB_CHANNEL]
});
-
- The storing and retrieval of received ATC commands
-
pubnub.addListener({
 message: (message) => {
   console.log(message.message);
   receivedPlaneCommands[message.message.planeName] = message.message.command;
 },
});
-
- Expose helper functions that publish plane data and game events to PubNub channels
-
function publish(pubnub, channel, data) {
 pubnub.publish({
   channel: channel,
   message: data
 }, (status, response) => {
   console.log(channel, status, response);
 });
}
-
The other methods in this file are simply helper methods that make publishing messages easier.
Airspace
Despite being slightly larger than the other files, the final file airspace.js is actually quite straightforward. It is responsible for the majority of the server-side game logic relating to aircraft movement.
During its initialization function “openAirspace”, two separate interval timers are made. These interval timers execute the following functions:
- Generate new aircraft by
- Randomly creating a new name
- Constructing an initial state
- Updating all existing planes by
- Applying any commands
- Updating the aircraft state (fuel, position, etc.)
- Check for any special conditions (e.g. fuel remaining)
When a plane enters the “crashed” state, the player loses. We clear the interval timers when this state is reached to mark the end of the game.
Running our Real-time Node.js Airport
Execution
Open a terminal within the project directory and then run:
node airfield.js --experimental-modules
Note: The application is written using ES6 modules. At the time of writing, the latest version of Node.js requires the --experimental-modules flag to be present. It is possible that in subsequent versions of Node this flag will no longer be required.
You should now see console outputs for the publish events occurring.
Visualizing the output
We haven’t yet created our React Native user interface to visualize and interact with our airport, as this is the subject of part 2. We can however view the output of, and interact with our airfield via PubNub’s debug console.
To do this, sign into the admin portal: https://admin.pubnub.com/signup
Then navigate to “Debug Console” from the left-hand menu.
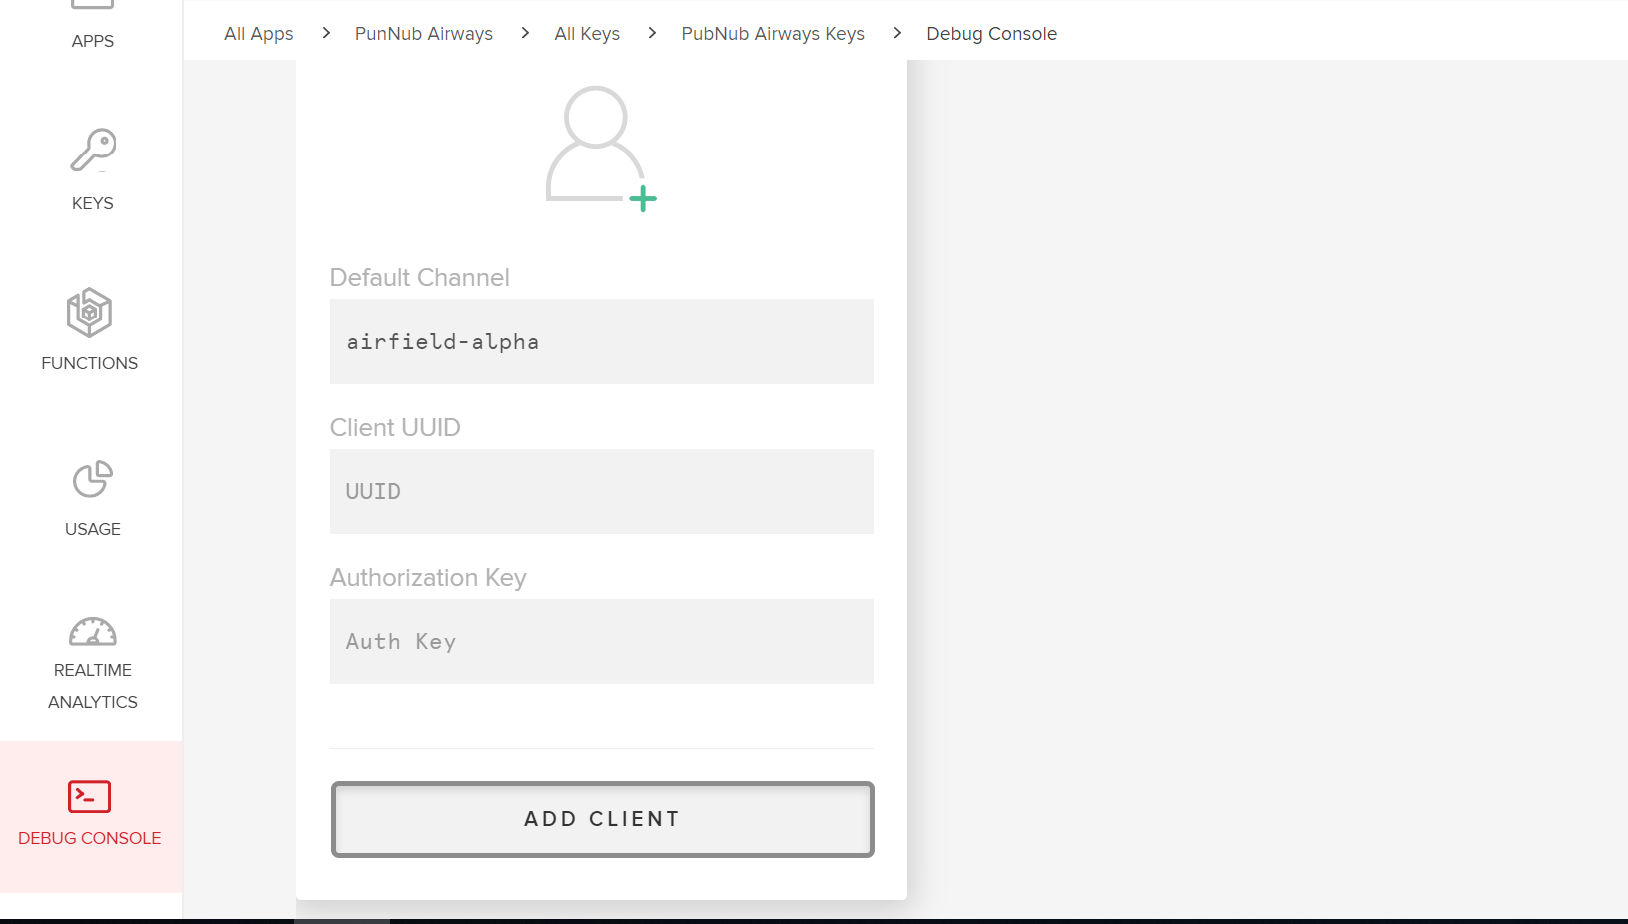
From here, you can create ‘clients' for each channel you want to interact with as shown below:

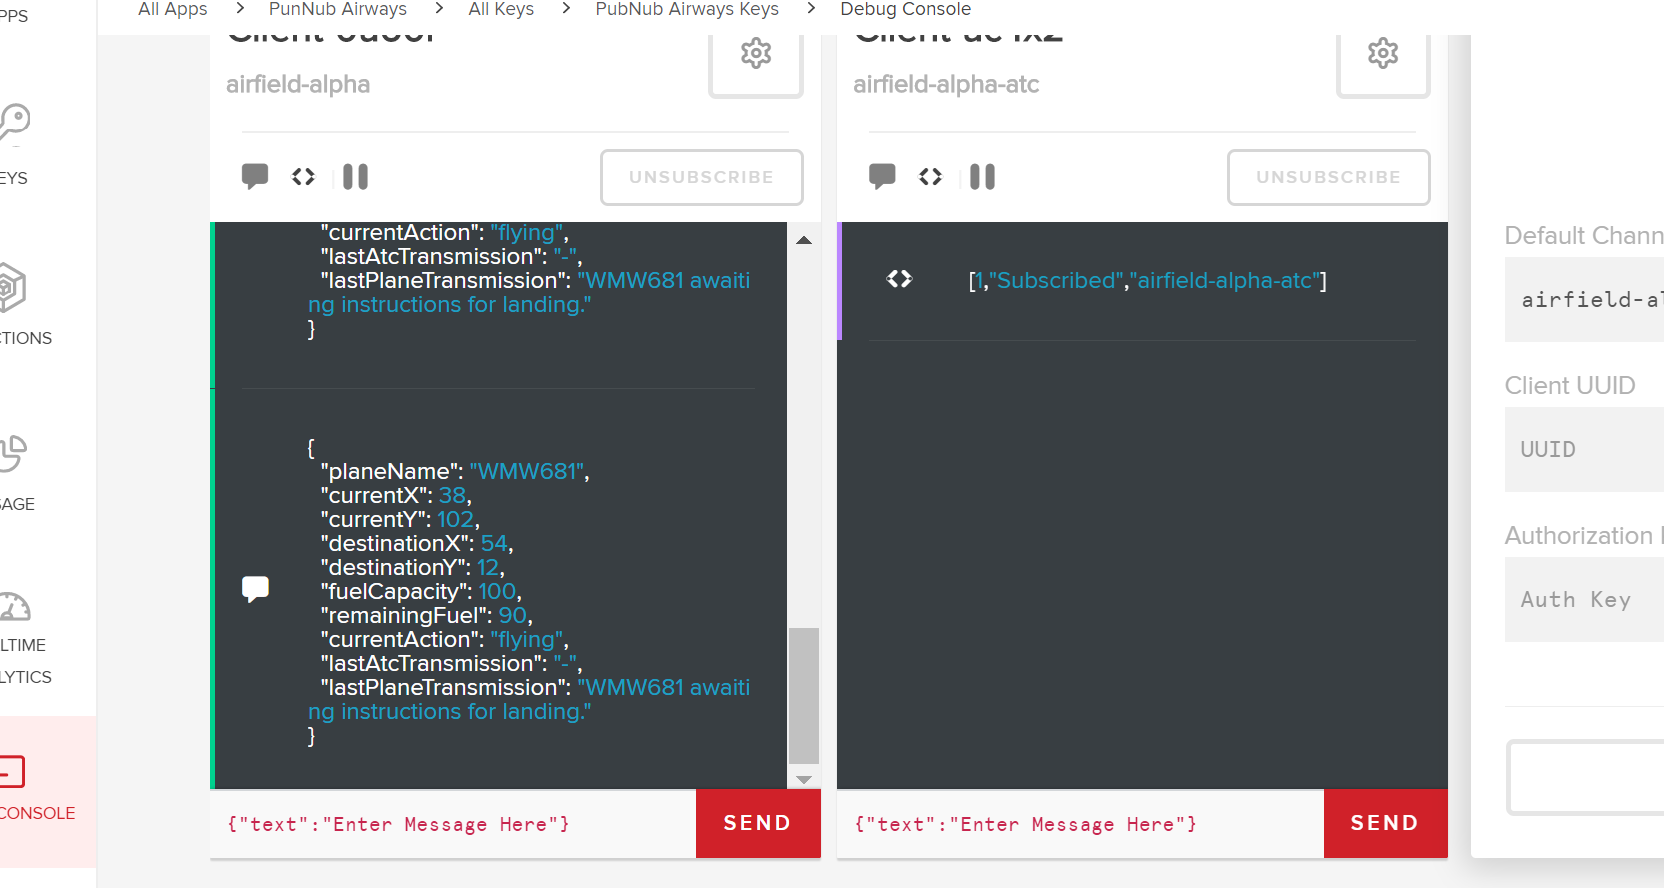
If our program is running and we subscribe to the PLANES_PUB_CHANNEL (as defined in broadcaster.js) then we should start to see messages about planes in our airspace as shown below:

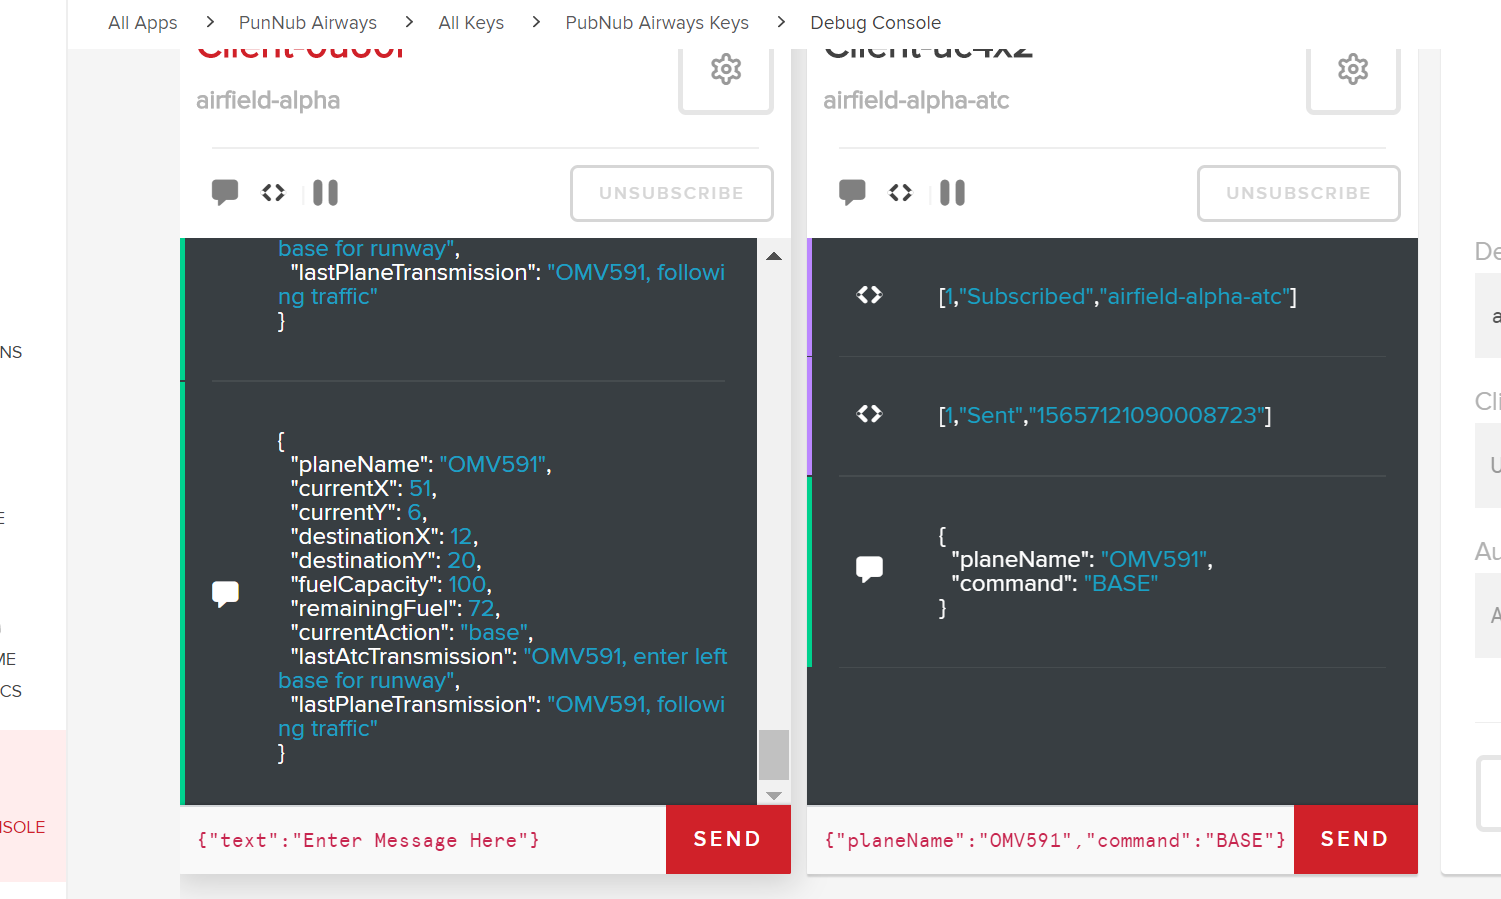
You will notice in the screenshot above that I have also added a client for the ATC_SUB_CHANNEL (again, as defined in broadcaster.js) which we can use to issue commands to the planes. This channel will eventually be replaced by buttons in our app, but for now, we can use the Debug Console to simulate this. As shown below, we can enter a JSON string such as:
{
    "planeName": "PLANE_NAME",
    "command": "BASE"
}
You can see in the screenshot below how issuing the command has changed the details of the plane in the other client.

Next Steps for Making a Real-time React Native ATC Game
With our airport fully operational, we have completed part 1. In the next part, create a React Native App with PubNub, we will be creating the main user interface for the game with React Native. Alternatively, you can skip to part 3, using TypeScript and Presence, to see how I use TypeScript for type checking code and Presence to enhance the multiplayer experience.
