Controlling a Drone with PubNub and AT&T IoT StarterKit
This is a guest post from Tom Minnich, who describes himself as an “embedded software guy for a long time.”
AT&T and PubNub recently sponsored the Real-time AT&T IoT StarterKit Challenge, a contest via Hackster.io to prototype and deploy innovative IoT solutions with the AT&T StarterKit. The following is my submission.
I hope the material presented will be a good starting tutorial for Internet of Things cloud-based services with PubNub and AT&T. Methods demonstrated will also apply to many other hardware platforms beyond the AT&T starter kit. My main focus is on how PubNub services can make commercial drones safe and practical. The code examples can be downloaded from the Hackster.io project here: Drone with AT&T and PubNub Connectivity.
Commercial-Use Drones
Drones are being used to replace expensive commercial and industrial inspection methods that require using helicopters or the construction of scaffolding. To use drones in commercial and industrial settings requires extensive design work to make the drone reliable and able to function in adverse conditions. For commercial inspection work there is a desire to convey inspection results quickly, so an LTE modem would be ideal for this task. There are also opportunities to monitor the vital signs of the drone to make sure that the flights are safe flights, that generate positive results and only favorable publicity.
AT&T IoT StarterKit and PubNub to the Rescue!
The AT&T IoT StarterKit includes an LTE modem which I used to extend my drone’s functionality beyond that of a typical drone, to provide a backup for the radio control link, and to safely guide the drone to a landing zone in the event of a failure of the radio control link.
Before we can get going, you'll need three accounts:
Building on the Starter Kit Example Projects
Pressed with a hard deadline, there was just not enough time to do anything terribly fancy, so I modified the starter kit example to meet my project goals. This also fits nicely with the iterative design process enabled by the AT&T Flow programming environment.
This tutorial demonstrates the collection of sensor data with M2X and the Flow programming environment. It demonstrates the trigger feature which I used in my project. Fortunately, the MBED project that supplies the firmware for the NXP Freedom K64 board has the ability to send Accelerometer and GPS data streams. I also sent along temperature for a nice beginning to a drone telemetry stream.
But we also have resources supplied through PubNub that I wanted to learn how to leverage.
Mixing these two software example projects together created the AT&T PubNub IoT-enabled Drone software project!
Xadow GPS Module
The website for the starter kit has a tutorial for extending the base starter kit project to use a Xadow GPS module. This was exactly what I needed to get done next so I went through the tutorial.
PubNub MBED API
PubNub Publish and Subscribe in MBED
Speeding Up the Programming
Efforts were focused on sending “dummy” telemetry reports from the AT&T IoT Starter Kit into the cloud, and working on the Flow programming to get cool things to happen in response to the “dummy” telemetry. It did not make much sense to make the drone physically real (and drone telemetry real) until the cloud programming was both correct and interesting.
The Flow Program for the Drone
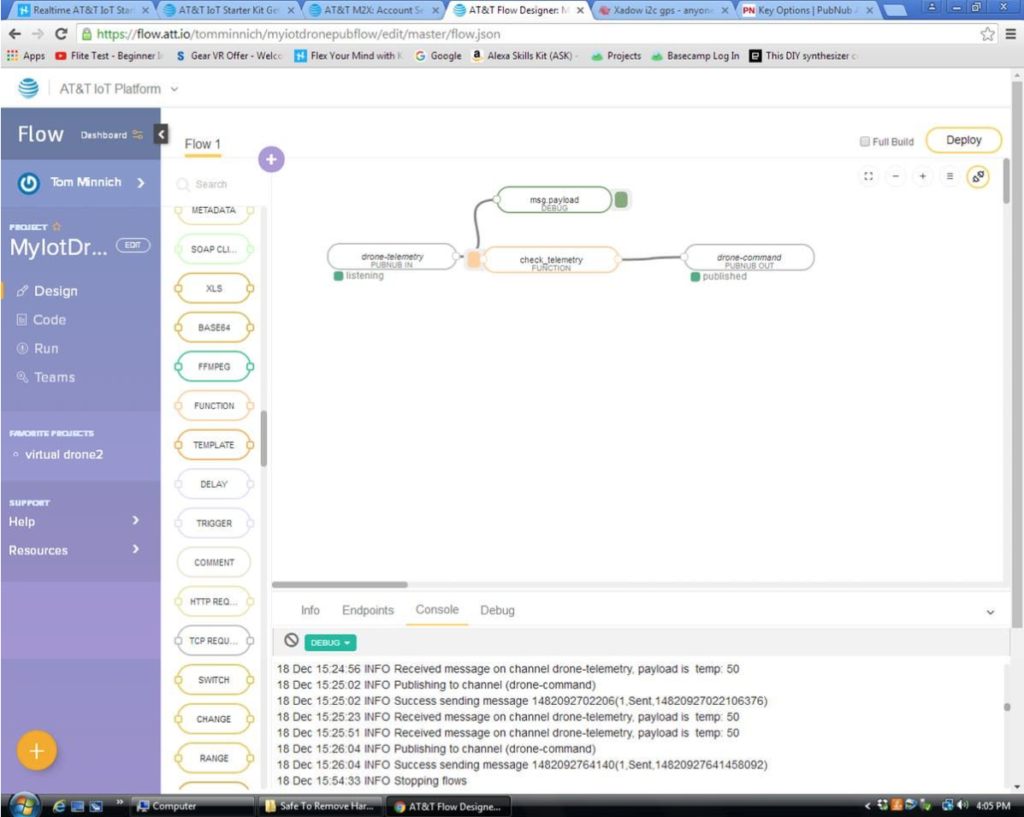
Simple First Flow Program
The program above is, for the moment, copying the telemetry back to the drone. The test string is “temp: 50”. So the “small matter of programming” or SMOP is to change the check_telemetry function from the present pass the data through unchanged process to something much more interesting.
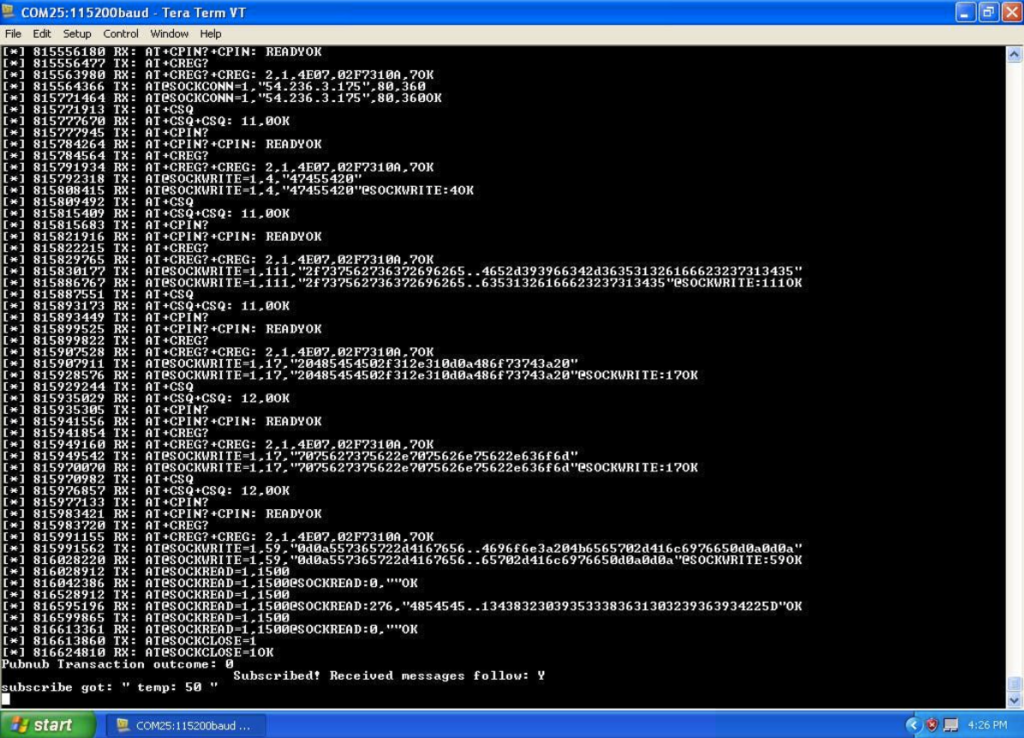
AT&T IoT Starter Kit Program Output
This shows that telemetry data has indeed been sent back to the AT&T IoT Starter Kit. The data has gone from the drone up to the cloud and come right back to the drone.
Here is the JavaScript for the check_telemetry function. The message input to the function is the output of the function.
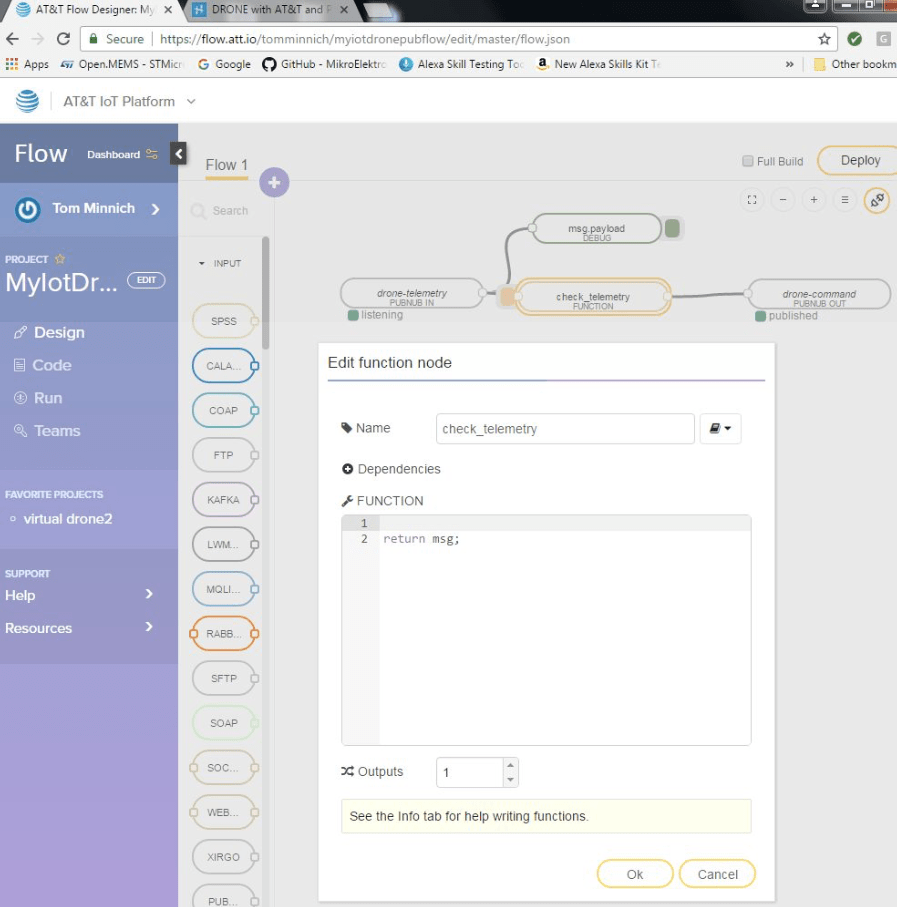
The really scary part of the project is behind us. It is a matter of building the check_telemetry function to do real command and control sorts of things. There is the ability to inject string data so we can build and test without having to use the LTE modem to convey the data.
Getting the real live sensors working will be no problem as we have many code examples to show how to do that.
Modifying the MBED program, that runs on the AT&T IoT Starter Kit, to interpret the command and control strings received by the LTE modem will be no problem either.
Injecting Data in Flow
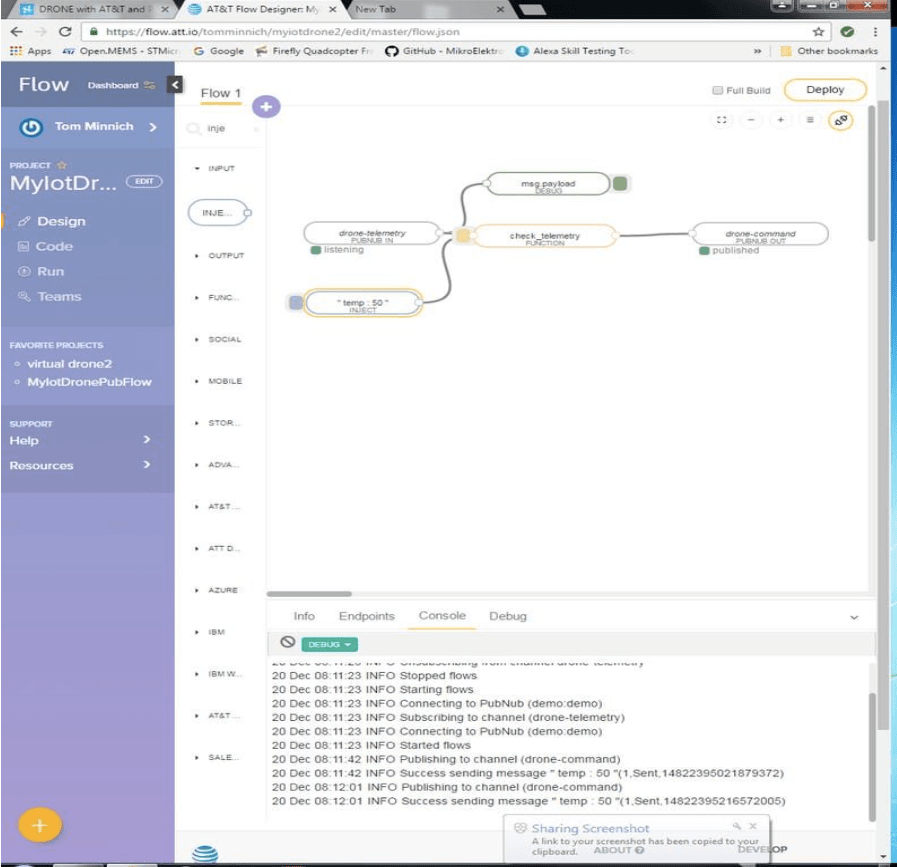
Adding an inject node allows us to test the Flow program without having to use the IoT Starter Kit to transmit the data. This will be extremely useful for testing various responses to the incoming IoT drone telemetry.
Simulating an Error
Using another inject node I will inject a simulated temperature spike. This will be caught in my AT&T Flow design as a trigger event that causes a series of GPS coordinates to be sent from the cloud to the IoT-based drone, to indicate a safe landing approach. The landing zone is in the center of a traffic circle near my workplace. I really would not use this as a landing zone in “real life”.
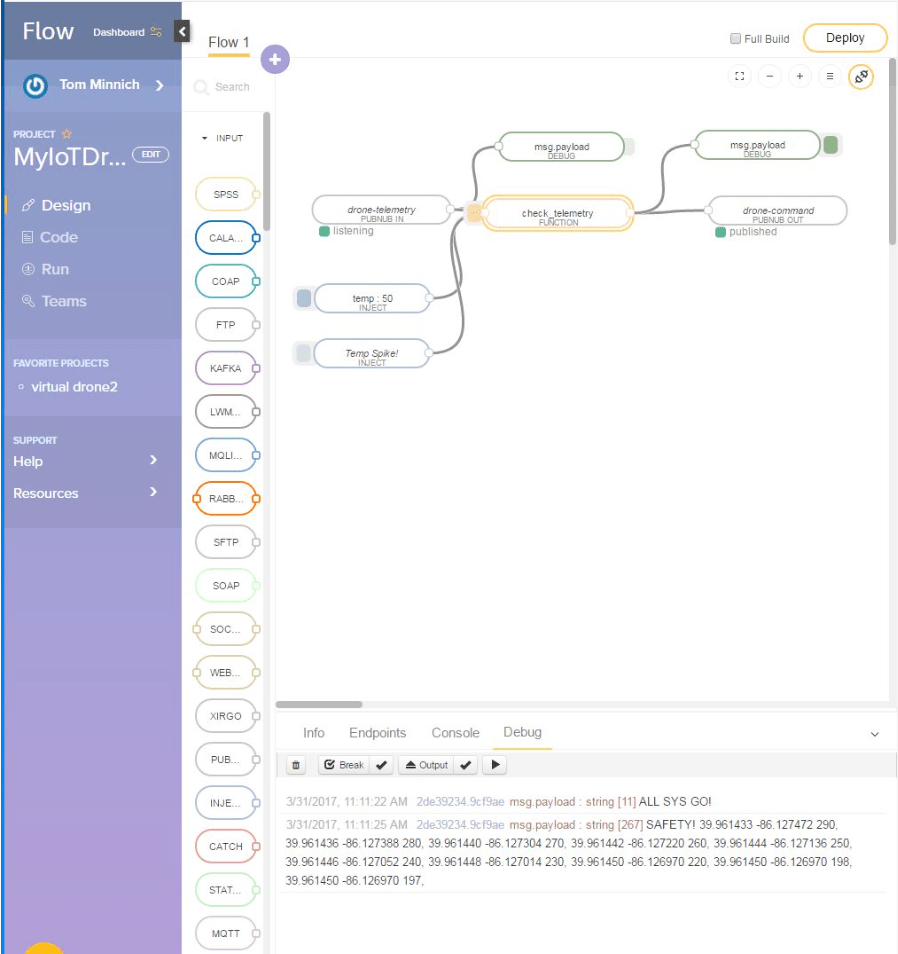
Overtemp Detection
A very simple flow program to detect a reported temperature over 79 degrees Celsius. If the temperature is under 79 degrees Celsius “ALL SYS GO!” is passed back to the IoT drone. If the temperature is above 79 degrees Celsius a safe landing approach is passed back to the IoT drone. The debug output shows the GPS coordinates of a ten GPS waypoint landing approach.
Here is the JavaScript for the improved check_telemetry function.
var tempValue = parseFloat(msg.payload[8]);//msg.payload[0]
290,";
var safe1 = "SAFETY! 39.961433 -86.127472
var safe2 = " 39.961436 -86.127388 280,";
var safe3 = " 39.961440 -86.127304 270,";
var safe4 = " 39.961442 -86.127220 260,";
var safe5 = " 39.961444 -86.127136 250,";
var safe6 = " 39.961446 -86.127052 240,";
var safe7 = " 39.961448 -86.127014 230,";
var safe8 = " 39.961450 -86.126970 220,";
var safe9 = " 39.961450 -86.126970 198,";
var safe10 = " 39.961450 -86.126970 197,";
if (tempValue >= 1) { //assume something was found
msg = {}; //Create blank object
msg.payload = (tempValue >= 8) ? safe1+safe2+safe3+safe4+safe5+safe6+safe7+safe8+safe9+safe10 : "ALL SYS GO!";
} return msg;
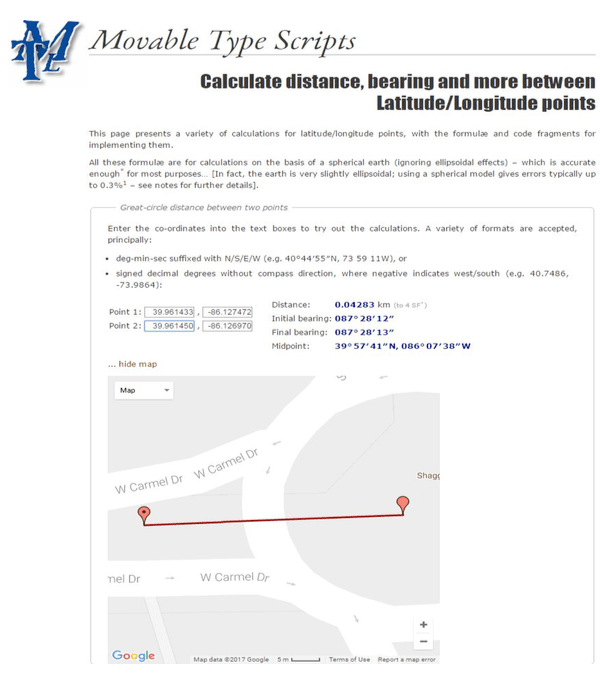
This is a very good resource for background on the math involved in GPS related calculations. Source
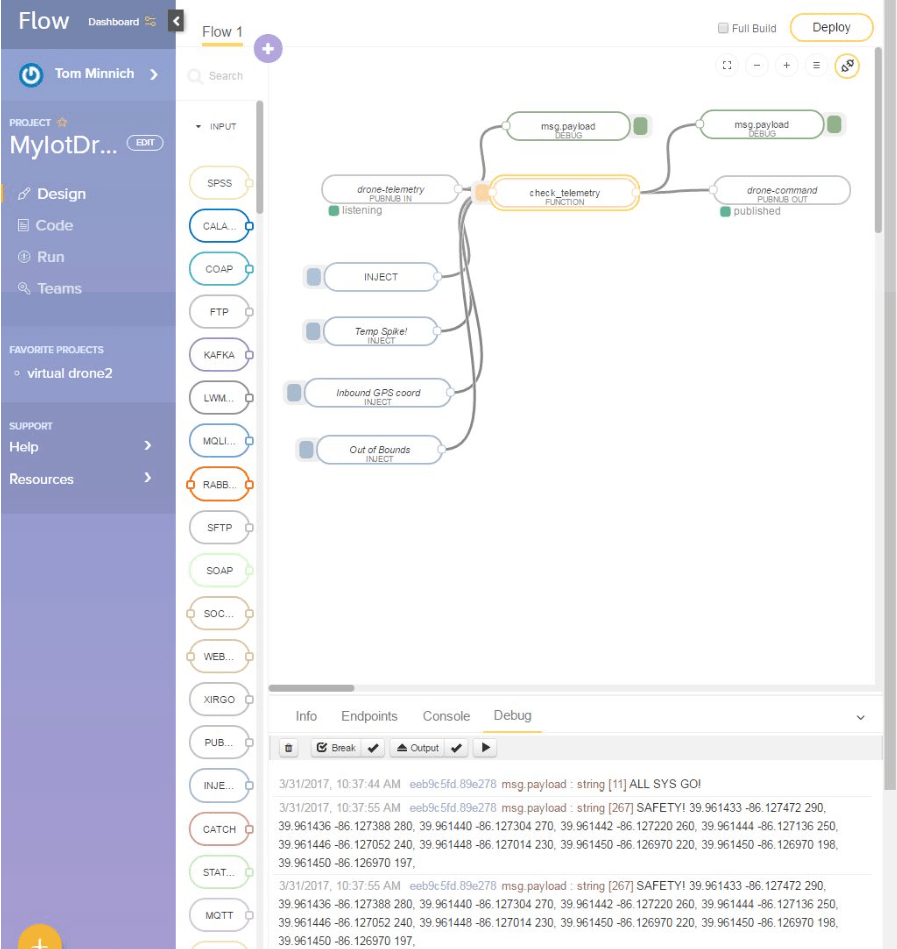
GPS-enforced Flight Boundaries
In a similar fashion to the temperature based trigger event, a second development milestone will be to provide trigger events based on monitoring the GPS location data stream.
The first test will be to provide a cube shaped safe flight zone.
There are high and low limits placed on altitude, longitude and latitude data from the GPS. These limits taken together form a safe flight zone cube. Leaving the safe flight zone will also cause a series of GPS coordinates to be sent from the cloud to the IoT-based drone, to indicate a safe landing approach. A similar test to the temperature spike test will be used to test GPS enforced flight boundaries.
Here is the further improved check_telemetry function that enforces GPS and altitude boundaries. These are my first programming attempts in JavaScript and it probably shows. I spend most of my time coding in C, writing code for embedded systems.
var tempValue = parseFloat(msg.payload.substring(8,11));
var lat_delta = 0.005;
var lon_delta = 0.005;
var ceiling = 100; // 100 meters over the ground
var ground = 258;
var ref_lat = 39.961282;
var ref_lon = -86.127067
var safe1 = "SAFETY! 39.961433 -86.127472 290,";
var safe2 = " 39.961436 -86.127388 280,";
var safe3 = " 39.961440 -86.127304 270,";
var safe4 = " 39.961442 -86.127220 260,";
var safe5 = " 39.961444 -86.127136 250,";
var safe6 = " 39.961446 -86.127052 240,";
var safe7 = " 39.961448 -86.127014 230,";
var safe8 = " 39.961450 -86.126970 220,";
var safe9 = " 39.961450 -86.126970 198,";
var safe10 = " 39.961450 -86.126970 197,";
msg2 = {};
// assume that there will be a fault found
msg2.payload = safe1+safe2+safe3+safe4+safe5+safe6+safe7+safe8+safe9+safe10;
if (tempValue >= 1) { //assume something was found
       if (tempValue >= 80){
       }else{
           tempValue = parseFloat(msg.payload.substring(15,26));
           if(  (ref_lat - lat_delta) < tempValue ){
               if(tempValue < (ref_lat + lat_delta)){
                   tempValue = parseFloat(msg.payload.substring(27,38));
                   if(  (ref_lon - lon_delta) < tempValue ){
                       if(tempValue < (ref_lon + lon_delta)){
                           tempValue = parseFloat(msg.payload.substring(39,47));
                           if(ground >= tempValue){
                               if( tempValue < (ground + ceiling)){
                                   msg2.payload = "ALL SYS GO!";
                               }
                           }
                       }
                   }
               }
           }
       }
}
return msg2;
In a system developed further, the IoT drone could be protected from other objects moving in the IoT drone's workspace, the flight boundaries could be constantly adjusted by decisions made by cloud-based programs.
Further Work
I hope to have further blogs where dashboards for drone telemetry and maps showing flight paths appear, perhaps with images of what the drone captures with a camera. There are so many possibilities with the cloud-based services that can be leveraged with PubNub! When people say drone more often they mean something that flies. More generally it can include any moving object, so what I am learning can be applied to robots as well.