Build Twitter Into 3rd Party Apps to Publish/Delete Tweets
In this tutorial, we'll combine the power of Functions via the BLOCKS Catalog with the Twitter API to allow users to tweet, delete tweets, and more from an authorized Twitter account, simply by publishing a PubNub message. For those unfamiliar, Functions allows you to filter, route, aggregate, and transform PubNub messages without making servers the bottleneck. All processing happens on the network.
With the Twitter Function, you could:
- Allow users to write a tweet from a chat app
- Trigger a tweet based on a connected device reading or action (think Earthquake warnings)
- Trigger a tweet based on a customized threshold (maybe a certain amount of users have voted for something)

Tutorial Overview
In this article, we dive into a simple example of how to enable tweet functionality in a real-time Angular2 chat application. So, what exactly is this “tweet” functionality we speak of?
In this case, Twitter Bridge refers to creating a custom application that can take real-time messages and create posts on Twitter. Social Media integration has a number of issues to consider, including differences in integration across services, creating a pleasant (and viral) user experience, dealing with flash memes, graceful degradation and error handling, and management and versioning of social media integrations.
As we prepare to explore our sample with social media features, let’s check out the underlying Twitter API.
Twitter API

Engaging social applications are quite challenging to build and operate on your own; they require substantial effort and engineering resources to create friendly user interfaces, maintain integration points, and operate large-scale services at scale. In the meantime, Twitter APIs make it easy to give your applications a social media “voice.”
Looking closer at the APIs, simple “tweeting” is just the beginning. There are a lot of API methods available for integration across a variety of use cases (such as geolocation). It really is a powerful tool for integrating media communications across the entire mobile landscape. In this article though, we’ll keep it simple and implement a basic “tweet” integration that posts messages from a PubNub channel.
Obtaining your PubNub Developer Keys
You'll first need your PubNub publish/subscribe keys. If you haven't already, sign up for PubNub. Once you've done so, go to the PubNub Admin Portal to get your unique keys. The publish and subscribe keys look like UUIDs and start with “pub-c-” and “sub-c-” prefixes respectively. Keep those handy – you'll need to plug them in when initializing the PubNub object in your HTML5 app below.
Getting Started with the Twitter API
The next thing you’ll need to get started with Twitter services is a Twitter account to take advantage of the REST API. We presume you already have a regular Twitter account.
- Step 1: go to the Twitter apps page and create a new app for Twitter integration.
- Step 2: follow the prompts on the “keys and access tokens page” to create a new OAuth token for your integration.
- Step 3: make note of the credentials on that page for future use (you’ll be plugging them in soon).
All in all, not too shabby!
Setting up the Function
With Functions, it’s really easy to create code to run in the network. Here’s how to make it happen:
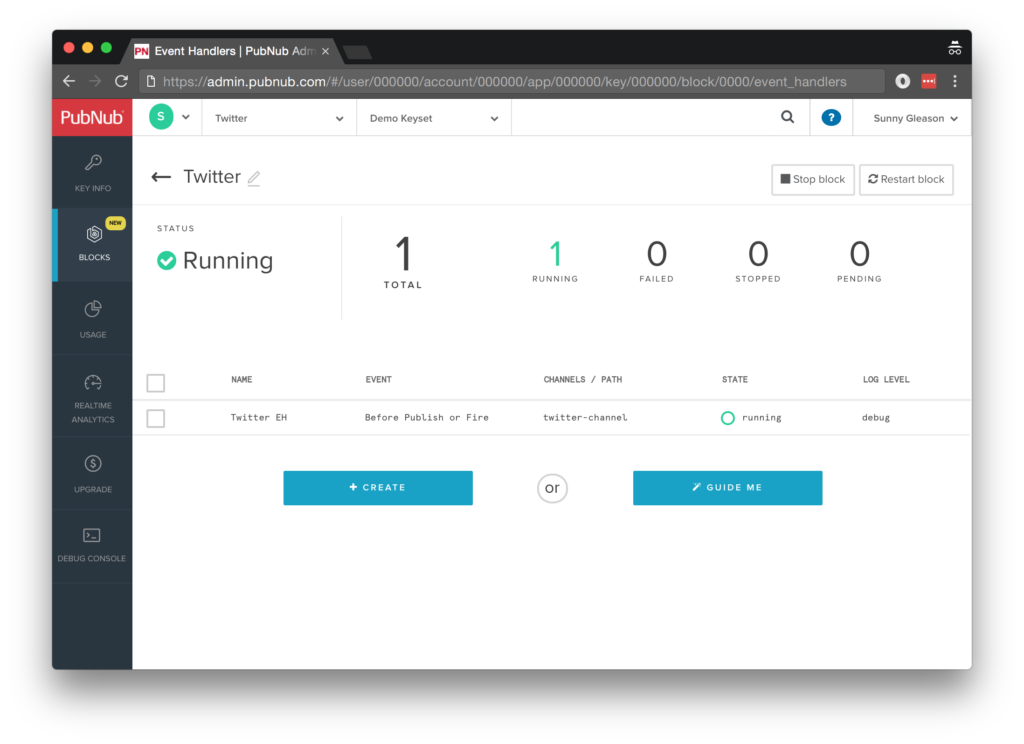
Go to the application instance on the PubNub Admin Dashboard.
 Create a new Function.

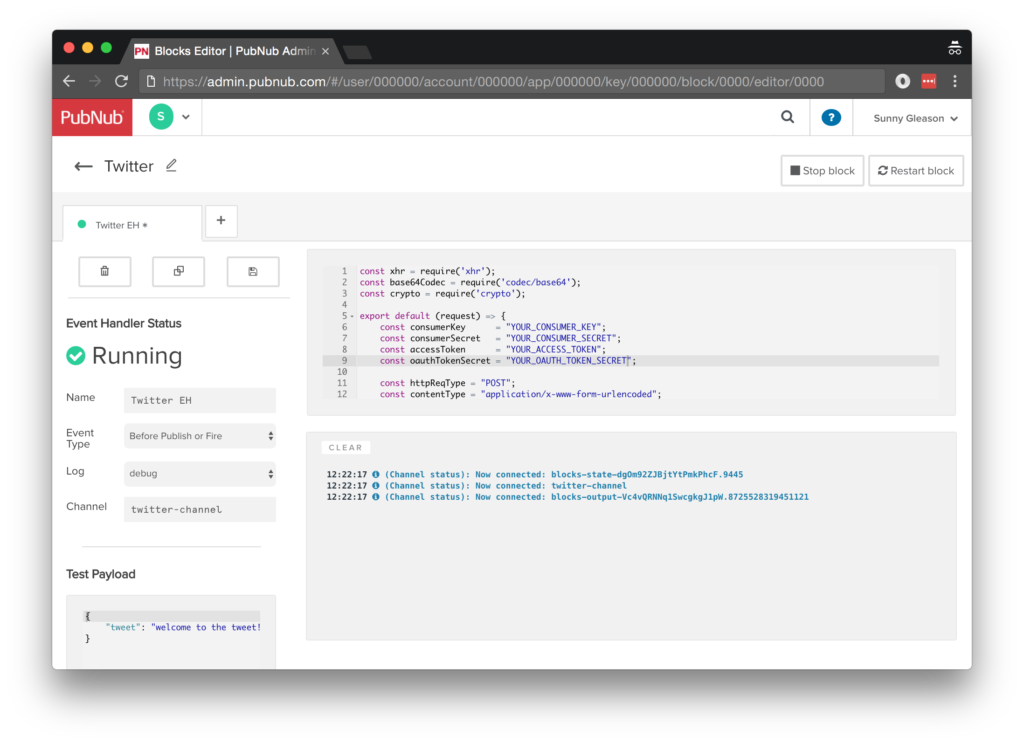
Paste in the Function code from the next section and update the bot name with the credentials from the previous steps above.

Start the Function, and test it using the “publish message” button and payload on the left-hand side of the screen.
That’s all it takes to create your serverless code running in the cloud!
Diving into the Code – the Function
You’ll want to grab the 73 lines of Function JavaScript and save them to a file, say, pubnub_twitter_block.js. It’s available as a Gist on GitHub for your convenience.
First up, we declare our dependency on xhr (for HTTP requests), base64 and crypto (for signing requests), and create a function to handle incoming messages.
const xhr = require('xhr');
const base64Codec = require('codec/base64');
const crypto = require('crypto');
export default (request) => {
Next, we fill in the OAuth credentials to give us publishing permissions, and declare the API URL, method and content type for the request.
// see https://apps.twitter.com
const consumerKey      = "YOUR_CONSUMER_KEY";
const consumerSecret   = "YOUR_CONSUMER_SECRET";
const accessToken      = "YOUR_ACCESS_TOKEN";
const oauthTokenSecret = "YOUR_OAUTH_TOKEN_SECRET";
const httpReqType = "POST";
const contentType = "application/x-www-form-urlencoded";
let url = "https://api.twitter.com/1.1/statuses/update.json";
If there’s no tweet specified in the message, we return an error.
if (!request.message.tweet) {
    return request.abort({ "400": "400: Bad Request" });
}
The tweet content is contained in the message’s tweet attribute. We escape special characters properly and turn it into a URI-encoded string for the body content.
let tweetContent = (request.message.tweet || "");
   let content = (tweetContent ? "status=" + encodeURIComponent(tweetContent).replace(/[!'()*]/g, escape) : "");
Now that we have all the parameters set, we create an object to hold all the relevant OAuth signing data.
let oauth = {
    "oauth_consumer_key": consumerKey,
    "oauth_nonce": base64Codec.btoa(Math.random().toString(36)).replace(/(?!\w)[\x00-\xC0]/g, ""),
    "oauth_signature_method": "HMAC-SHA1",
    "oauth_timestamp": Math.floor(new Date().getTime() / 1000),
    "oauth_token": accessToken,
    "status": tweetContent
};
We need to do a little nesting here because the OAuth signature method returns a promise. So we call the getOAuthSignature() method to obtain the signature, then continue with the result.
return getOAuthSignature(oauth, httpReqType, url, consumerSecret, oauthTokenSecret).then((result) => {
    oauth.oauth_signature = result;
    delete oauth.status;
    let authHeaderString = objectToRequestString(oauth, 'OAuth ', '="', '"', ', ');
Once we have the OAuth parameters set, we can create the API request object:
let http_options = {
    "method": httpReqType,
    "headers": {
        "Content-Type": contentType,
        "Authorization": authHeaderString
    },
    "body": content
};
Finally, we perform the API request and decorate the message with a twtr_response attribute containing the Twitter API result.
    return xhr.fetch(url, http_options).then((response) => response.json()).then((response) => {
        request.message.twtr_response = response;
        return request.ok();
    });
})
We include a bit of code to handle any errors that arise and communicate them accordingly.
    .catch((error) => {
        return request.abort({ "500": "500: Internal server error" });
    });
};
Here we have the utility method for creating an OAuth signature based on Twitter’s API requirements:
function getOAuthSignature(oauth, httpReqType, url, consumerSecret, oauthTokenSecret) {
    let parameterString = objectToRequestString(oauth, '', '=', '', '&');
    let signatureBaseString = httpReqType + "&" + encodeURIComponent(url) + "&" + encodeURIComponent(parameterString);
    let signingKey = base64Codec.btoa(encodeURIComponent(consumerSecret) + "&" + encodeURIComponent(oauthTokenSecret));
    return crypto.hmac(signingKey, signatureBaseString, crypto.ALGORITHM.HMAC_SHA1).then((result) => {
        return result;
    });
}
And here we have a utility method for converting an object with parameters into a representation that is ready for OAuth signing.
function objectToRequestString(obj, prepend, head, tail, append) {
    let requestString = prepend || "";
    Object.keys(obj).forEach((key, i) => {
        requestString += key + head + encodeURIComponent(obj[key]).replace(/[!'()*]/g, escape) + tail;
        i < Object.keys(obj).length-1 ? requestString += append : null;
    });
    return requestString;
}
All in all, it doesn’t take a lot of code to add Twitter integration to our application. We like that!
OK, let’s move on to the UI!
Diving into the Code – the User Interface
You’ll want to grab these 92 lines of HTML & JavaScript and save them to a file, say, pubnub_twitter_ui.html.
The first thing you should do after saving the code is to replace two values in the JavaScript:
- YOUR_PUB_KEY: with the PubNub publish key mentioned above.
- YOUR_SUB_KEY: with the PubNub subscribe key mentioned above.
If you don’t, the UI will not be able to communicate with anything and probably clutter your console log with entirely too many errors.
Dependencies
First up, we have the JavaScript code & CSS dependencies of our application.
<!DOCTYPE html>
<html>
  <head>
    <title>Angular 2</title>
    <script src="https://unpkg.com/core-js@2.4.1/client/shim.min.js"></script>
    <script src="https://unpkg.com/zone.js@0.7.2/dist/zone.js"></script>
    <script src="https://unpkg.com/reflect-metadata@0.1.9/Reflect.js"></script>
    <script src="https://unpkg.com/rxjs@5.0.1/bundles/Rx.js"></script>
    <script src="https://unpkg.com/@angular/core/bundles/core.umd.js"></script>
    <script src="https://unpkg.com/@angular/common/bundles/common.umd.js"></script>
    <script src="https://unpkg.com/@angular/compiler/bundles/compiler.umd.js"></script>
    <script src="https://unpkg.com/@angular/platform-browser/bundles/platform-browser.umd.js"></script>
    <script src="https://unpkg.com/@angular/forms/bundles/forms.umd.js"></script>
    <script src="https://unpkg.com/@angular/platform-browser-dynamic/bundles/platform-browser-dynamic.umd.js"></script>
    <script src="https://unpkg.com/pubnub@4.3.3/dist/web/pubnub.js"></script>
    <script src="https://unpkg.com/pubnub-angular2@1.0.0-beta.8/dist/pubnub-angular2.js"></script>
    <link rel="stylesheet" href="https://maxcdn.bootstrapcdn.com/bootstrap/3.3.7/css/bootstrap.min.css" />
    <link rel="stylesheet" href="https://maxcdn.bootstrapcdn.com/bootstrap/3.3.7/css/bootstrap-theme.min.css" />
  </head>
For folks who have done front-end implementation with Angular2 before, these should be the usual suspects:
- CoreJS ES6 Shim, Zone.JS, Metadata Reflection, and RxJS : Dependencies of Angular2.
- Angular2 : core, common, compiler, platform-browser, forms, and dynamic platform browser modules.
- PubNub JavaScript client: to connect to our data stream integration channel.
- PubNub Angular2 JavaScript client: provides PubNub services in Angular2 quite nicely indeed.
In addition, we bring in the CSS features:
- Bootstrap: in this app, we use it just for vanilla UI presentation.
Overall, we were pretty pleased that we could build a nifty UI with so few dependencies. And with that… on to the UI!
The User Interface
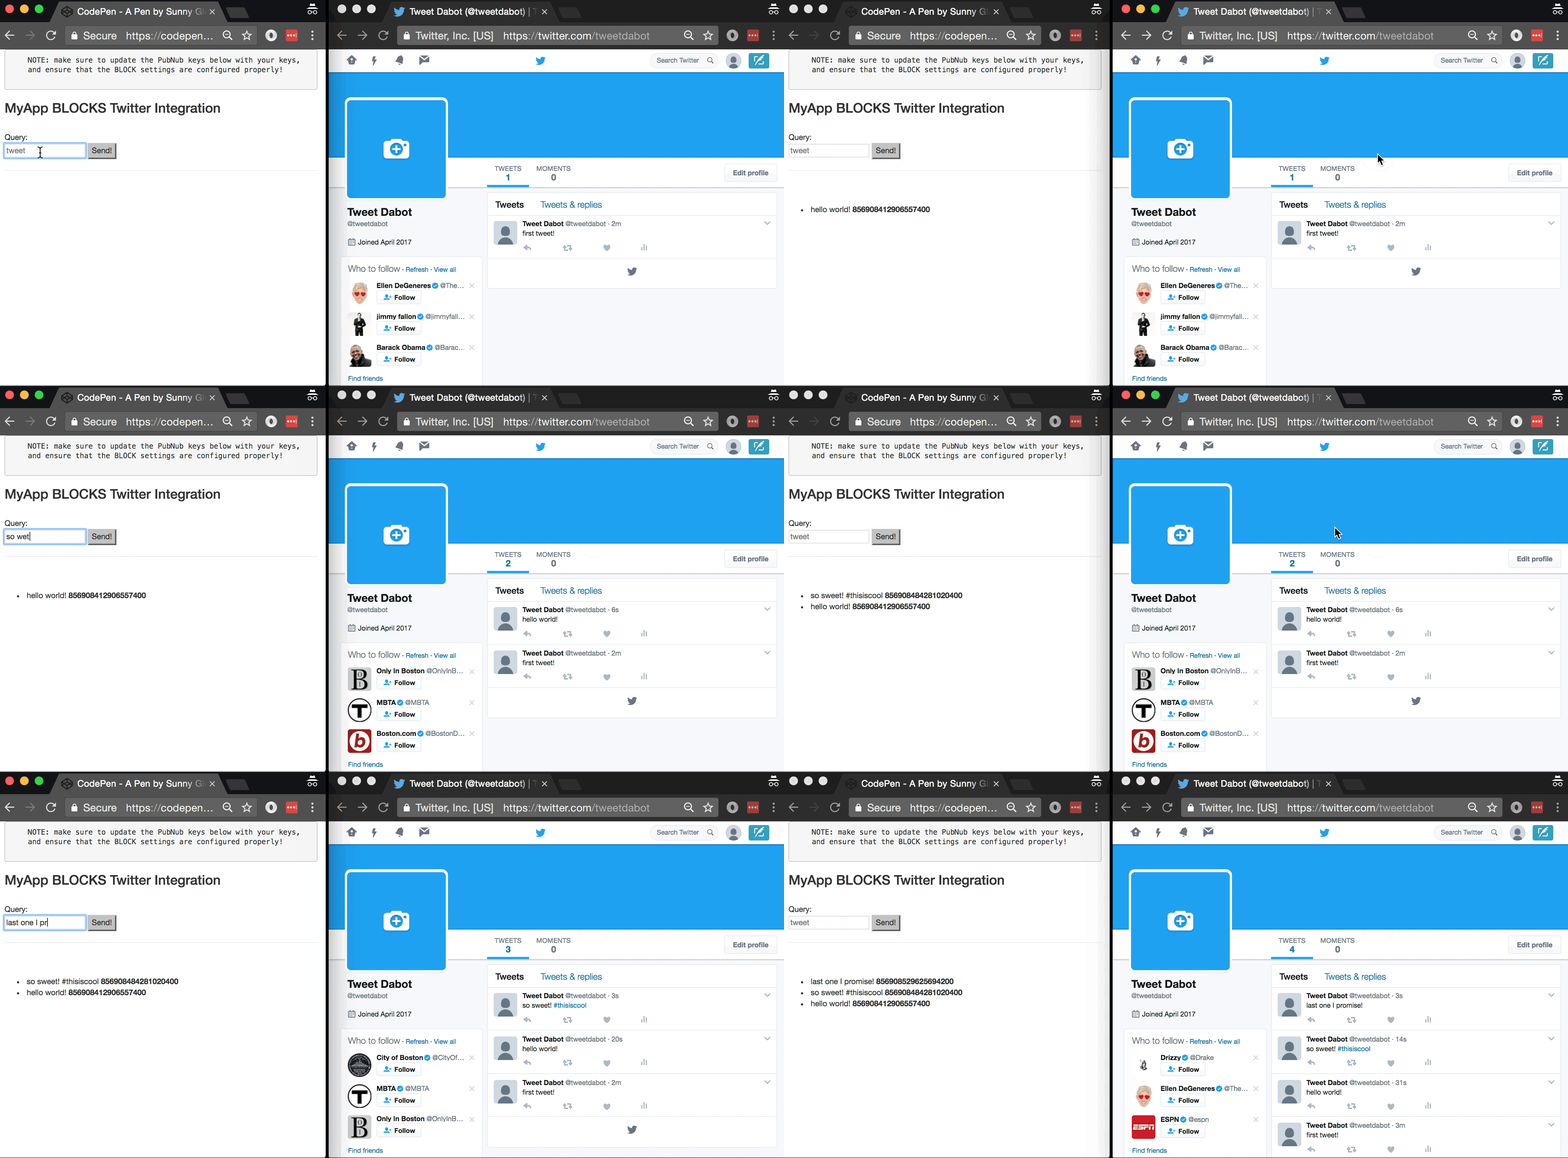
Here’s what we intend the UI to look like:

The UI is pretty straightforward – everything is inside a main-component tag that is managed by a single component that we’ll set up in the Angular2 code.
<body>
  <main-component>
    Loading...
  </main-component>
Let’s skip forward and show that Angular2 component template. The h3 heading should be pretty self-explanatory. We provide a simple button to trigger the user’s tweet to send to the PubNub channel via the publish() action.
<div class="container">
    <pre>
    NOTE: make sure to update the PubNub keys below with your keys,
    and ensure that the BLOCK settings are configured properly!
    </pre>
    <h3>MyApp Functions Twitter Integration</h3>
    <br />
    Tweet:
    <br />
    <input type="text" [(ngModel)]="toSend" placeholder="tweet" />
    <input type="button" (click)="publish()" value="Send!" />
    <hr/>
    <br/>
    <br/>
    <ul>
      <li *ngFor="let item of messages.slice().reverse()">
        <div>{{item.message.tweet}} <b>{{item.message.twtr_response.id}}</b></div>
      </li>
    </ul>
</div>
The component UI consists of a simple list of messages. We iterate over the messages in the controller scope using a trusty ngFor. Each message includes the original tweet as well as the API response.
And that’s it – a functioning real-time UI in just a handful of code (thanks, Angular2)!
The Angular2 Code
Right on! Now we’re ready to dive into the Angular2 code. It’s not a ton of JavaScript, so this should hopefully be pretty straightforward.
The first lines we encounter set up our application (with a necessary dependency on the PubNub AngularJS service) and a single component (which we dub main-component).
<script>
var app = window.app = {};
app.main_component = ng.core.Component({
    selector: 'main-component',
    template: `...see previous...`
The component has a constructor that takes care of initializing the PubNub service, and configuring the channel name. NOTE: make sure this matches the channel specified by your BLOCK configuration and the BLOCK itself!
}).Class({
    constructor: [PubNubAngular, function(pubnubService){
        var self = this;
        self.pubnubService = pubnubService;
        self.channelName = 'twitter-channel';
        self.messages = [];
        self.toSend = "";
        pubnubService.init({
            publishKey:   'YOUR_PUB_KEY',
            subscribeKey: 'YOUR_SUB_KEY',
            ssl:true
        });
We subscribe to the relevant channel and create a dynamic attribute for the messages collection.
pubnubService.subscribe({channels: [self.channelName], triggerEvents: true});
self.messages = pubnubService.getMessage(this.channelName,function(msg){
  // no handler necessary, dynamic collection of msg objects
});
We also create a publish() event handler that performs the action of publishing the message containing the command to the PubNub channel.
    }],
    publish: function(){
        this.pubnubService.publish({ channel: this.channelName, message: {tweet:this.toSend} });
        this.toSend = "";
    }
});
Now that we have a new component, we can create a main module for the Angular2 app that uses it. This is pretty standard boilerplate that configures dependencies on the Browser and Forms modules and the PubNubAngular service.
app.main_module = ng.core.NgModule({
    imports: [ng.platformBrowser.BrowserModule, ng.forms.FormsModule],
    declarations: [app.main_component],
    providers: [PubNubAngular],
    bootstrap: [app.main_component]
}).Class({
    constructor: function(){}
});
Finally, we bind the application bootstrap initialization to the browser DOM content loaded event.
document.addEventListener('DOMContentLoaded', function(){
    ng.platformBrowserDynamic.platformBrowserDynamic().bootstrapModule(app.main_module);
});
We mustn’t forget close out the HTML tags accordingly.
});
</script>
</body>
</html>
Not too shabby for about 92 lines of HTML & JavaScript!
Additional Features
There are a couple other endpoints worth mentioning in the Twitter API.
You can find detailed API documentation here.
- Search : find recent tweets that match search criteria.
- Place Search : find tweets in a specific area.
- Media : Uploading images and videos.
- And more!
All in all, we found it pretty easy to get started with social media integration using the API, and we look forward to using more of the deeper integration features.