Build a Cloud Server State Machine with Functions
In this tutorial, we're going to show you how to create a simple state machine using Functions; however, before we do so, let's explain what a state machine is and their importance.
What is a State Machine?
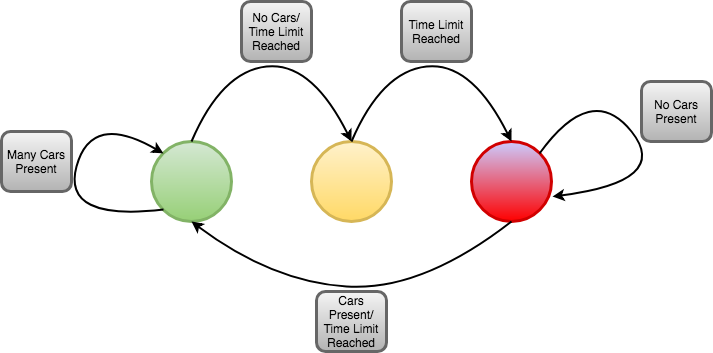
First and foremost, a state machine is a mathematical abstraction that allows a device to be in one of a set number of stable conditions, depending on its previous condition and on the present values of its inputs. A stoplight is an example of a state machine, changing its state to green, yellow, or red, depending on whether there is a car present or not.

State machines are a fundamental tool in computer programming and are highly effective infrastructures for embedded devices, especially within the IoT domain. As most IoT devices are put into situations where they are gathering different amounts and types of data to process, state machines allow code to be compartmentalized into smaller states so that not all the code has to be running at once. For example, to extend battery life, an IoT device may conserve energy by entering a “low power state” when no data is coming in.
Additionally, state machines allow for code to be very readable as the code can be broken up into very small and manageable blocks that other users can quickly run through. If an IoT device is not functioning properly, the developer can physically identify which state is dysfunctional and quickly fix the problematic code associated with that state.
Why Use Functions to Implement State Machines?
While state machines can be implemented in a variety of ways, embedding PubNub into your state machine design or additionally with ngrok will prove very efficient and effective for IoT embedded systems.
Using Functions allows the developer to outsource all of the heavy computation and logic to the cloud, which frees up many resources for the IoT device. This allows for better battery life for the device as well as opening the possibility to use a cheaper and/or smaller device.
Additionally, Functions exists as a compartmentalized module in the cloud that can be globally deployed within seconds. This means that you can have millions of IoT devices receive code and code updates to your state machines instantly and all at once.
If applied correctly, a smart farmer would have thousands of cheap IoT watering devices spread out across his field with simply an internet connection, a few kilobytes of storage, and an on/off valve. All the farmer would have to do is quickly code up a state machine in Functions, deploy it to all of his devices instantly, and have all of his devices maximize the efficiency of his land. He could even attach humidity sensors to each device to monitor when plants need watering as well as deploy updates to each device during weather/seasonal changes.
Here's a little demo:
Code Walkthrough
Step 1: Planning
One of the most crucial steps in implementing a state machine is figuring out its design and how to optimize it to receive the maximum benefits it can provide for your scenario. You must ask yourself: How many states (# of variable values) am I going to need? What do I need to do to remember to interpret my inputs or produce my outputs? Is there a distinct sequence of “steps” or “modes” that are used? Do I really need a state for that?
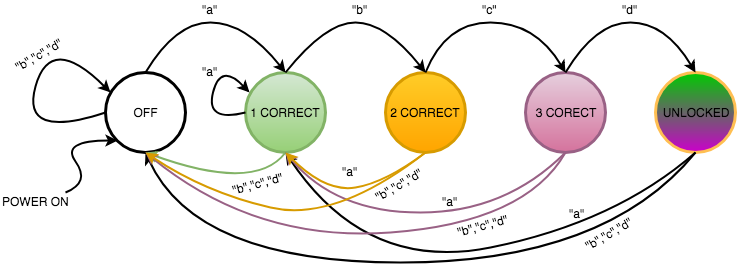
For this demonstration, I wanted to create a 4-button IoT lock that would need the correct 4-digit combination to unlock. Since I was going to use LEDs to visualize which state I was in, I knew I needed a total of 5 states (OFF, 1 CORRECT, 2 CORRECT, 3 CORRECT, UNLOCKED!). I also took note of my state transitions for code optimizations which you can see in the next step.
Step 2: Draw it out
With a solid plan comes a solid diagram, which will make your code much easier to write and debug later. To come up with a state diagram to solve a problem:
- Write out an algorithm or series of steps to solve the problem
- Each step in your algorithm will usually be one state in your diagram
- Ask yourself what past inputs need to be remembered and what will usually lead to a state representation
Here's what the finished flow diagram looked like for my scenario:

Note that when “a” is pressed, it reverts the state back to the 1 CORRECT state, unlike the other inputs, as that could be the beginning of the next input sequence.
Part 3: Functions
If you took the time to complete parts 1 & 2, coding the actual state machine will be a piece of cake! If you've coded state machines before, the process is very similar, except for the few key differences that make cloud computing so valuable.
First, you'll need to sign up for a free account here.
Next, create a Function:
 Click
Click  “Create New App” in the top right
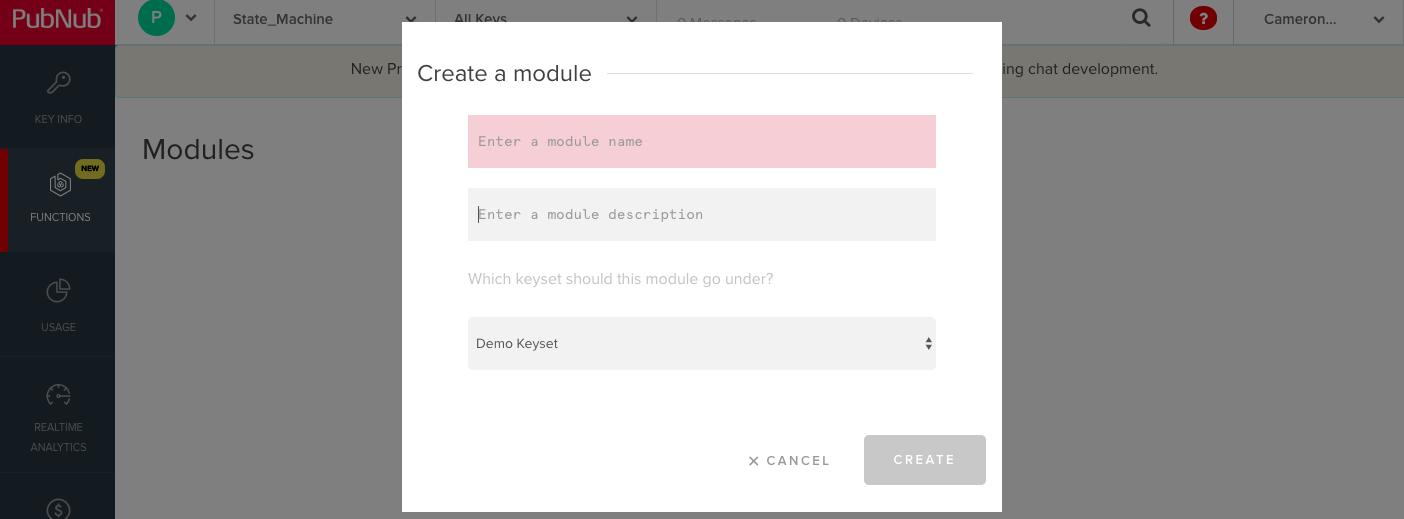
Name your app and then create your module. Select the “Demo” Keyset you were given when generating the app if you want.

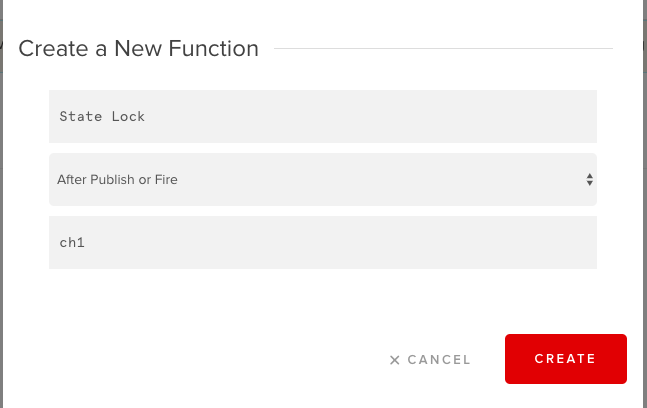
Lastly, create your function, name your channel, and be sure to select the “After Publish or Fire” option

Now that you've created the real estate to house our code, we can begin outsourcing or state machine from device to cloud. The crux of implementing a state machine in your Function lies within the KV store feature. KV store allows you to save a variable in your function that does not reset its value after each function is fired. This is perfect for state variables and remembering our inputs to execute specific outputs.
To use KV store as well as some PubNub capabilities we'll need later to publish to our IoT device, include these libraries
const db = require("kvstore");
const pubnub = require('pubnub');
The way KV store works is that the variable is stored in a Functions server and to access that variable, you must make GET and SET requests to that server. So, to have our function first read the state variable to see if the state has changed, you must make a promise like so,
//retrieve state variable from kv store
return db.get("state").then((state) => {<State machine code>}
The structure of a state machine goes as follows: Outer if statements check the state, inner if statements check the inputs. So the outer structure should implement like this:
if(state == 0 || !state){} // !state checks if state is null, in case nothing has ever been written to the state before
else if (state == 1){}
else if (state == 2){}
else if (state == 3){}
To implement the inputs, refer back to the flow diagram you created earlier. Each if statement is a block in your diagram so you must check the arrows to see how each input affects the state. Then, implement your inner if statements accordingly to each state.
For the demo, since the data inputs are coming in from messages structured as “text”: followed by “a”, “b”, “c”, or “d” from remote pushbuttons, we must open up the message like so:
if(request.message.text == "a"){}
We'll get to more on the structure of publishing pushbuttons messages in the next section.
Depending on your input, you'll want to change your state and publish a message on your device's channel to let it know what it's supposed to do. Typically, you will want to publish the message back on a second channel so messages do not conflict with the messages published from the device.
pubnub.publish({
      "channel": "ch2",
      "message": "a"
      }).then((publishResponse) => {
      console.log(`Publish Status: ${publishResponse[0]}:${publishResponse[1]} with TT ${publishResponse[2]}`);
      });
Lastly, you will want to store the state variable to the KV store if it has been changed. You will want to do this at the end of Outer (state) if statement, right after the Inner (data input) if statements.
//store state in kv store
db.set("state", state)
//error handling
.catch((err) => {
console.log("An error occured.", err);
});
Those are all the tools needed to make your PubNub state machine. If you would like to see the entire code used for the demo project, here's the link to the GitHub repository: https://github.com/Cakhavan/PubNubStateMachine
Part 4: Client Code
Now you will get to see the benefits of using PubNub state machines from the client device's perspective. Since all of the logic is handled in the cloud, all we need to do is make sure our device can publish and subscribe to messages, which PubNub makes all the more simple!
In this demonstration, I chose to program an Arduino with JavaScript, which means I need to use the Johnny-Five platform to allow the program to communicate with the device. You can download Johnny-Five by running the terminal npm command
npm install johnny-five
Depending on your circuit setup, Johnny-five provides many different implementations and even circuit diagrams to help you figure out what you want to do: http://johnny-five.io/examples/
For my demonstration, I wired 4 pullup-buttons to inputs A2-A5 and 3 LEDs to inputs 11-13.
Once you've figured out what circuit you want to build, include your libraries in your code.
var five = require("johnny-five"),
board, button;
board = new five.Board();
var PubNub = require('pubnub');
Turn on your Johnny-five board to connect with your Arduino
board.on("ready", function(){<your code>}
Then, declare your push buttons and LEDs following the Johnny-Five syntax
 // Create a new 'LED' hardware instance.
 var led_1 = new five.Led(13);
 var led_2 = new five.Led(12);
 var led_3 = new five.Led(11);
 // Create a new `button` hardware instance.
 var button_1 = new five.Button({
  pin: "A5",
  isPullup: true
});
 var button_2 = new five.Button({
  pin: "A4",
  isPullup: true
});
 var button_3 = new five.Button({
  pin: "A3",
  isPullup: true
});
 var button_4 = new five.Button({
  pin: "A2",
  isPullup: true
});
Initialize your PubNub instance to publish and subscribe to messages using your key-set. Sign up to get your own forever free API keys.
pubnub = new PubNub({
     publishKey : 'YOUR-PUBLISH-KEY',
     subscribeKey : 'YOUR-SUBSCRIBE-KEY',
});
Then, create a function to be called and be able to publish messages according to whatever format and channel you want.
function publish(x){ //x is the message passed to be published

     var publishConfig = {channel : "ch1",
                          message : { "text": x  //publish messages of the format message.text.x }
                         }
     pubnub.publish(publishConfig, function(status, response){
          console.log(status, response);
     });
};
Next, configure your buttons to publish the data for the state machine inputs
// "down" the button is pressed
 button_1.on("down", function() {
   publish("a");
 });
 button_2.on("down", function(){
   publish("b");
 });
  button_3.on("down", function(){
   publish("c");
 });
   button_4.on("down", function(){
   publish("d");
 });
Then, subscribe to the second channel that receives the messages published by the state machine to let the device know the state has been changed.
console.log("Subscribing");
pubnub.subscribe({
    channels: ['ch2']
});
Lastly, create your listener to execute the proper commands in accordance to which state the cloud is telling it is in.
pubnub.addListener({
     message: function(message){
          console.log(message.message);
          if(message.message == "a"){
               led_1.stop().off();
               led_2.stop().off();
               led_3.stop().off();
               led_1.on();
           }else if(message.message == "b"){
               led_1.stop().off();
               led_2.stop().off();
               led_3.stop().off();
               led_1.on();
               led_2.on();
           }else if(message.message == "c"){
               led_1.stop().off();
               led_2.stop().off();
               led_3.stop().off();
               led_1.on();
               led_2.on();
               led_3.on();
           }else if(message.message == "Unlocked!"){
               led_1.stop().off();
               led_2.stop().off();
               led_3.stop().off();
               led_1.blink();
               led_2.blink();
               led_3.blink();
           }else if(message.message == "off"){
               led_1.stop().off();
               led_2.stop().off();
               led_3.stop().off();
           }
               }
                  });
The full code is in the following GitHub repo: https://github.com/Cakhavan/PubNubStateMachine
And that's it! Those are all the tools you need to implement an efficient cloud state machine with Functions!