For many years, quiz/trivia games have been extremely popular, consistently charting at the top of app markets globally. Specifically, HQ Trivia was able to revolutionize this market, by making their game a viral social trend. It instantly became a norm to see friend groups and families coming together with their phones in a circle ready to tune in live to HQ Trivia. If you're not familiar with HQ Trivia, it is a live game show app that allows players to compete with upwards of a million other players in a 10 question quiz for enticing monetary prizes.
Building such an app, however, includes huge technical challenges such as scaling up to a million users, displaying the questions to all of them synchronously, receiving all their responses in real time, and incrementing answer counts and returning all this data back to all the players instantly. With PubNub, a real-time data stream network, developers can reduce this challenging task to a much more intuitive and simplified one.
Tutorial Overview
Full source code for this tutorial is available here.
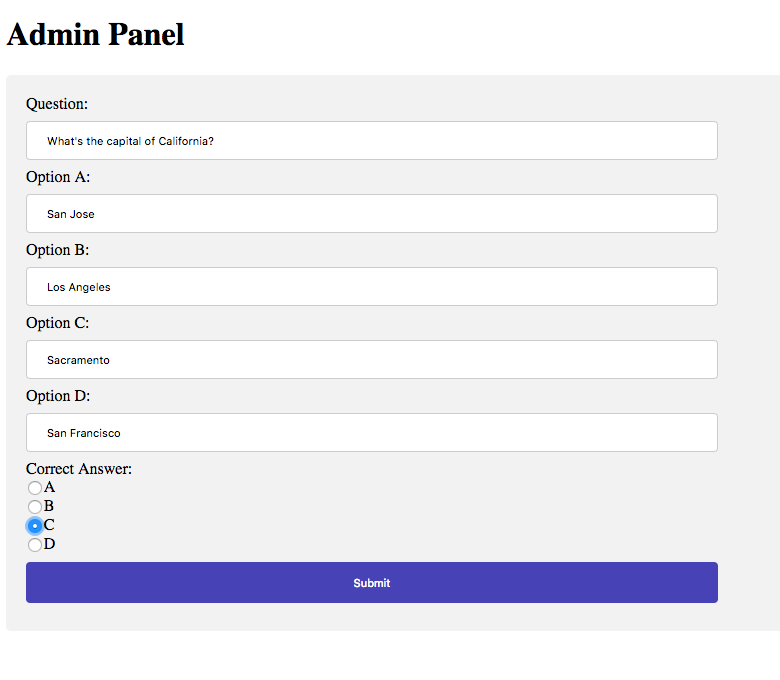
In this tutorial, we will build a basic HQ demo app that has two interfaces. The first will be the Admin Interface, a web app, from which the Admin will publish the question live to all the game's players eagerly waiting. After 10 seconds for the player to answer the question, it will then automatically publish answer results live for players to see. This interface that the admin interacts with is shown below.
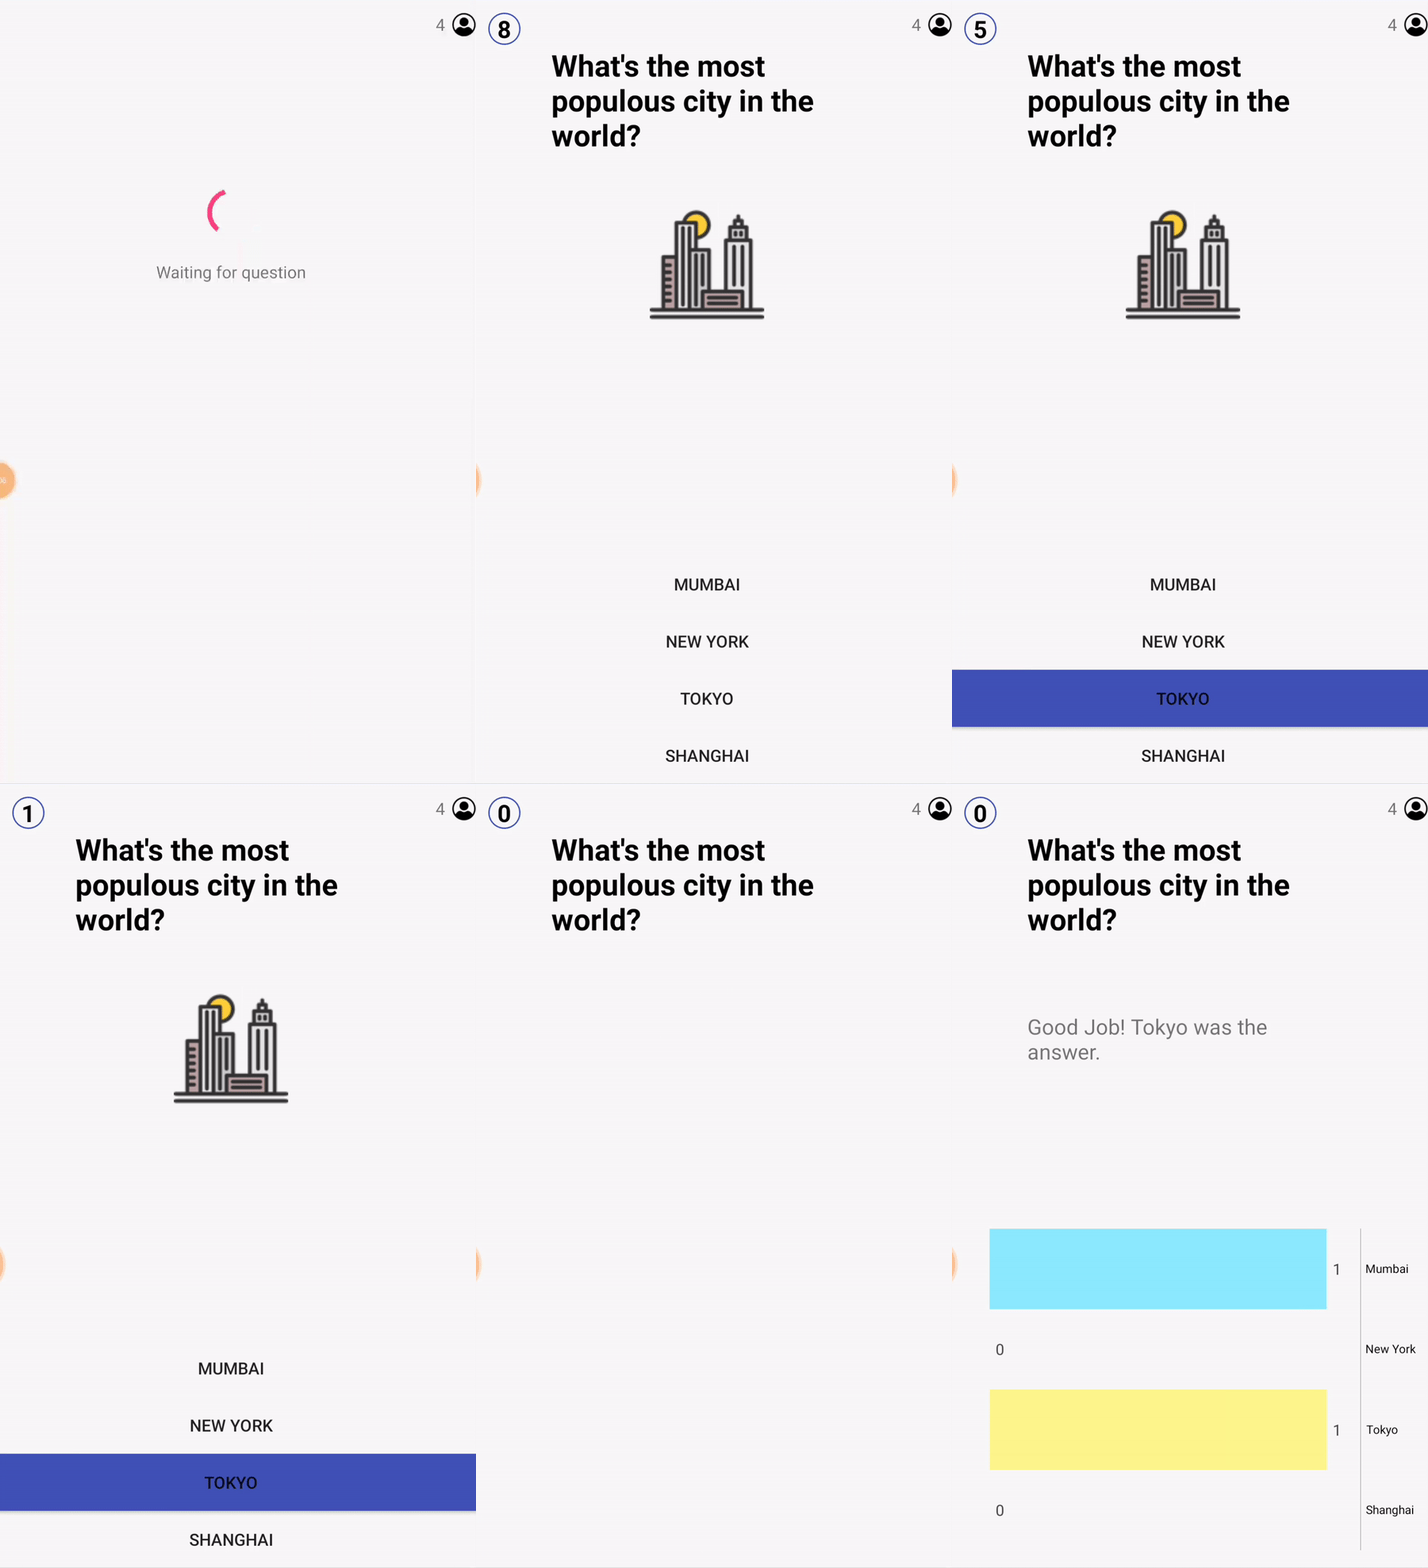
The second will be the Player Interface, an Android app, from which the players will engage in the game playing experience. Here they will see a loading screen and the number of players currently playing the game, until a question is uploaded from the admin. Once uploaded, the player will see the question, the corresponding answer options, and a 10-second countdown timer. This experience is shown in the gif below.
PubNub Setup
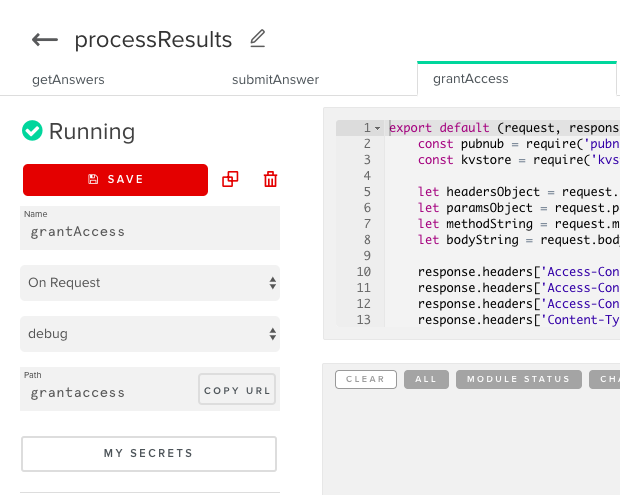
In order to set up PubNub in our app, we will head over to the PubNub Dashboard, to create a new project called HQDemo. In this new project, we will navigate to the sidebar and click on Key Info. For our Key Set, we will enable Presence, Functions, and Access Manager. Then click on functions, in our sidebar. Here, we will create a module called processResults and within the module create 3 functions: getAnswers, submitAnswer, and grantAccess.
For getAnswers, we will set our event type to be On Request, since it will be called by a XMLHTTPRequest from the Admin Web App. For submitAnswer, the event type will be set to After Publish or Fire, since it will be invoked after a user publishes their answer. We will set its channel name to also be submitAnswer. Finally for grantAccess, we will set our event type to be OnRequest, since it is called from a XMLHTTPRequest from the Admin User. You will declare these settings in the panel to the left of the screen as shown.
Now, we have completed the initial setup of PubNub in our app.
Admin App
Our Admin App Development can be broken down into the following steps:
- Initial Setup of PubNub Javascript SDK
- Build Admin App User Interface
- Publish Question
- Get Answer Counts
- Publish Answer Results
- Reset Answer Counts
Initial Setup of PubNub Javascript SDK
In our admin app, we will simply add the following script tags into our index.html file in order to import our PubNub Javascript SDK and our Javascript file (index.js) that we will write our logic in.
<script src="https://cdn.pubnub.com/sdk/javascript/pubnub.4.21.2.js"></script>
<script src="./index.js"></script>
Inside index.js, create the variables subscribe_key, publish_key, and secret_key at the top of a file. Initialize them with their appropriate values from the key set we created in the PubNub Dashboard. The admin will initialize their PubNub instance with the secret key, so that they have unlimited access to read/write to all the channels.
Now, we are finished with the initial setup of PubNub into our admin app.
Build Admin App User Interface
The Admin App will have a basic layout with 5 text fields: Question, Option A, Option B, Option C, and Option D. It will then have radio buttons to allow the admin to select which option is the correct answer. Finally, there will be a submit button. This simple layout can be created with the following code in index.html.
In the action attribute of the form tag, we must specify the function that will be called once the submit button is pressed. We will do that by making the action javascript:publishQuestionAnswer(), where publishQuestionAnswer() is the function. Take note of the ID's that you have specified for each UI element, since they will be used again in the javascript code to obtain the admin's input.
<body>
     <h1>Admin Panel</h1>
      <div>
         <form name="questionAnswerForm" action="javascript:publishQuestionAnswer()">
            Question:<br>
            <input type="text" id="question" name="question"><br>
            Option A:<br>
            <input type="text" id="optionA" name="optionA"><br>
            Option B:<br>
            <input type="text" id="optionB" name="optionB"><br>
            Option C:<br>
            <input type="text" id="optionC" name="optionC"><br>
            Option D:<br>
            <input type="text" id="optionD" name="optionD"><br>
            Correct Answer:<br>
            <input type="radio" name="correct_answer" id="a_correct" value="a_correct">A<br>
            <input type="radio" name="correct_answer" id="b_correct" value="b_correct">B<br>
            <input type="radio" name="correct_answer" id="c_correct" value="c_correct">C<br>
            <input type="radio" name="correct_answer" id="d_correct" value="d_correct">D<br>
            <input type="submit" value="Submit">
         </form>
      </div>
   </body>
In order to improve the User Interface of the Admin Panel, feel free to add CSS to our HTML code. I have added the following inside of a style tag to make such improvements.
input[type=text], select {
width: 50%;
padding: 12px 20px;
margin: 8px 0;
display: inline-block;
border: 1px solid #ccc;
border-radius: 4px;
box-sizing: border-box;
}
input[type=submit] {
width: 50%;
background-color: #3F51B5;
color: white;
padding: 14px 20px;
margin: 8px 0;
border: none;
border-radius: 4px;
cursor: pointer;
}
input[type=submit]:hover {
background-color: #303F9F;
}
div {
border-radius: 5px;
background-color: #f2f2f2;
padding: 20px;
}
Publish Question
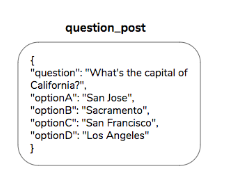
Here, we will use PubNub's Publish/Subscribe Model to have the admin publish the question to all of our game's players. The channel question_post will hold messages with the question's title and its answer options, encoded in JSON. The message structure for this channel is shown in the example below. We must use the same keys when publishing a message to the channel.
Now, we'll write our Javascript code in index.js. We need to write method publishQuestionAnswer() that we defined earlier in our HTML code as the method invoked when the user presses submit. In here, we want to initialize our PubNub instance, so that we can use PubNub in our Admin App. We will do this by adding the following code into the method. Here we are using the variables subscribe_key, publish_key, and secret_key, which we already gave values to.
pubnub = new PubNub({
        subscribeKey: subscribe_key,
        publishKey: publish_key,
        secretKey: secret_key,
        ssl: true
   });
Next, we must use this PubNub instance we just initialized to publish the question to the question_post channel. We will use document.getElementById('ENTER UI ELEMENT ID').value, to obtain the specific values inputted into each text fields. We'll then publish this data to our channel in the appropriate format we defined earlier.
pubnub.publish({
        message: {
            "question": document.getElementById('question').value,
            "optionA": document.getElementById('optionA').value,
            "optionB": document.getElementById('optionB').value,
            "optionC": document.getElementById('optionC').value,
            "optionD": document.getElementById('optionD').value
        },
        channel: 'question_post',
        sendByPost: false, // true to send via post
        storeInHistory: false //override default storage options
    },
    function(status, response) {
        if (status.error) {
            // handle error
            console.log(status);
        } else {
            console.log("message Published w/ timetoken", response.timetoken);
        }
    });
Get Answer Counts
Now that our question message has been published to question_post, the admin account will allow the user 10 seconds to answer the question. We want to then consider up to 2 seconds latency between answers being sent in and results being published. Thus that adds up to a 12 second delay between the question being published and the answer results being published.
In order to do this we will use the function setTimeout(), which holds two parameters. The first is the function to be executed after a certain amount of time and the second is the amount of time to wait in milliseconds.
setTimeout(getResults, 12000);
Now we want to write our getResults() function, which must make a request to our getAnswers Function.
Before we make this request, let's write the code of our getAnswers Function.
We will model it as a REST API, so that it can perform different functions dependent on the route parameter which we will specify in the URL. We need 2 routes, one will be called getcount and the next one is reset. The route getcount will get the count of a specific option and the route reset will reset the count of a specific option to 0. Reset will be used after we display the answer results, since we want to reset every counter to prepare for the next question. Thus, we will write the code for reset in step 6.
With the following setup in our getAnswers Function, we declare our routes in an object called controllers. Then, we can define our functions for each route, using the following code.
let controllers = {
    getcount: {},
    reset: {}
};
controllers.getcount.post = () => {
...
};
controllers.reset.post = () => {
...
};
In order to determine which route specific function to invoke we will have the following logic. Here, we check to see if there is a method and route defined and if so, we will return the corresponding function. If not, we will return a 404 error.
const route = request.params.route;
const method = request.method.toLowerCase();
if (
    method &&
    route &&
    controllers[route] &&
    controllers[route][method]
) {
    return controllers[route][method]();
} else {
    response.status = 404;
    return response.send();
}
Now, we must actually fill in the blanks of what is done in getcount. We must extract the request parameter that the admin user will pass. This will be one of “A”, “B”, “C”, or “D”. Then, we will use JavaScript's template literals to make a string “optionA”, “optionB”, “optionC” or “optionD”. These are the keys of our Key-Value store for the counters of each option.
In the case that the request passed is one of the above accepted requests, our Function will get the count for that key and return it in jsonRes, else it will return a 400 error response.
var whichOption = JSON.parse(request.body).which;
var option_string = `option${ whichOption }`;
// Validates user input on the backend
if (whichOption !== 'A' &&
    whichOption !== 'B' && whichOption !== 'C' &&
    whichOption !== 'D') {
    response.status = 400;
    return response.send();
} else {
    return kvstore.getCounter(option_string).then((count) => {
        var jsonRes = {
            [option_string]: count
        };
        return response.send(jsonRes);
    });
}
Going back to the admin app, we will make 4 separate requests to the getAnswers function we just created. Each of the requests will have a parameter with key “which” that determines which option we are looking to perform the Function on. Thus, we will create a variable jsonReqOptions, that holds the parameter. We will also create a get_answers_url variable to hold the URL to this function.
var jsonReqOptions = {
    "body": {
        "which": "A"
    }
};
var get_answers_url = "URL OF GET ANSWERS FUNCTION";
Before making each request, we must ensure that our jsonReqOptions variable's value for which is the appropriate one for the request. Also, our URL must be the get_answers_url variable and the URL parameter of the route appended onto it.
In this case, since we are doing getcount first, it will be ?route=getcount that we append. Finally, as we defined in our Function, the request must be of type POST. In order to make our 4 requests cleaner, we will add a helper method request(), which allows us to “promisify” our requests. Using the responses we get from each request, firstResponse, secondResponse, thirdResponse, and fourthResponse, we can extract the count of how many users answered each option.
jsonReqOptions.body.which = "A";
    return request(get_answers_url + '?route=getcount', 'POST', jsonReqOptions).then((firstResponse) => {
        var countA = firstResponse.optionA;
        jsonReqOptions.body.which = "B";
        return request(get_answers_url + '?route=getcount', 'POST', jsonReqOptions).then((secondResponse) => {
            var countB = secondResponse.optionB;
            jsonReqOptions.body.which = "C";
            return request(get_answers_url + '?route=getcount', 'POST', jsonReqOptions).then((thirdResponse) => {
                var countC = thirdResponse.optionC;
                jsonReqOptions.body.which = "D";
                return request(get_answers_url + '?route=getcount', 'POST', jsonReqOptions).then((fourthResponse) => {
                    var countD = fourthResponse.optionD;
                    // TODO Publish answer results
                    // TODO Reset answer counts
                })
            })
        })
    }).catch((error) => {
        console.log(error);
    });
function request(url, method, options) {
    return new Promise((resolve, reject) => {
        const xhr = new XMLHttpRequest();
        let contentTypeIsSet = false;
        options = options || {};
        xhr.open(method, url);
        for (let header in options.headers) {
            if ({}.hasOwnProperty.call(options.headers, header)) {
                header = header.toLowerCase();
                contentTypeIsSet = header === 'content-type' ? true : contentTypeIsSet;
                xhr.setRequestHeader(header, options.headers[header]);
            }
        }
        if (!contentTypeIsSet) {
            xhr.setRequestHeader('Content-type', 'application/x-www-form-urlencoded');
        }
        xhr.onload = function() {
            if (xhr.status >= 200 && xhr.status < 300) {
                let response;
                try {
                    response = JSON.parse(xhr.response);
                } catch (e) {
                    response = xhr.response;
                }
                resolve(response);
            } else {
                reject({
                    status: xhr.status,
                    statusText: xhr.statusText,
                });
            }
        };
        xhr.send(JSON.stringify(options.body));
    });
}
Now, that we have obtained the answer counts, we are almost ready to publish this data to the players. This takes us to our next step!
Publish Answer Results
The admin will publish answer results to the channel answer_post which players will be subscribed to, using PubNub's Pub/Sub model. This channel will hold messages with counts for how many users answered each answer option and the correct answer option (either “optionA”, “optionB”, “optionC”, or “optionD”), all encoded in JSON. The message structure for both channels is shown below in the following example.
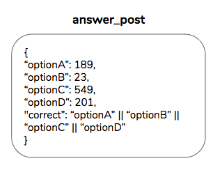
We have just obtained the answer counts through our Function getAnswers, so now all we need is the correct answer, denoted by “correct” key. In order to determine the correct answer that the admin has chosen, we will simply use a series of if statements to determine which radio button was selected.
var correctAnswer;
if (document.getElementById('a_correct').checked) {
    correctAnswer = "optionA";
} else if (document.getElementById('b_correct').checked) {
    correctAnswer = "optionB";
} else if (document.getElementById('c_correct').checked) {
    correctAnswer = "optionC";
} else if (document.getElementById('d_correct').checked) {
    correctAnswer = "optionD";
}
Now, that we've determined the correct answer and stored it in our variable correctAnswer, we may publish a message to the answer_post channel. We will call a helper method publishAnswerResults() to do this, and pass the counts for each answer option: countA, countB, countC, countD. The last parameter is the correctAnswer, which we obtained the value for. The call will look like this.
publishAnswerResults(countA, countB, countC, countD, correctAnswer);
function publishAnswerResults(countA, countB, countC, countD, correctAnswer) {
    pubnub.publish({
            message: {
                "optionA": countA,
                "optionB": countB,
                "optionC": countC,
                "optionD": countD,
                "correct": correctAnswer
            },
            channel: 'answer_post',
            sendByPost: false, // true to send via post
            storeInHistory: false //override default storage options
        },
        function(status, response) {
            if (status.error) {
                // handle error
                console.log(status);
            } else {
                console.log("message Published w/ timetoken", response.timetoken);
            }
        });
}
Reset Answer Counts
In order to reset the answer counts, we must make requests to our getAnswersFunction and define our reset route function. It will act similarly to getcount and first verify that the request parameter passed is one of the accepted requests. In that case it will get the counter with the key option_string. It will then use the kvstore's incrCounter() function and increment by the negative of the value, to set it to 0.
var whichOption = JSON.parse(request.body).which;
var option_string = `option${ whichOption }`;
// Validates user input on backend
if (whichOption !== 'A' &&
    whichOption !== 'B' && whichOption !== 'C' &&
    whichOption !== 'D') {
    response.status = 400;
    return response.send();
} else {
    return kvstore.getCounter(option_string).then((count) => {
        if (count !== 0) {
            console.log('Reset ' + whichOption);
            return kvstore.incrCounter(option_string, -1 * count).then((newCount) => {
                return response.send();
            });
        } else {
            return response.send();
        }
    }).catch((err) => {
        console.log(err);
    });
}
After publishing the answer results, we have one final thing to do: reset the counts for each answer option. We will do this a second after answer data is published, to allow time for possible latency.
setTimeout(resetCounters, 1000);
In resetCounters(), we will simply do the same exact thing as we did with getcount, except the route should be reset instead, so we know the right part of our function is being called. Thus we append ?route=reset to get_answers_url. Additionally, we won't be doing anything with the responses from these requests, since all we're doing is resetting counters.
function resetCounters() {
    jsonReqOptions.body.which = "A";
    return request(get_answers_url + '?route=reset', 'POST', jsonReqOptions).then((firstResponse) => {
      jsonReqOptions.body.which = "B";
        return request(get_answers_url + '?route=reset', 'POST', jsonReqOptions).then((secondResponse) => {
          jsonReqOptions.body.which = "C";
            return request(get_answers_url + '?route=reset', 'POST', jsonReqOptions).then((thirdResponse) => {
              jsonReqOptions.body.which = "D";
                return request(get_answers_url + '?route=reset', 'POST', jsonReqOptions).then((fourthResponse) => {
                    console.log('Reset all counters!');
                })
            })
        })
    }).catch((error) => {
        console.log(error);
    });
}
Congrats, we have now completed the admin side of our HQ Demo App. The Admin Panel now publishes questions and answer results live to the channels. It also resets the counts for how many players answered each option. Now, we must work on the player app and solidify the interface from which the game players can submit their answers and engage in the game experience.
Player App
Our Player App Development can be broken down into the following steps:
- Initial Setup of PubNub Android SDK
- Authentication with Access Manager
- Player App UI Elements Setup
- Loading Screen with Total Occupancy
- Display Question with Countdown Timer
- Submitting Player Answers
- Display Answer Results
Initial Setup of PubNub Android SDK
We will first complete the initial setup for the Android player app. We must add the following gradle dependencies into our Module build.gradle file in order to utilize the PubNub SDK, Android Volley Library, and MPAndroidChart Library.
implementation group: 'com.pubnub', name: 'pubnub-gson', version: '4.12.0'
implementation 'com.android.volley:volley:1.1.0'
implementation 'com.github.PhilJay:MPAndroidChart:v3.0.3'
We must then add the following line to our Project build.gradle file under allprojects and then repositories.
maven { url 'https://jitpack.io' }
Finally, we will add the following Android Manifest Permissions to allow our app to use the internet.
<uses-permission android:name="android.permission.INTERNET" />
<uses-permission android:name="android.permission.ACCESS_NETWORK_STATE" />
We will then make a Constants.java class that will declare all our important constants such as Subscribe Key and Publish Key. Enter the corresponding values into this file. Do not include the secret key on the player side!
Authentication with Access Manager
Our next step, will be to establish our Authentication requirements so that the game is secure from malicious users. Using Access Manager, this task becomes significantly easier. Our app must meet the following security requirements:
- Only the Admin can publish Questions and the Answer Results
- Only the Admin can read answer submissions
In the PubNub setup step, we enabled Access Manager into our PubNub app. With Access Manager, we are able to easily regulate access to all of our channels. Our rough outline for how Access Manager will work in our app is as follows:
- Our Admin will have the secret key so that they have read/write access to all channels.
- Our players will sign up when they first open the app. When they have signed up, we will generate a random UUID (Universal Unique Identifier), corresponding to their account. This UUID will also be used as their Auth Key, which is a String used to allow the user certain access into specific Access Manager controlled channels.
- Once the UUID is generated, a request will be made to our Function, grantAccess, from the user's device. The UUID will be passed as a parameter in this request. Inside the Function, we will grant the following permissions to the user's unique Auth Key (their UUID).
- We will allow read only access to the question_post channel and the answer_post channel. This will allow users to read question postings and answer result postings (when available), but prevent them from maliciously writing to these channels.
- Inside this function, we will also grant write only access to the submitAnswer channel. This will allow users to publish their own answers, but not read other users' submissions to this channel.
We will now write the SignupActivity from the player app to make the plan above possible. The SignupActivity will be the launcher activity, meaning that it is the activity launched first when the app is launched. To specify this, we must add the following code under the activity tag for SignupActivity in the AndroidManifest file.
<intent-filter>
      <action android:name="android.intent.action.MAIN" />
      <category android:name="android.intent.category.LAUNCHER" />
</intent-filter>
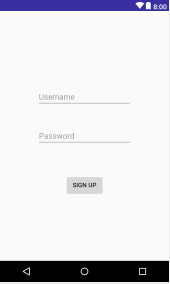
Our SignupActivity will have a very basic layout with a simple text field for both the username and password and then a submit button. Use either the drag and drop layout or the .xml file to create the following view for our SignupActivity.
<?xml version="1.0" encoding="utf-8"?>
<RelativeLayout
xmlns:android="http://schemas.android.com/apk/res/android"
xmlns:app="http://schemas.android.com/apk/res-auto"
xmlns:tools="http://schemas.android.com/tools"
android:layout_width="match_parent"
android:layout_height="match_parent"
tools:context=".SignupActivity">
<EditText
android:id="@+id/username"
android:layout_width="wrap_content"
android:layout_height="wrap_content"
android:layout_alignParentTop="true"
android:layout_centerHorizontal="true"
android:layout_marginTop="172dp"
android:ems="10"
android:hint="Username"
android:inputType="textPersonName" />
<EditText
android:id="@+id/password"
android:layout_width="wrap_content"
android:layout_height="wrap_content"
android:layout_centerInParent="true"
android:hint="Password"
android:ems="10"
android:inputType="textPassword" />
<Button
android:id="@+id/signup"
android:layout_width="wrap_content"
android:layout_height="wrap_content"
android:layout_alignParentBottom="true"
android:layout_centerHorizontal="true"
android:layout_marginBottom="148dp"
android:onClick="signUp"
android:text="Sign Up" />
</RelativeLayout>
For the sake of our demo, however, we will not use the username and password that the user enters but rather, we will simply randomly generate their UUID, once the user presses the submit button. This UUID will be stored locally on the device using SharedPreferences, a class offered by Android.
Thus, on the onClick method for the submit button, we must first generate a random UUID and store this locally onto the user's device using SharedPreferences, under the key “uuid”. This is shown below in the following code. In order to create an onClick method, simply add the onClick android attribute to your button XML tag in the signupactivity's layout.xml file. Then create a method with the exact same signature as the one defined in your xml file.
public void signUp(View v) {
// SET UUID in SharedPreferences
SharedPreferences.Editor editor = pref.edit();
String uuid = UUID.randomUUID().toString();
editor.putString("uuid", uuid);
editor.commit();
...
}
Then in the same signUp() method, we will call our Function grantAccess. Here, we use Android's Volley Library to make a request to our grantAccess Function. In this request we pass a JSONObject, with “uuid” as the key and we pass the value to be what we just stored in our SharedPreferences instance. To get the value from our SharedPreferences, we can use the following line of code. pref.getString("uuid", null)
Here we are getting the string with key “uuid” and null as the default value, if there is no such value. In order to get the grantAccess URL, navigate over to the Functions code editor and click on the copy URL button. In the onResponse() callback, we will use a Toast Message to show the user that they have successfully been signed up and granted their user access permissions. They will then be redirected to the MainActivity where they can play the game. With the queue.add(), we can make the request to our Function while passing our request parameters through a JSON Object. This is all shown in the code snippet below.
private void grantAccess() {
    // Instantiate the RequestQueue.
    RequestQueue queue = Volley.newRequestQueue(this);
    try {
        JSONObject requestParams = new JSONObject();
        requestParams.put("uuid", pref.getString("uuid", null));
        JsonObjectRequest jsonObjectRequest = new JsonObjectRequest
                (Request.Method.POST, Constants.GRANT_ACCESS_FUNCTION_URL, requestParams, new Response.Listener<JSONObject>() {
                    @Override
                    public void onResponse(JSONObject response) {
                        Toast.makeText(SignupActivity.this, "You've been signed up!", Toast.LENGTH_LONG).show();
                        startActivity(new Intent(SignupActivity.this, MainActivity.class));
                    }
                }, new Response.ErrorListener() {
                    @Override
                    public void onErrorResponse(VolleyError error) {
                        Log.d("Error", error.toString());
                    }
                }) {
            @Override
            public Map<String, String> getHeaders() {
                HashMap<String, String> headers = new HashMap<String, String>();
                headers.put("Content-Type", "application/json; charset=utf-8");
                headers.put("User-agent", "user");
                return headers;
            }
        };
        queue.add(jsonObjectRequest);
    } catch (JSONException e) {
        e.printStackTrace();
    }
}
Now, we must write the code in our grantAccess Function in the editor online. First, we must extract the UUID that has been passed as a parameter in the request.
var uuid = JSON.parse(request.body).uuid;
Using this value, we will add the following code to grant access to the user's auth key (their UUID). We will make two grant() calls, as we defined earlier. One to allow read only access to the channels question_post and answer_post. And the second to allow write only access to submitAnswer. We will nest the second call inside the .then() of the first call, so that the second is executed once the first is completed successfully. In the case that there is an error we will send back a 500 Error response. In the case that the grants were completed successfully we will send back a 200 OK response. This is shown in the below code.
return pubnub.grant({
        channels: ['question_post', 'answer_post', 'presence'],
        read: true, // false to disallow
        write: false, // false to disallow,
        authKeys: [uuid],
        ttl: 0
    }).then(() => {
        return pubnub.grant({
            channels: ['submitAnswer'],
            read: false, // false to disallow
            write: true, // false to disallow,
            authKeys: [uuid],
            ttl: 0
        }).then(() => {
            response.status = 200;
            return response.send({});
        });
    }).catch(() => {
        console.log('500');
        response.status = 500;
        return response.send();
    });
Finally, we will add the following code in the onCreate() method of our SignupActivity. This will check if the user has already signed up, or in other words, there is already a randomly generated UUID stored locally on the device. If so we will automatically redirect the user to the MainActivity, where the user can play the game. If not, the user will remain in the SignupActivity, so they can sign up. This is shown in the following code.
// SharedPreferences object used to store UUID locally on device.
pref = getApplicationContext().getSharedPreferences("pref", 0);
// If user already has created account and has UUID, then go to MainActivity.
if (pref.contains("uuid")) {
     startActivity(new Intent(SignupActivity.this, MainActivity.class));
}
Now, we have successfully completed the authorization with Access Manager security part of our app. Next, we will move on to the game functionality in the MainActivity.
Player App UI Elements Setup
In this step, we will first be writing our layout file for MainActivity, the central Activity file for the player's game experience. The layout elements we'll need for this activity are:
Once User enters MainActivity
- ProgressBar(Loading Spinner), TextView (label explaining what user is waiting for).
- TextView (Number of Players)
Once Question is published by Admin
- TextView (Question)
- Button (option A), Button (optionB), Button (optionC), Button (optionD)
- TextView (time left)
Once 10 seconds to answer the question is over
- TextView (correct answer)
- HorizontalBarChart (displays answer results)
In the beginning we want only a loading spinner and the number of players to show, so the user knows that they are waiting for the question to be posted. These will be the only UI Elements in the Layout file that are visible. Everything else will be declared as gone, with the attribute android:visibility="gone". They will be programmatically set to visible in our MainActivity code, when the time is appropriate. The entire layout file is shown here.
Now, we'll initialize the UI elements in code in the MainActivity class. We must start by declaring our class fields that we will need. The String optionChosen, will hold either “optionA”, “optionB”, “optionC”, “optionD” and is used to store the option that the user has currently chosen. After 10 seconds is over, this string will be published as a message to the channel submitAnswer. OPTION_A, OPTION_B, OPTION_C, and OPTION_D are constants used to store the string representation of each option. This is used to minimize coding errors from hardcoded strings. Finally, we will use our PubNub instance to subscribe to the question_post and answer_post channel and then publish to the submitAnswer channel.
private TextView question, numPlayers, timeLeft, answer, loadingText;
private Button aButton, bButton, cButton, dButton;
private ProgressBar loadingSpinner;
private PubNub pubNub;
private String questionText, optionAText, optionBText, optionCText, optionDText;
private HorizontalBarChart answerResultsChart;
private ImageView questionImage;
private String optionChosen; // Must be optionA, optionB, optionC, or optionD. Use the constants defined below.
private final String OPTION_A = "optionA";
private final String OPTION_B = "optionB";
private final String OPTION_C = "optionC";
private final String OPTION_D = "optionD";
In onCreate(), which is called when MainActivity is created, we will first initialize all of our UI Elements by using the method findViewById() and passing the ID's we set in the layout file as parameters.
question = findViewById(R.id.question);
questionImage = findViewById(R.id.questionImage);
answer = findViewById(R.id.answer);
answerResultsChart = findViewById(R.id.answerResultsChart);
timeLeft = findViewById(R.id.timeLeft);
numPlayers = findViewById(R.id.numPlayers);
aButton = findViewById(R.id.optionA);
bButton = findViewById(R.id.optionB);
cButton = findViewById(R.id.optionC);
dButton = findViewById(R.id.optionD);
loadingSpinner = findViewById(R.id.progressBar);
loadingText = findViewById(R.id.loadingTextView);
Loading Screen with Total Occupancy
Inside our method onCreate(), we will call initPubNub(). Through this method, we will be able to initialize the PubNub instance on the player's app. We will pass the credentials that we already entered in our Constants.java class. We must set our auth key to the UUID that has been granted player specific access. After initializing the PubNub instance, we will call helper method updateUI(), which will help us display the total occupancy of players currently playing the game.
private void initPubNub() {
        PNConfiguration pnConfiguration = new PNConfiguration();
        // Local Device Storage to store user's UUID (Universal Unique ID)
        SharedPreferences pref = getApplicationContext().getSharedPreferences("pref", 0);
        pnConfiguration.setUuid(pref.getString("uuid", null));
        pnConfiguration.setSubscribeKey(Constants.PUBNUB_SUBSCRIBE_KEY);
        pnConfiguration.setPublishKey(Constants.PUBNUB_PUBLISH_KEY);
        pnConfiguration.setAuthKey(pref.getString("uuid", null));
        pnConfiguration.setSecure(true);
        pubNub = new PubNub(pnConfiguration);
        updateUI();
    }
At the end of initPubNub(), we are calling updateUI(), which will use the PubNub instance to call its hereNow() method, which will allow us to track how many users are currently subscribed to the question_post channel (how many users are playing the game at the moment). Inside the onResponse() callback method, we then use getTotalOccupancy(), to find this number and set the text of our TextView numPlayers to it.
private void updateUI() {
    // TODO Subscribe to channels and add listener
    // Used to maintain the current occupancy of the channels,
    // or in other words, players playing the game at the moment.
    pubNub.hereNow()
            .channels(Arrays.asList(Constants.POST_QUESTION_CHANNEL))
            .includeUUIDs(true)
            .async(new PNCallback<PNHereNowResult>() {
                @Override
                public void onResponse(final PNHereNowResult result, PNStatus status) {
                    if (status.isError()) {
                        // handle error
                        return;
                    }
                    runOnUiThread(new Runnable() {
                        @Override
                        public void run() {
                            numPlayers.setText(String.valueOf(result.getTotalOccupancy())); // Displays current number of players
                        }
                    });
                }
            });
}
Now our player app displays a loading screen and the total number of occupants playing the game. However, it will not work properly yet, since our players are not subscribed to the channels. This takes us to our next step.
Display Question with Countdown Timer
Before displaying the question to the player, we must ensure that they are subscribed to the appropriate channels. Thus, we will add the following lines of code to updateUI() in order to subscribe to question_post and answer_post. We will also add a listener with a message() callback method for when a message is published to either channel. In the callback method, will use a simple if-else statement to determine which channel the message has been published to and act accordingly. We'll also subscribe to both channels after adding the listener.
pubNub.addListener(new SubscribeCallback() {
       @Override
       public void status(PubNub pubnub, PNStatus status) {
          // Empty, not needed.
       }

       @Override
       public void message(PubNub pubnub, final PNMessageResult message) {
           runOnUiThread(new Runnable() {
               @Override
               public void run() {
                  // New Question has just been posted
                   if (message.getChannel().equals(Constants.POST_QUESTION_CHANNEL)) {
                       // TODO SHOW QUESTION
                   }
                  // New Answer Result has just been posted
                   else {
                       // TODO SHOW ANSWER RESULTS
                   }
               }
           });
       }

       @Override
       public void presence(PubNub pubnub, final PNPresenceEventResult presence) {
          // Empty, not needed.
       }
   });

   pubNub.subscribe()
           .channels(Arrays.asList(Constants.POST_QUESTION_CHANNEL, Constants.POST_ANSWER_CHANNEL)) // subscribes to channels
           .execute();
Now to display the question to our players, we want to call our method showQuestion(), which will take a PNMessageResult object as a parameter. From this object, it will extract the question, and answer options. It will then set the question TextView to its appropriate text, the text of the buttons for each option to their appropriate text. Using method setVisibility(View.VISIBLE), it will make these UI Elements all visible. We must also make the loading spinner disappear by setting its visibility to gone, with setVisibility(View.GONE).
A 10 second timer will then be started where each second, the TextView showing time left will be updated. We will do this using the CountDownTimer class provided in Android. Instantiating this class takes two parameters: the total milliseconds of timer and the ticking interval in milliseconds. We will set the first to 10000 (10 seconds) and second to 1000(1 second), so it ticks every second for 10 seconds. Then once the timer is finished, callback method onFinish() will be invoked.
private void showQuestion(PNMessageResult message) {
        questionText = message.getMessage().getAsJsonObject().get("question").getAsString();
        optionAText = message.getMessage().getAsJsonObject().get(OPTION_A).getAsString();
        optionBText = message.getMessage().getAsJsonObject().get(OPTION_B).getAsString();
        optionCText = message.getMessage().getAsJsonObject().get(OPTION_C).getAsString();
        optionDText = message.getMessage().getAsJsonObject().get(OPTION_D).getAsString();
        question.setText(questionText);
        question.setVisibility(View.VISIBLE);
        questionImage.setVisibility(View.VISIBLE);
        timeLeft.setVisibility(View.VISIBLE);
        aButton.setText(optionAText);
        aButton.setVisibility(View.VISIBLE);
        bButton.setText(optionBText);
        bButton.setVisibility(View.VISIBLE);
        cButton.setText(optionCText);
        cButton.setVisibility(View.VISIBLE);
        dButton.setText(optionDText);
        dButton.setVisibility(View.VISIBLE);
        loadingSpinner.setVisibility(View.GONE);
        loadingText.setVisibility(View.GONE);
        new CountDownTimer(10000, 1000) {
            public void onTick(long millisUntilFinished) {
                timeLeft.setText(String.valueOf(millisUntilFinished / 1000));
            }
            public void onFinish() {
               // TODO Send Player's answer to submitAnswer channel
               // TODO Display Answer Results
            }
        }.start();
    }
Now, we have setup the players' subscriptions, along with the listener that will display the question/answer options and a 10 second timer once the admin has published a question.
Submitting Player Answers
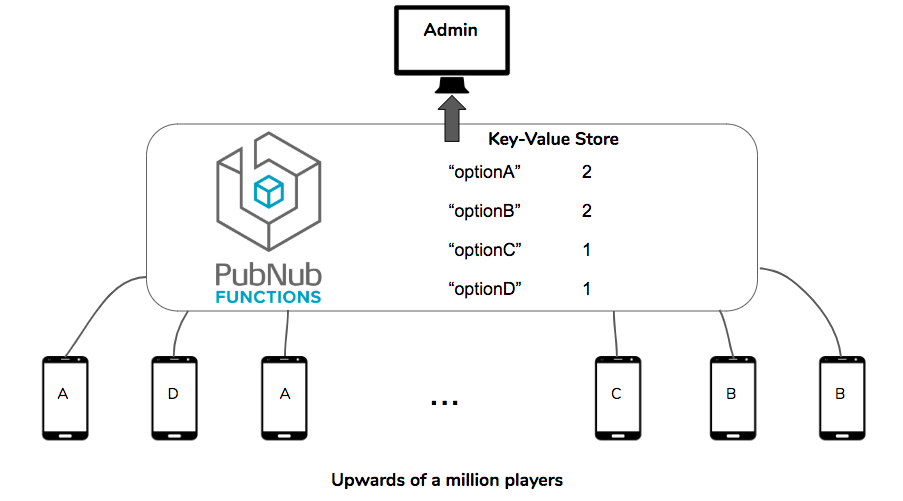
We will use Functions to handle our answer submissions. Each player's device will use the PubNub fire() method to send a message, specifying which answer option they have chosen, to the channel submitAnswer. fire() is essentially the same as publish(), except it does not replicate the messages to servers across the world, but rather only to the servers in the geographical region of the app's users. This is a good practice to minimize usage.
Using our Function, submitAnswer, that has event type After Publish or Fire, we check which answer each user has chosen. Using the Key-Value Store feature, we can then maintain counters for how many players answered each answer option. This is shown in the diagram below.
Before writing onFinish(), we will write our onClick methods for each answer option's button. We want to set the background color of the button that is currently pressed to a shade of blue indicating that it is the currently selected answer option. We also want to set our variable optionChosen to the appropriate answer option string.
 /*
    Called when user presses A button.
 */
public void pressedA(View v) {
    aButton.setBackgroundColor(Color.rgb(63, 81, 181));
    bButton.setBackgroundColor(0x00000000);
    cButton.setBackgroundColor(0x00000000);
    dButton.setBackgroundColor(0x00000000);
    optionChosen = OPTION_A;
}
/*
    Called when user presses B button.
 */
public void pressedB(View v) {
    aButton.setBackgroundColor(0x00000000);
    bButton.setBackgroundColor(Color.rgb(63, 81, 181));
    cButton.setBackgroundColor(0x00000000);
    dButton.setBackgroundColor(0x00000000);
    optionChosen = OPTION_B;
}
/*
    Called when user presses C button.
 */
public void pressedC(View v) {
    aButton.setBackgroundColor(0x00000000);
    bButton.setBackgroundColor(0x00000000);
    cButton.setBackgroundColor(Color.rgb(63, 81, 181));
    dButton.setBackgroundColor(0x00000000);
    optionChosen = OPTION_C;
}
/*
    Called when user presses D button.
 */
public void pressedD(View v) {
    aButton.setBackgroundColor(0x00000000);
    bButton.setBackgroundColor(0x00000000);
    cButton.setBackgroundColor(0x00000000);
    dButton.setBackgroundColor(Color.rgb(63, 81, 181));
    optionChosen = OPTION_D;
}
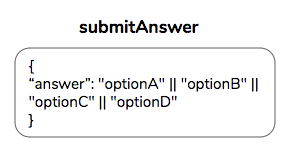
Now in the onFinish() method of our CountDownTimer, we will call a method makeRequestToPubNubFunction() and make the answer option buttons' visibilities gone, so that users cannot submit an answer after the 10 seconds are over. In makeRequestToPubNubFunction(), we simply send a JSON message with key “answer” and value as “optionA”, “optionB”, “optionC”, or “optionD”, as specified below. We will then use PubNub's fire() method to send the user's answer to the submitAnswer channel.
 /** Uses PubNub fire method to efficiently send user's answer over to submitAnswer channel.
 * @param optionChosen this is the option that the user has chosen.
 */
private void makeRequestToPubNubFunction(final String optionChosen) {
    try {
        JSONObject answerObj = new JSONObject();
        answerObj.put("answer", optionChosen);
        pubNub.fire()
                .message(answerObj)
                .channel(Constants.SUBMIT_ANSWER_CHANNEL)
                .usePOST(false)
                .async(new PNCallback<PNPublishResult>() {
                    @Override
                    public void onResponse(PNPublishResult result, PNStatus status) {
                        if (status.isError()) {
                            // something bad happened.
                            System.out.println("error happened while publishing: " + status.toString());
                        } else {
                            System.out.println("publish worked! timetoken: " + result.getTimetoken());
                        }
                    }
                });
    } catch (JSONException e) {
        e.printStackTrace();
    }
}
Now, we want to write our After Publish or Fire Function submitAnswer, which is called when the player's device fires a message to the submitAnswer channel. We will simply obtain the user's answer, through simple JSON parsing. Then we will increment our counters, “optionA”, “optionB”, “optionC”, and “optionD” appropriately using the kvstore's incrCounter() function.
var answer = request.message.nameValuePairs.answer;
if (answer !== "optionA" && answer !== "optionB" && answer !== "optionC" &&
    answer !== "optionD") {
    response.status = 400;
    return response.send();
} else {
    kvstore.incrCounter(answer, 1);
}
return request.ok(); // Return a promise when you're done
Now, we've successfully made a fire() call to the submitAnswer Function from each player device and written the function so it increments the counter of the answer option each user has chosen.
Display Answer Results
First, we will display the correct answer, using our method showCorrectAnswer(), if a message has been published to our answer_post channel. This method takes in a parameter of a PNMessageResult object. Thus, we will make the following call in the message() callback, in the else case that the message is from channel answer_post.
showCorrectAnswer(message);
This method first checks whether the optionChosen is null. If so, the user did not enter an answer, it will tell the user they ran out of time. If the user's optionChosen string matches correct, it will congratulate them. Otherwise it will apologize for their loss. Then it will state what the correct answer was. This text must then be made visible and set as the text for our TextView answer.
private void showCorrectAnswer(PNMessageResult message) {
        String correct = message.getMessage().getAsJsonObject().get("correct").getAsString();
        String correctAnswerMessage = "";
        if (optionChosen == null) {
            correctAnswerMessage += "You ran out of time. ";
        } else if (optionChosen.equals(correct)) {
            correctAnswerMessage += "Good Job! ";
        } else {
            correctAnswerMessage += "Sorry, you are wrong. ";
        }
        if (correct.equals(OPTION_A)) {
            correctAnswerMessage += optionAText;
        } else if (correct.equals(OPTION_B)) {
            correctAnswerMessage += optionBText;
        } else if (correct.equals(OPTION_C)) {
            correctAnswerMessage += optionCText;
        } else if (correct.equals(OPTION_D)) {
            correctAnswerMessage += optionDText;
        }
        correctAnswerMessage += " was the answer.";
        answer.setVisibility(View.VISIBLE);
        answer.setText(correctAnswerMessage);
    }
Next, we want to display the statistics of how many users answered each option. We must first obtain the data from the answer_post channel message.
Thus right after our showCorrectAnswer(message) call, we will the following call.
showAnswerResults(message)
This method will first extract the counts for how many players answered each option. To do this, it will get the value for the keys “optionA”, “optionB”, “optionC”, and “optionD” in an answer_post channel message. It will then add the counts in reverse order, since MPAndroidChart's BarEntry class operates as a stack. Then we will also add the options' texts to the chart's xAxis, so we can see the label of the option by its bar on the chart. We must then make our answerResultsChart view visible, so users can see it.
private void showAnswerResults(PNMessageResult message) {
    int countA = message.getMessage().getAsJsonObject().get(OPTION_A).getAsInt();
    int countB = message.getMessage().getAsJsonObject().get(OPTION_B).getAsInt();
    int countC = message.getMessage().getAsJsonObject().get(OPTION_C).getAsInt();
    int countD = message.getMessage().getAsJsonObject().get(OPTION_D).getAsInt();
    // Enter them backwards since BarEntry ArrayLists work like a stack.
    ArrayList<BarEntry> entries = new ArrayList<>();
    entries.add(new BarEntry(0, countD));
    entries.add(new BarEntry(1, countC));
    entries.add(new BarEntry(2, countB));
    entries.add(new BarEntry(3, countA));
    BarDataSet dataSet = new BarDataSet(entries, "Results");
    dataSet.setDrawValues(true);
    dataSet.setColors(ColorTemplate.VORDIPLOM_COLORS);
    dataSet.setValueTextColor(Color.DKGRAY);
    dataSet.setValueFormatter(new DecimalRemover());
    BarData data = new BarData(dataSet);
    data.setValueTextSize(13f);
    data.setBarWidth(1f);
    ArrayList<String> xAxis = new ArrayList<>();
    xAxis.add(optionDText);
    xAxis.add(optionCText);
    xAxis.add(optionBText);
    xAxis.add(optionAText);
    // Hide grid lines
    answerResultsChart.getAxisLeft().setEnabled(false);
    answerResultsChart.getAxisRight().setEnabled(false);
    answerResultsChart.getXAxis().setDrawGridLines(false);
    // Hide graph description
    answerResultsChart.getDescription().setEnabled(false);
    // Hide graph legend
    answerResultsChart.getLegend().setEnabled(false);
    answerResultsChart.setData(data);
    answerResultsChart.getXAxis().setValueFormatter(new IndexAxisValueFormatter(xAxis));
    answerResultsChart.getXAxis().setLabelCount(xAxis.size());
    answerResultsChart.animateXY(1000, 1000);
    answerResultsChart.invalidate();
    answerResultsChart.setVisibility(View.VISIBLE);
}
Now, we have shown our answer results to our players, who are subscribed to the answer_post channel. We have successfully completed all the steps of our Player App.
Further Optimizations
If you wish to further develop this demo, one good practice would be to change the ttl during the granting access portion of our app code. Using 0 is not a recommended security practice, since this means that access is granted permanently. A better practice would be to have the access token expire in a set amount of time and if a user is not able to obtain access, since their token has expired, to refresh their token. For sake of simplicity in our demo we used 0.
Additionally, you could work on expanding the demo so that it allows users to engage in a 10 question quiz experience, instead of just one.
Conclusion
Congrats! We have now successfully built our functional HQ Demo App on the admin side and the player side. If you are testing your app, ensure that the module for your Functions is running. Click here for the full source code.