Building a React Native Chat App- Part 3: Online User Count
Welcome to part three of our tutorial series on building a fully-featured React Native chat app. In our previous two parts, we covered basic messaging, UI and crude authentication, and added message persistence. If you haven’t already, complete parts one and two, as they lay the groundwork for what we’ll cover going forward.
In this part, we will learn how to display an online user count to identify how many users are in the chatroom in realtime. To implement this feature in our app, we are going to use Presence.
Activating Presence
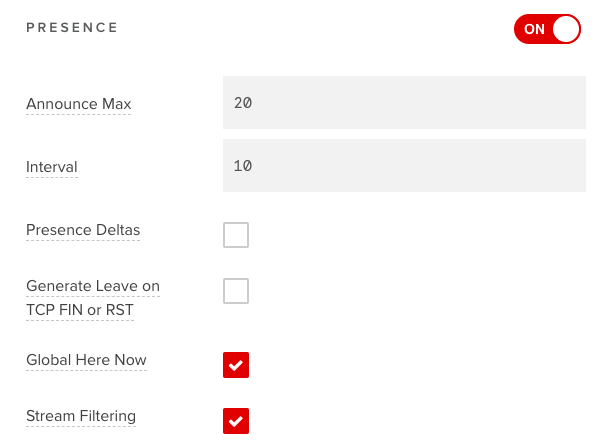
To activate Presence, navigate to the PubNub Admin Dashboard. The dashboard will have multiple configurations which you can see in the screenshot below. The minimum value set for the interval is 10 seconds. This will help when you are in dev mode. To reduce costs in production, raise this number to a larger interval length, like 1 minute.
Users will trigger the following presence events in the channels they subscribe to:
- join – A user subscribes to a channel.
- leave – A user unsubscribes from a channel.
- timeout – A timeout event is fired when a connection to a channel is severed and the subscriber has not been seen in 320 seconds (just over 5 minutes). This timeout interval can be customized using the heartbeat and heartbeat interval settings (SDK v3.6 or later).
- state-change – A state-change event will be fired any time the state is changed using the state API (function signature varies by SDK).
- interval – An occupancy count is sent every 10 seconds (the default setting for the Presence Interval property, which is also configurable in the Presence add-on settings in your admin dashboard).
Activating Presence in our React Native App
In this step, we are going to activate Presence in our React Native chat app that we've built up in our previous parts.
First, you need to change the hardcoded “MainChat1” room name to a variable as shown in the code snippet below (MainChat.js file):
const RoomName = "MainChat1";
Then, you need to add UUID to identify the device and add a timeout for dev mode, which you can see in the code snippet below (MainChat.js file):
this.pubnub = new PubNubReact({
  publishKey: "yourapikeyhere",
  subscribeKey: "yourapikeyhere",
  uuid: this.props.navigation.getParam("username"),
  presenceTimeout: 10
});
Then, you need to activate Presence when subscribing to the channel by setting the withPresence state to true like in the code snippet below:
this.pubnub.subscribe({
  channels: [RoomName],
  withPresence: true
});
This completes the setup of Presence in our application.
Handling Presence State
In this step, we are going to handle the presence states. Start off by creating a new state object. This will handle data like messages, online users, and online user count like shown in the code snippet below. Put this in the constructor of MainChat:
this.state = {
  isTyping: false,
  messages: [],
  onlineUsers: [],
  onlineUsersCount: 0
};
Handling Presence Events
Here we are going to handle the Presence event. First, you need to create a new function named PresenceStatus and get presence state using a getPresence function and pass two parameters. They are the room name and a callback function, which is shown in the code snippet below. Put these in the MainChat class:
PresenceStatus = () => {
    this.pubnub.getPresence(RoomName, presence => {})
}
Note: There are two types of events that we need to handle, which are user-generated and PubNub generated.
PubNub Presence Events
These are user-generated events such as logging in, logging out, etc. When a user clicks on login, it generates a join event. When a user clicks on logout to close the app, it generates a leave event and when a user doesn’t do anything for a while, it generates a timeout event.
Join Event
The join event is very simple. Whenever a user successfully logs into the app, they join the chat room and receive a join event. This can be done by using the code in the following code snippet:
PresenceStatus = () => {
    this.pubnub.getPresence(RoomName, presence => {
        if (presence.action === "join") {
            let users = this.state.onlineUsers;
            users.push({
                state: presence.state,
                uuid: presence.uuid
            });
            this.setState({
                onlineUsers: users,
                onlineUsersCount: this.state.onlineUsersCount + 1
            });

        }
    })
}
First, we need to check if the presence event is a “join.” Then we add the new user to the state collection. Finally, we update the React State instance.
Leave or Timeout Events
Next, we generate a leave event and timeout event whenever the user logs out or times-out of the chatroom. When a user clicks “back” or anything that initiates the componentDidMount event, the app generates a leave event.
When a user is idle for too long, they get pushed out of the chat room. The code to implement this is provided in the code snippet below. Add this to your PresenceStatus function:
if (presence.action === "leave" || presence.action === "timeout") {
    let leftUsers = this.state.onlineUsers.filter(
      users => users.uuid !== presence.uuid
    );

    this.setState({
      onlineUsers: leftUsers
    });

    const length = this.state.onlineUsers.length;
    this.setState({
      onlineUsersCount: length
    });
    this.props.navigation.setParams({
      onlineUsersCount: this.state.onlineUsersCount
    });
}
First, we get other users and filter them out of the state, then put data back into the state. Then we need to count online users and put the count back into the onlineUsersCount state, as shown in the code snippet.
PubNub Network Presence Events
This part of the tutorial addresses the events generated by PubNub. The interval event is a PubNub network generated event. We can use this when a user comes online on the channel. They will be able to see a realtime update such as online users joining/leaving. Also, users can identify which other users are online.
We will do the same logic as user-generated events, but by checking conditions in the interval event data.
Join Event
Add this to your PresenceStatus function:
if (presence.action === "interval") {
    if (presence.join || presence.leave || presence.timeout) {
        let onlineUsers = this.state.onlineUsers;
        let onlineUsersCount = this.state.onlineUsersCount;

        if (presence.join) {
            presence.join.map(
                user =>
                user !== this.uuid &&
                onlineUsers.push({
                    state: presence.state,
                    uuid: user
                })
            );

            onlineUsersCount += presence.join.length;
        }
    }
}
First, we are checking for an interval event. If new member matches the criteria, then we get current state data and create a new state instance. This gets pushed to the array of online users as seen in the code snippet above.
Next we are going to check the state after a join event. If the new UUID does not match a UUID in the collection, then we assume that the new user needs to be added to the onlineUsers collection. Then we increase the onlineUsersCount number.
Leave Event
if (presence.leave) {
  presence.leave.map(leftUser =>
    onlineUsers.splice(onlineUsers.indexOf(leftUser), 1)
  );
  onlineUsersCount -= presence.leave.length;
}
For the leave event, we are going to keep the track of users that leave, and splice them from onlineUsers array. Then we need to decrease the onlineUsersCount instance to decrease the count of online users.
Timeout Event
Here, we need to do the same process as the leave event.
if (presence.timeout) {
  presence.timeout.map(timeoutUser =>
    onlineUsers.splice(onlineUsers.indexOf(timeoutUser), 1)
  );
  onlineUsersCount -= presence.timeout.length;
}
We add the update state logic, like in the code snippet below:
this.setState({
    onlineUsers,
    onlineUsersCount
});
Next, update the componentWillMount function with the following code:
componentWillMount() {
  this.props.navigation.setParams({
    onlineUsersCount: this.state.onlineUsersCount,
    leaveChat: this.leaveChat.bind(this)
  });
  this.pubnub.subscribe({
    channels: [RoomName],
    withPresence: true
  });
  this.pubnub.getMessage(RoomName, m => {
    this.setState(previousState => ({
      messages: GiftedChat.append(previousState.messages, m["message"])
    }));
  });

  // this.hereNow();
  this.PresenceStatus();
}
Now we are done with implementing code for PresenceStatus.
Display Presence Data
In this section, we are going to display state data that we manipulated in the last section. First, we are going to display data on the navbar. Then we are going to display the user’s avatars below the navbar.
Display User Count
Navbar is a component that is generated from the React Navigation package. We need to pass the onlineUserCount state to the navbar. Then we need to set parameters from outside the navbar scope to get the parameter from the navbar.
Setting State Data on Update
We have multiple lines where we need to update onlineUserCount. So, we are going to pass it as a parameter, as shown in the code snippet below (MainChat.js):
componentWillMount() {
  this.props.navigation.setParams({
    onlineUsersCount: this.state.onlineUsersCount
  });
}
Your PresenceStatus function should look like this:
PresenceStatus = () => {
  this.pubnub.getPresence(RoomName, presence => {
    if (presence.action === "join") {
      let users = this.state.onlineUsers;

      users.push({
        state: presence.state,
        uuid: presence.uuid
      });

      this.setState({
        onlineUsers: users,
        onlineUsersCount: this.state.onlineUsersCount + 1
      });
      this.props.navigation.setParams({
        onlineUsersCount: this.state.onlineUsersCount
      });
    }

    if (presence.action === "leave" || presence.action === "timeout") {
      let leftUsers = this.state.onlineUsers.filter(
        users => users.uuid !== presence.uuid
      );

      this.setState({
        onlineUsers: leftUsers
      });

      const length = this.state.onlineUsers.length;
      this.setState({
        onlineUsersCount: length
      });
      this.props.navigation.setParams({
        onlineUsersCount: this.state.onlineUsersCount
      });
    }

    if (presence.action === "interval") {
      if (presence.join || presence.leave || presence.timeout) {
        let onlineUsers = this.state.onlineUsers;
        let onlineUsersCount = this.state.onlineUsersCount;

        if (presence.join) {
          presence.join.map(
            user =>
              user !== this.uuid &&
              onlineUsers.push({
                state: presence.state,
                uuid: user
              })
          );

          onlineUsersCount += presence.join.length;
        }

        if (presence.leave) {
          presence.leave.map(leftUser =>
            onlineUsers.splice(onlineUsers.indexOf(leftUser), 1)
          );
          onlineUsersCount -= presence.leave.length;
        }

        if (presence.timeout) {
          presence.timeout.map(timeoutUser =>
            onlineUsers.splice(onlineUsers.indexOf(timeoutUser), 1)
          );
          onlineUsersCount -= presence.timeout.length;
        }

        this.setState({
          onlineUsers,
          onlineUsersCount
        });
        this.props.navigation.setParams({
          onlineUsersCount: this.state.onlineUsersCount
        });
      }
    }
  });
};
Online User Count Data in The NavBar
To update the navbar with state data, we can get data from parameters, like in the code snippet below:
static navigationOptions = ({ navigation }) => {
  return {
    headerTitle:
      navigation.getParam("onlineUsersCount") + " member online"
  };
};
We need to add navigationOptions which is the variable used to configure the navbar. Then, using getParam and onlineUsersCount, we can set the text in the UI.
Display Online Users in Chat with an Avatar
In the next step, we will implement avatars for presence below the navbar. For this, you need to copy the code provided in the code snippet below and replace it in your MainChat.js file.
  render() {
    let username = this.props.navigation.getParam("username");
    return (
      <View style={{ flex: 1 }}>
        <View style={styles.online_user_wrapper}>
          {this.state.onlineUsers.map((item, index) => {
            return (
              <View key={item.uuid}>
                <Image
                  key={item.uuid}
                  style={styles.online_user_avatar}
                  source={{
                    uri: "https://robohash.org/" + item.uuid
                  }}
                />
              </View>
            );
          })}
        </View>
        <GiftedChat
          messages={this.state.messages}
          onSend={messages => this.onSend(messages)}
          user={{
            _id: username,
            name: username,
            avatar: "https://robohash.org/" + username
          }}
        />
      </View>
    );
  }
}
Next, we are going to create a main wrapper that wraps a new section and chat view. Then we need to add a wrapper to contain the avatar and iterate through the onlineUsers state collection. We will create a unique image for each user using robohash.
Then, finally complete it by adding some CSS, like in the code snippet below (MainChat.js):
const styles = StyleSheet.create({
  online_user_avatar: {
    width: 50,
    height: 50,
    borderRadius: 20,
    margin: 10
  },
  container: {
    flex: 1,
    justifyContent: "center",
    alignItems: "center",
    backgroundColor: "#F5FCFF"
  },
  welcome: {
    fontSize: 20,
    textAlign: "center",
    margin: 10
  },
  online_user_wrapper: {
    height: "8%",
    justifyContent: "flex-end",
    alignItems: "center",
    flexDirection: "row",
    backgroundColor: "grey",
    flexWrap: "wrap"
  }
});
Chat Logout Functionality
Before we consider this tutorial section complete, let's implement a logout feature for our chat app. When the user clicks on logout, the presence data needs to be adjusted. Also, the user must unsubscribe from the channel.
Create a leaveChat function
Here, we are going to create a leaveChat function like shown in the code snippet below (MainChat.js):
leaveChat = () => {
  this.pubnub.unsubscribe({ channels: [RoomName] });
  return this.props.navigation.navigate("Login");
};
When the function is executed, the user will be unsubscribed from the PubNub channel and redirected to the Login screen.
We need to invoke this function in two places, which are mentioned below. Before we implement a componentWillUnmount function, we need to implement the leaveChat function as shown in the code snippet below:
componentWillUnmount() {
  this.leaveChat();
}
Add Logout to the NavBar
We are adding the function to the logout button click in the navbar. This is to cover a user logging out manually. We will save some screen space by passing it to the header, like in the code snippet below. Modify your componentWillMount function:
  componentWillMount() {
    this.props.navigation.setParams({
      onlineUsersCount: this.state.onlineUsersCount,
      leaveChat: this.leaveChat.bind(this)
    });
...
Lastly, we are going to remove the back button and replace it with our logout button in the header. Add this code below the constructor function in MainChat.js:
static navigationOptions = ({ navigation }) => {
  return {
    headerTitle:
      navigation.getParam("onlineUsersCount", "No") + " member online",
    headerLeft: null,
    headerRight: (
      <Button
        onPress={() => {
          navigation.state.params.leaveChat();
        }}
        title="Logout"
        color="red"
      />
    )
  };
This completes our tutorial to display online users using Presence!
Using your command line, run the React Native mobile app simulator.
react-native run-ios
react-native run-android
Wrapping Up
In this tutorial, we learned how to keep tabs on how many users are currently in the chatroom using Presence.
Your chat app is growing in features, but there’s a lot more we can do. Keep an eye out for subsequent posts on typing indicators, unread message count, and more.