Build a PubNub-Driven Smart Contract App with Ethereum
Thinking about digital transformation conjures images of what work technology once was, and how it's transformed through all the innovation that's taken place over the last couple of decades.

Our physical tools are going digital. They're deemed valid even though they may not be tangible. Take the case of cryptocurrency. The promise is in a few years from now, you may not have to carry cash or even credit cards. All your cash will be tucked away in a secured digital wallet.
At PubNub, we take pride in driving digital transformation for our customers. From chat to IoT to eCommerce, PubNub powers underlying business processes for thousands of companies. In this tutorial, we'll extend into a future economy driven by blockchain.
Blockchain: the Guardian of Digital Transactions
Blockchain provides a secure way of accessing and transacting assets. However, the biggest benefit comes from its ability to execute smart contracts across business boundaries. The best part is, a smart contract is not merely a digital copy of a paper document stored in 1s and 0s. It actually acts as a policy enforcer.
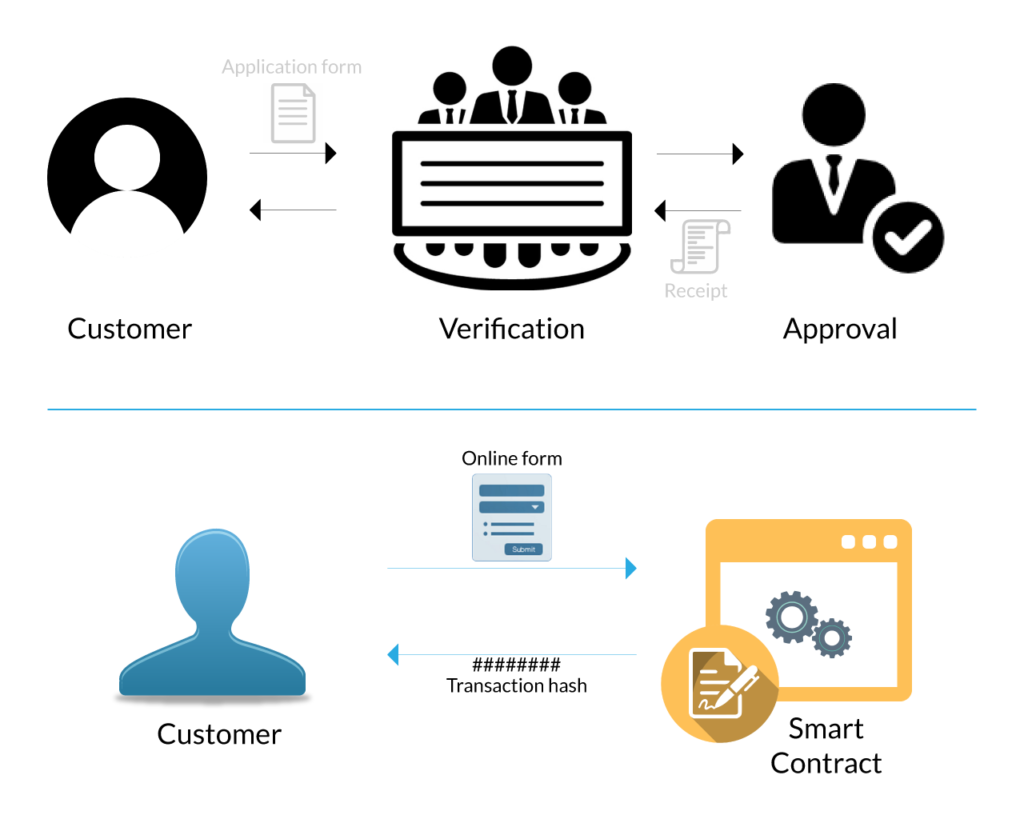
Example: Service Subscription
A smart contract is a computer program which executes a set of contractual rules coded in the source code of the program. If you think of the popular Ethereum Blockchain platform, then Solidity is the programming language for writing smart contracts.
Any business process can be transformed into a Blockchain-enabled process by codifying the protocols of business transactions in a smart contract. Consider a simple insurance service. A company offering a subscription to its insurance policy can codify the rules for the customers in a series of transactions. Moreover, these rules can work across multiple business entities, thanks to the Blockchain’s promise of a distributed ledger.
PubNub-powered Smart Contract
The idea of a smart contract-based subscription service can be envisaged as a web app which allows users who have signed up to subscribe to a service. The backend is driven by a private Ethereum blockchain with Solidity. As a demo app, Ganache can be used to simulate an Ethereum Blockchain and Truffle framework can be used via a REST API to invoke Solidity contracts.
And where does PubNub fit in?
PubNub can fit in almost anywhere, but for this specific case, its use for sending real-time notifications of contract execution.
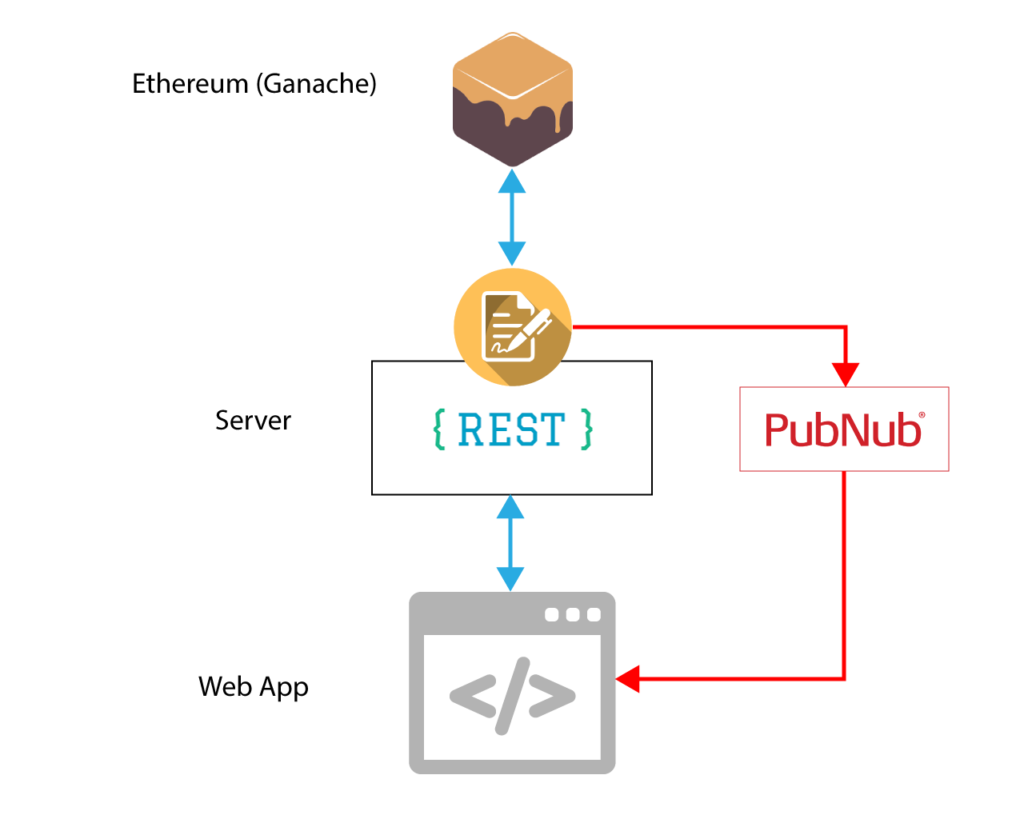
Before you begin, make sure that you have access to the tutorial source code from Github.
You can choose to run the application by following the README file from the repo. In this tutorial, we'll dive into the details. Here's an outline of what we'll cover:
- Step 1 – Install software
- Step 2 – Install packages and dependencies
- Step 3 – Compile smart contract
- Step 4 – Deploy the smart contract
- Step 5 – Deploy the web server
- Step 6 – Test application
- Step 7 – Perform user operation.
- Step 8 – Check stats
Step 1: Install Software
To power your PubNub-driven smart contract app, you will need to install the Truffle framework and Ganache.
- Truffle provides an application suite to compile and build Solidity based smart contracts.
- Ganache acts as the Ethereum Blockchain node which logs all transactions on a local blockchain node.
Follow the Truffle installation guide to install the Truffle npm package and Ganache download page to download and install the Ganache executable. Ganache is mainly available for Windows, but includes options for other OSs.
With Truffle, you also get the solc-js Solidity compiler which will be used for compiling the smart contract code.
Step 2: Install Packages and Dependencies
It is time now to set up a demo project using the Truffle CLI tools. Truffle ships with a lot of pre-built app packages called Truffle Boxes.
We are going to use a third-party box that supports invocation of smart contracts through REST APIs. It’s called express-box.
Run this command to install express-box within a new project folder:
truffle unbox arvindkalra/express-box
You should now have the following directories installed inside the project folder:
- /connections – Contains app.js that defines all the smart contract invocation functions from javascript.
- /contracts – Contains the .sol smart contract files
- /migrations- Contains the code for migration and deployment of contracts
- /public_static – Contains the web root directory for serving the application
- /test – Contains the test contract. But you can ignore it for this demo.
You will also get a few js files at the root level:
- js – the expressjs application server that defines the REST endpoints
- js – Config file for connecting with Ganache
By default, express-box contains a different application. We will replace these files from the GitHub:
Alternatively, you can ignore the express-box installation and clone the GitHub repo under the project folder to get the same directory structure.
At the end, you also need to install the PubNub NodeJS package.
npm install pubnub
Step 3: Compile Smart Contracts
This application depends on the Subscribe.sol contract. This defines three transactions which form the core business logic of the app.
- getSubscriptionStatus
- getCustomerCount
- performSubscription
contracts/Subscribe.sol
pragma solidity ^0.5;
contract Subscribe {

  //Store customer accounts that have subscription
  mapping(address => bool) public customers;

  //Store  customer count
  uint private customerCount;
  //Subscribe event
  event subscribedEvent (address indexed _customerId);
  constructor() public {

    customerCount = 0;

  }

  function getSubscriptionStatus(address _customerId) public view returns(bool) {
    if (customers[_customerId]) {
      return true;
    } else {
      return false;
    }

  }
  function getCustomerCount() public view returns(uint){

    return customerCount;
  }
  function performSubscription() public returns(bool sufficient){
    //Require that customer haven't subscribed yet
    if(customers[msg.sender]) return false;
    customerCount++	;
    customers[msg.sender] = true;
    emit subscribedEvent(msg.sender);
    return true;
  }

}
The application also includes a default Migration.sol contract which is used for deployment.
From the project root location, compile the contracts as follows:
truffle compile
Once compiled you can see the JSON compiled contract file in build/contracts/ folder.
$ truffle compile
Compiling .\contracts\Migrations.sol...
Compiling .\contracts\Subscribe.sol...
Writing artifacts to .\build\contracts
Step 4: Deploy Smart Contracts
The fun begins now. You should now launch Ganache and make sure that its settings are per the truffle.js settings.
With Ganache up and running, you can deploy the contracts by running these commands in sequence.
truffle migrate --reset
truffle migrate --network development
If all goes well, you should see a “Network up to date” output on your screen.
Step 5: Deploy the web server
The smart contracts are up and running and it's time now to hook them up with REST API so that they can be invoked from a client application.
Hit npm start on the terminal and you should see the web server spring into action.
The web server is a simple expressJS program. Apart from hosting the webpage, it defines three APIs
- /getStatus – Fetches the subscription status of a given customer account
- /getCount – Fetches the count of already subscribed customers
- /subscribe – Initiates a transaction to subscribe a new customer
/server.js
const express = require('express');
const app = express();
const port = 3000 || process.env.PORT;
const Web3 = require('web3');
const truffle_connect = require('./connection/app.js');
const bodyParser = require('body-parser');
// parse application/x-www-form-urlencoded
app.use(bodyParser.urlencoded({ extended: false }));
// parse application/json
app.use(bodyParser.json());
app.use('/', express.static('public_static'));
app.get('/getStatus', (req, res) => {
  console.log("**** GET /getStatus ****");
  console.log(req.query);
  let currentAcount  = req.query.address;
  truffle_connect.getSubsStatus(currentAcount,function (answer) {
    res.send(answer);
  })
});
app.get('/getCount', (req, res) => {
  console.log("**** GET /getCount ****");
  truffle_connect.getCustCount( (answer) => {
    res.send(answer);
  })
});
app.post('/subscribe', (req, res) => {
  console.log("**** POST /subscribe ****");


  let add  = req.body.address;

  truffle_connect.SubscribeTransaction(add, (status) => {
    res.send(status);
  });
});
app.listen(port, () => {
  // fallback - use your fallback strategy (local node / hosted node + in-dapp id mgmt / fail)
  truffle_connect.web3 = new Web3(new Web3.providers.HttpProvider("http://localhost:8545"));
   truffle_connect.start(function(status) {
    console.log(status);
  });
  console.log("Express Listening at http://localhost:" + port);
});
Step 6: Test Application
Open your browser and access the app at http://localhost:3000.
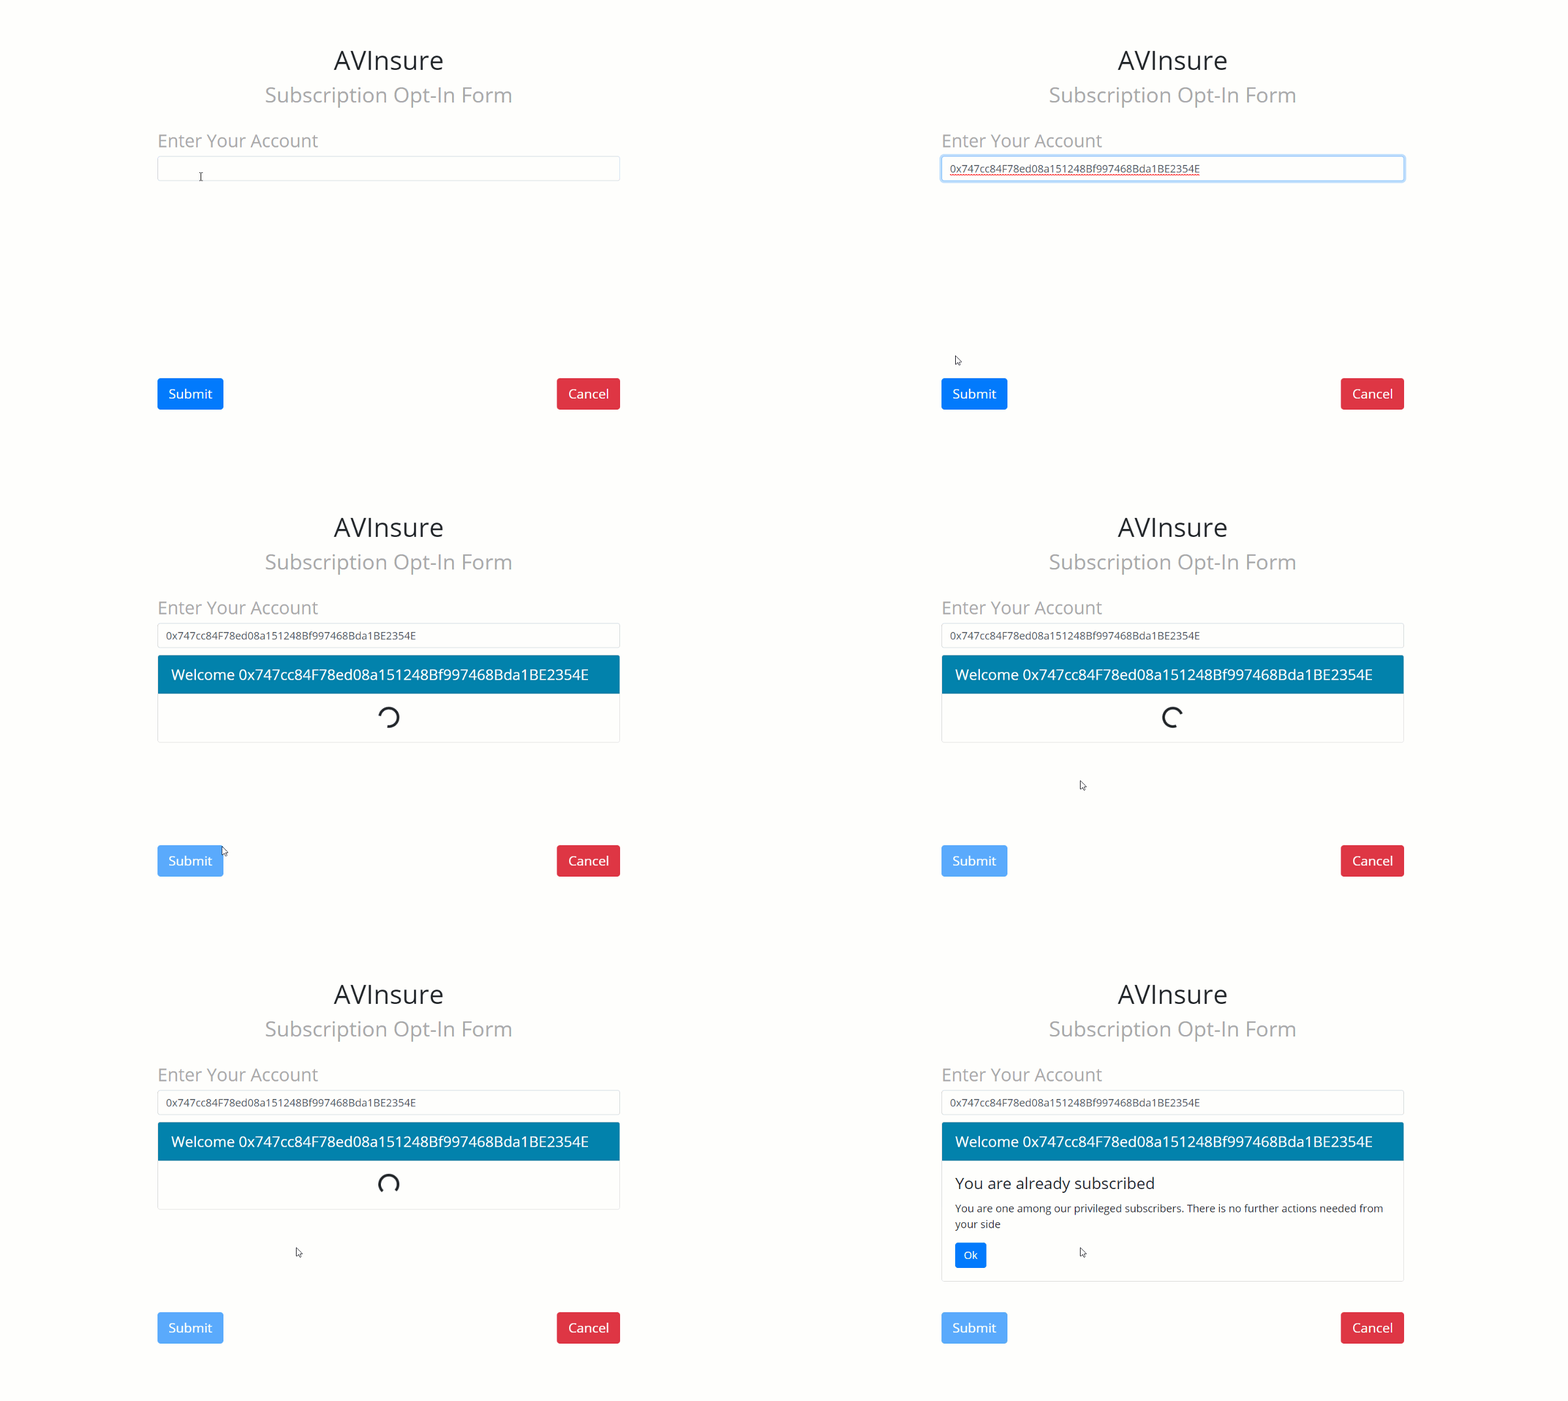
You will be greeted with the homepage which prompts you to enter a customer account. The assumption here is that the customers already have an account and this app enables them to subscribe to the service using their account number.
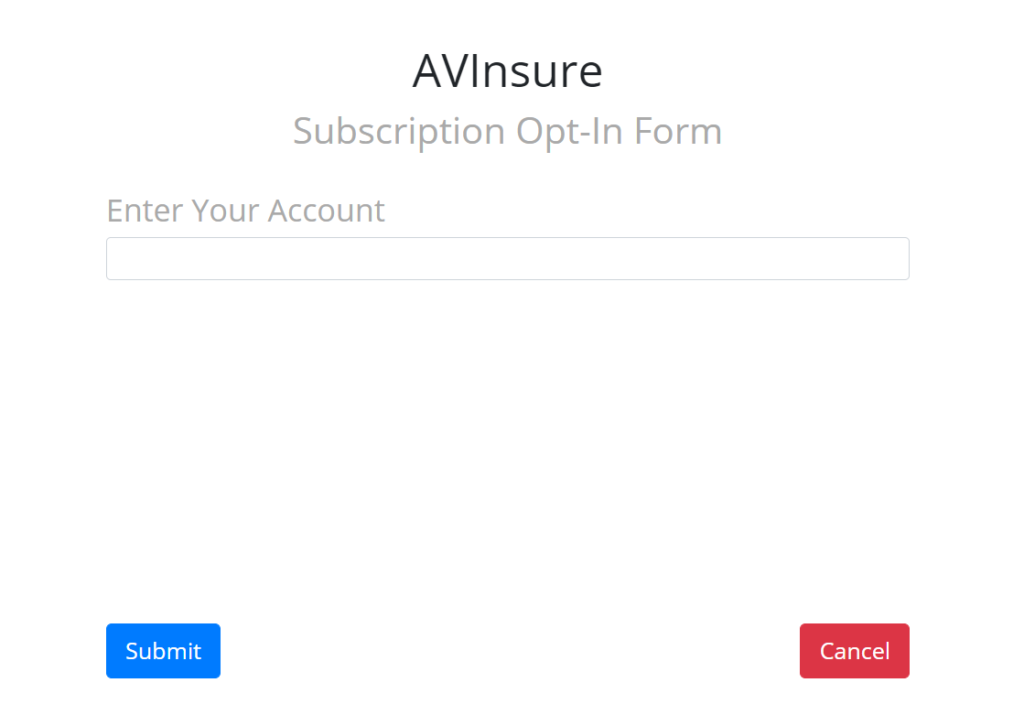
The web application logic is contained in accounts.js. The main operations are triggered as part of button clicks.
public_static/javascript/accounts.js
$(document).ready(function () {
  let  selectedAccount;
  let  currTemplate;
  var pubnub = new PubNub({
        subscribeKey: “<PUBNUB_SUBSCRIBE_KEY>”,
        publishKey: “<PUBNUB_PUBLISH_KEY>”,
        ssl: true
  })
  pubnub.addListener({

        message: function(msg) {
            console.log(msg.message);
            changeScreen(activationTemplate, {

        accountid: msg.message.transactionDetails.args._customerId,
        transCode: msg.message.transactionDetails.transactionHash

      });
        pubnub.unsubscribe({
    			channels: [selectedAccount.toLowerCase()]
      })

        },

    })
  let confirmTemplate    = Handlebars.compile($("#confirm-template").html());
  let loadingTemplate    = Handlebars.compile($("#loading-template").html());
  let subscribedTemplate = Handlebars.compile($("#subscribed-template").html());
  let activationTemplate = Handlebars.compile($("#activation-template").html());
  $('#submit').click(function () {
      selectedAccount = $('#acc-no').val();
      if(selectedAccount != ""){
      	changeScreen(loadingTemplate, { accountid: selectedAccount });
        $("#submit").attr('disabled', 'disabled');
        $.ajax({

              url:'/getStatus',

         	data: { "address": selectedAccount },

         	dataType: 'json',

         	success: function(response){
         		if(response.accExists){

         			if(!response.accSubs){

         				changeScreen(confirmTemplate, { accountid: selectedAccount });

         				pubnub.subscribe({

       						 	channels: [selectedAccount.toLowerCase()]

    						});

         			} else {

         				changeScreen(subscribedTemplate, { accountid: selectedAccount });

         			}
         		} else {
         			alert("Invalid Account : " + selectedAccount);
         			document.location.reload();

         		}

          }
        });

      } else {
        alert("Enter a valid account number");
        document.location.reload();
      }
  })
  $("body").on("click", "a", function(event){

      if(currTemplate == confirmTemplate){
          $.post('/subscribe', {"address" : selectedAccount}, function (response) {

               console.log(response);
          });
          changeScreen(loadingTemplate, { accountid: selectedAccount });
      }
  });
  $("body").on("click", "button", function(event){

      document.location.reload();
  });
  function changeScreen(template, paramObj){
    currTemplate = template;
       let content = currTemplate(paramObj);
    $('.subscription-stage').html(content);
  }
})
The HTML file of the app defines a set of handlebar templates which are displayed on the screen based on the state of the app and user account subscription.
public_static/index.html
<script id="confirm-template" type="text/x-handlebars-template">
        <!-- Subscription Confirmation -->
        <div class="card">
            <div class="card-header text-white">
              Welcome {{accountid}}
            </div>
            <div class="card-body">
              <h4 class="card-title">We are glad that you have opted for our subscription</h4>
              <p class="card-text">You are just one step away from availing the benefits of our subscription plan. Please confirm whether you want to go ahead</p>
              <a class="btn btn-primary text-white">Yes ! I Confirm</a>
            </div>
         </div>
  </script>
  <script id="subscribed-template" type="text/x-handlebars-template">
        <!-- Already Subscribed -->
        <div class="card">
            <div class="card-header text-white">
              Welcome {{accountid}}
            </div>
            <div class="card-body">
              <h4 class="card-title">You are already subscribed</h4>
              <p class="card-text">You are one among our privileged {{subscriptionCount}} subscribers. There is no further actions needed from your side</p>
              <button class="btn btn-primary">Ok</button>
            </div>
         </div>
  </script>
  <script id="loading-template" type="text/x-handlebars-template">
     <!-- Loading Animation -->
    <div class="card">
      <div class="card-header text-white">
         Welcome {{accountid}}
      </div>
      <div class="card-body">
        <div class="text-center">
           <div class="spinner-border" role="status">
             <span class="sr-only">Loading...</span>
           </div>
        </div>
     </div>
  </script>
  <script id="activation-template" type="text/x-handlebars-template">
        <!-- Subscription Activation -->
        <div class="card">
            <div class="card-header text-white">
              Welcome {{accountid}}
            </div>
            <div class="card-body">
              <h4 class="card-title">Thank you for subscribing to our service</h4>

              <p class="card-text">For your reference, your transaction hash code is {{transCode}} </p>
              <button class="btn btn-primary">Ok</button>
            </div>
         </div>
  </script>
Step 7: Perform User Operation
Let’s take a quick test drive and witness how users will use the app.
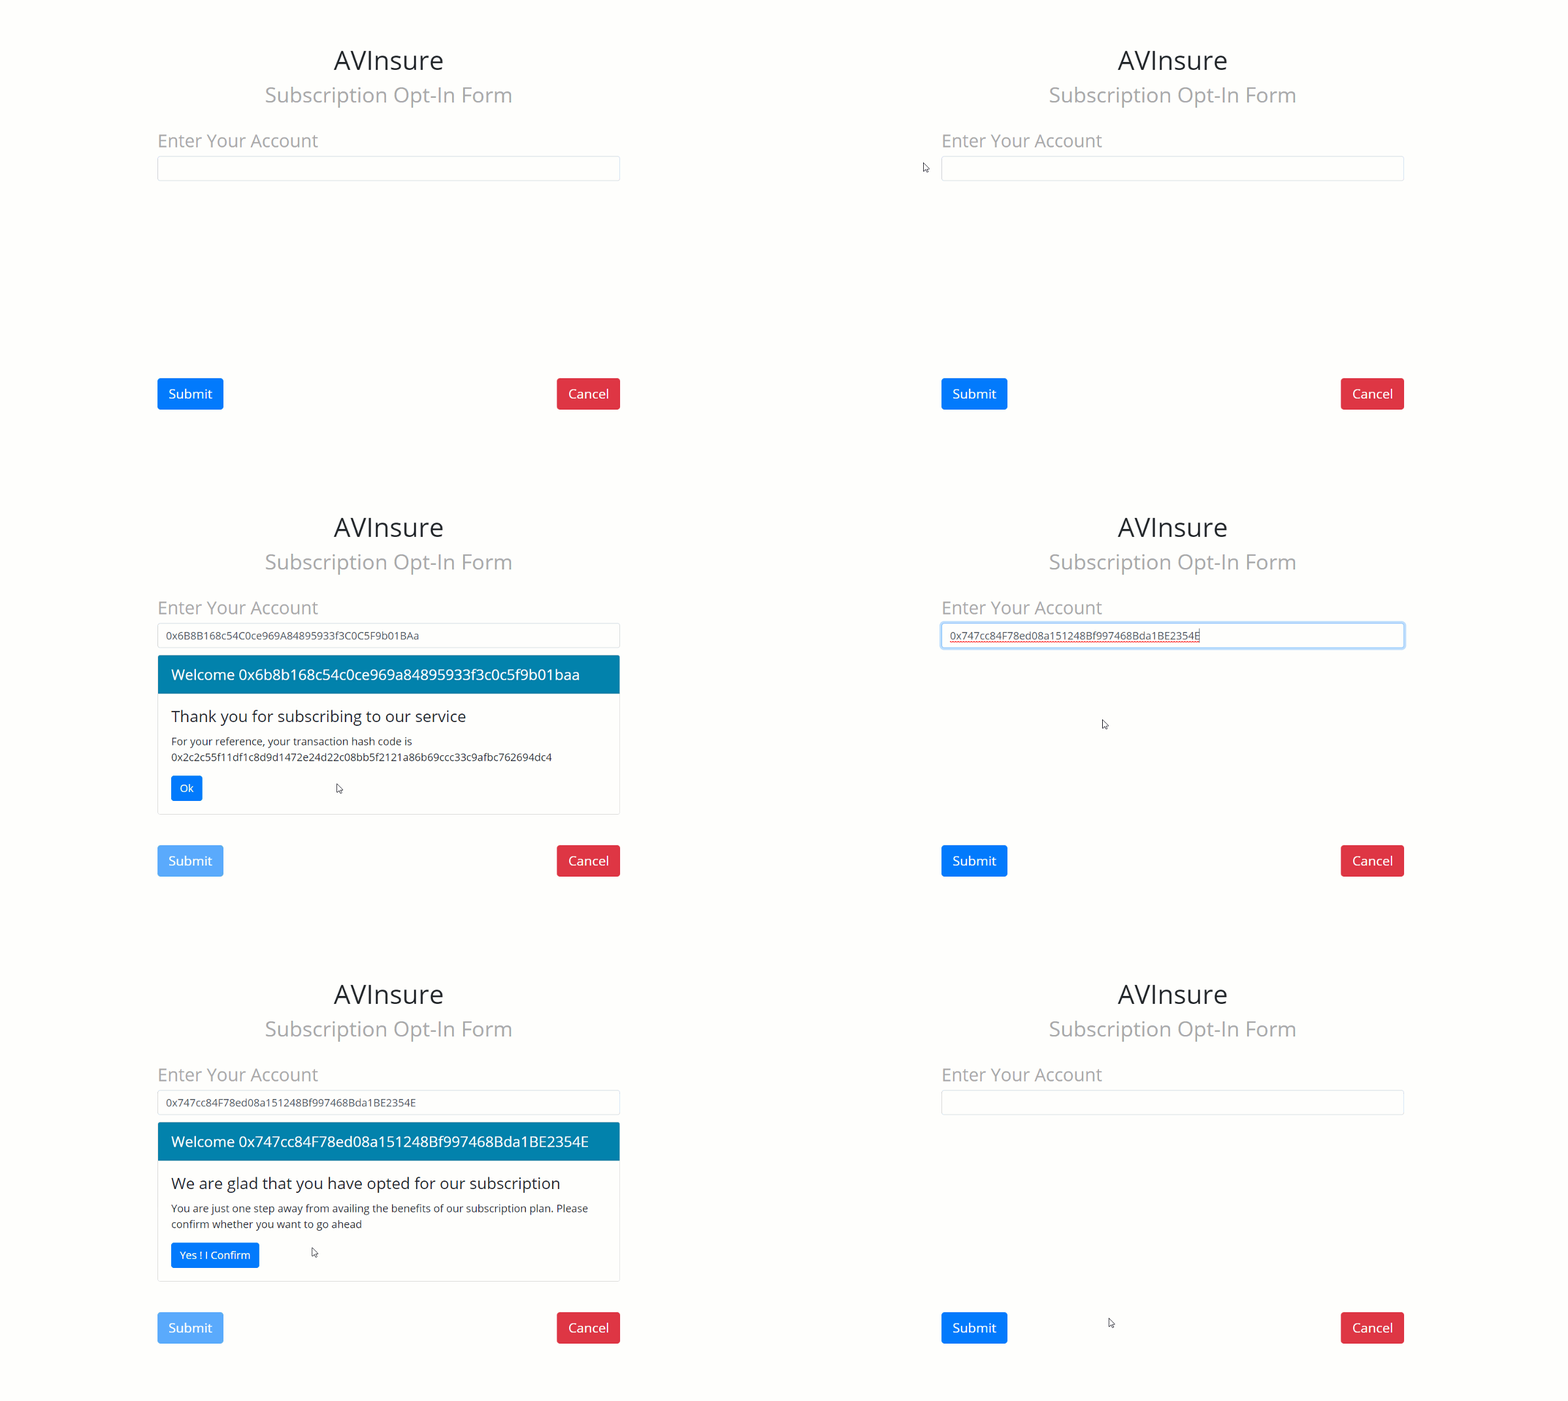
When the subscription transaction is completed, the server emits the transaction details which is then channeled back to the app via a PubNub channel. The name of the PubNub channel is the same as the customer account number.
connection/app.js
start: function(callback) {
    var self = this;
    self.account = self.web3.eth.accounts[0]
    // Bootstrap the MetaCoin abstraction for Use.
    Subscribe.setProvider(self.web3.currentProvider);
    //Set up listened for Subscription  events
     Subscribe.deployed().then(function(instance) {

      instance.subscribedEvent({}, {
        fromBlock: 0,
        toBlock: 'latest'
      }).watch(function(error, event) {
        console.log("New Subscribe transaction ", event);
        console.log("For Account Id ", event.args._customerId);

        pubnub.publish(
          {
              message: {
                          transactionDetails : event
                       },
              channel: event.args._customerId,

          },
          function (status, response) {
              if (status.error) {
                  // handle error
                  console.log(status)
              } else {
                  console.log("message Published w/ timetoken", response.timetoken)
              }
        });
      });
    });
  }
If an already subscribed user tries to subscribe, then the contract kicks in to indicate that the user is already subscribed.
Step 8: Check Stats
You can also query the smart contract for the number of subscribers. The /getCount API returns the current count of subscribed customers. It is hooked to the getCustomerCount( ) contract function to return this data.

And that's it! Now you know how to hook up PubNub to get real-time updates on Ethereum transactions. For a real-world application, this can be a great boon, especially in cases where the transactions take a longer time to be committed due to the time lag in consensus and mining.
For more such use cases on using PubNub with Ethereum, you can explore our other blog post on leveraging Functions with Ethereum Blockchain.