Initial configuration
Initialize and configure the Unity SDK and Unity Chat SDK before building your chat app.
Unity SDK is a prerequisite
You must install the Unity SDK before installing the Unity Chat SDK.
Prerequisites
- Sign in or create an account on the Admin Portal.
- Create an app to get your Publish Key and Subscribe Key.
Limit of 3 keysets for Free tier accounts
Effective February 3, 2025, all Free tier accounts are limited to a maximum of three keysets. If your account exceeds this limit, you must delete existing keysets to create new ones.
A new app receives demo keys automatically. You can create multiple keysets per app. Use separate keysets for production and test environments.
Required keyset settings
Enable these features on your keyset in the Admin Portal:
- App Context - Store user and channel data
- Presence - Track online/offline status
- Message Persistence - Store message history
Download the SDKs
Install the Unity SDK before installing the Unity Chat SDK.
Source code
Download the source code from GitHub: Unity SDK and Unity Chat SDK.
Package Manager
- Open Unity Editor and navigate to Window -> Package Manager.
- In the Package Manager window, click + and select Add package from git URL.
- Paste the PubNub Unity package links and click Add. Do it for both SDKs.
https://github.com/pubnub/unity.git?path=/PubNubUnity/Assets/PubNub

https://github.com/pubnub/unity-chat.git?path=/unity-chat/PubnubChatUnity/Assets/PubnubChat
WebGL configuration
Enable WebGL build mode only for builds
Using UnityWebGLHttpClientService outside of WebGL builds (including the editor) might cause unexpected behavior due to UnityWebRequest being thread-unsafe.
The Unity Chat SDK is compatible with WebGL builds. Configure your project for WebGL:
-
Go to Edit -> Project Settings -> Player and set Managed Stripping Level to
Minimal.Additional HTTP setup
If for some reason you can't turn on the
Secureoption in eitherPNConfigurationor the Scriptable Object config file, then you need to also go to Project Settings -> Player -> WebGL Settings and set the Allow downloads over HTTP option to Always allowed.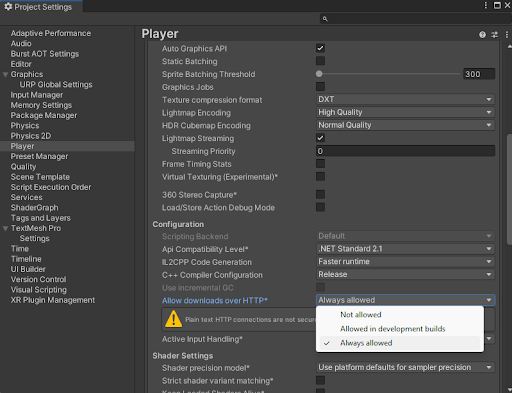
-
Install the WebGL Threading Patcher. Navigate to Window -> Package Manager, click +, select Add package from git URL, paste the link to the Threading Patcher's GIT repository, and click Add.
These steps configure your project for WebGL builds only. Configure other targets as needed.
Initialize PubNub
Use the CreateInstance() method to create a Chat SDK instance. Pass PNConfiguration for keys and user ID, and PubnubChatConfig for chat-specific features.
1
Initialize PubNub for WebGL
1
If you already have a PubNub instance set up for WebGL, you can pass it to the overloaded CreateInstance method.
Method signatures
Three overloads of CreateInstance are available:
CreateInstance(PubnubChatConfig chatConfig, PNConfiguration pubnubConfig, bool webGLBuildMode = false, bool unityLogging = false)CreateInstance(PubnubChatConfig chatConfig, PNConfigAsset configurationAsset, string userId)CreateInstance(PubnubChatConfig chatConfig, Pubnub pubnub)
The PubnubChatConfig parameters apply to all overloads.
PubnubChatConfig
| Parameter | Feature | Description |
|---|---|---|
TypingTimeoutType: intDefault: 5000 | Typing Indicator | Specifies the default timeout after which the typing indicator automatically stops when no typing signals are received. The default value is set to 5000 milliseconds (5 seconds). |
TypingTimeoutDifferenceType: intDefault: 1000 | Typing Indicator | Specifies the difference in time between actually sending the typing indicator and the value of TypingTimeout. This is designed to cover for any network lag that may occur. The default value is set to 1000 milliseconds (1 second). |
StoreUserActivityTimestampType: boolDefault: false | User's last online activity, global presence | Specifies if you want to track the user's global presence in your chat app. The user's activity is tracked through the LastActiveTimeStamp parameter on the User object. |
StoreUserActivityIntervalType: intDefault: 60000 | User's last online activity, global presence | Specifies how often the user global presence in the app should be updated. Requires StoreUserActivityTimestamp to be set to true. The default value is set to 60000 milliseconds (1 minute). |
SyncMutedUsersType: boolDefault: false | Moderation as user | Specifies if you want to persist the mute list for regular chat users beyond the scope of a single session. When set to true, the mute list is saved and retrieved during client initialization. |
EmitReadReceiptEventsType: Dictionary<string, bool>Default: {"public": false, "group": true, "direct": true} | Read Receipts | Controls whether read receipt events are emitted per channel type. Keys are channel type strings ("public", "group", "direct"), values are booleans. By default, read receipts are enabled for group and direct channels but disabled for public channels. |
RateLimitFactorType: intDefault: 2 | Send messages | Exponential backoff factor used by the rate limiter when a channel's send limit is exceeded. A value of 2 means each retry waits twice as long as the previous attempt. |
RateLimitsPerChannelType: RateLimitPerChannelDefault: all 0 (disabled) | Send messages | Per-channel-type rate limit in milliseconds applied between SendText() calls. Set to 0 to disable rate limiting for that channel type. See below for the RateLimitPerChannel fields. |
PushNotificationsType: PushNotificationsConfigDefault: n/a | Mobile Push Notifications | Configuration for mobile push notifications. See below for PushNotificationsConfig options. |
RateLimitPerChannel
Configure per-channel-type rate limiting by setting the RateLimitsPerChannel property of PubnubChatConfig:
| Parameter | Description |
|---|---|
DirectConversationType: intDefault: 0 | Minimum milliseconds between SendText() calls on direct channels. 0 disables rate limiting. |
GroupConversationType: intDefault: 0 | Minimum milliseconds between SendText() calls on group channels. 0 disables rate limiting. |
PublicConversationType: intDefault: 0 | Minimum milliseconds between SendText() calls on public channels. 0 disables rate limiting. |
UnknownConversationType: intDefault: 0 | Minimum milliseconds between SendText() calls on channels with an unrecognized type. 0 disables rate limiting. |
PushNotificationsConfig
Configure mobile push notifications by setting the PushNotifications property of PubnubChatConfig:
| Parameter | Description |
|---|---|
SendPushesType: boolDefault: false | Specifies whether push notifications are enabled for sending messages. When true, the SDK automatically adds push notification payloads to messages sent on registered channels. |
DeviceTokenType: stringDefault: n/a | The unique device token obtained from the push notification service (APNs or FCM). This identifies the device that will receive push notifications. |
DeviceGatewayType: PNPushTypeDefault: PNPushType.FCM | The push notification gateway to use. Options include PNPushType.FCM for Firebase Cloud Messaging (Android) or PNPushType.APNS2 for Apple Push Notification service (iOS). |
APNSTopicType: stringDefault: n/a | The bundle identifier for your iOS app. Required when using APNs. |
APNSEnvironmentType: PushEnvironmentDefault: PushEnvironment.Development | The APNs environment to use. Options are PushEnvironment.Development or PushEnvironment.Production. |
PNConfiguration
| Parameter | Feature | Description |
|---|---|---|
PublishKey *Type: stringDefault: n/a | Send messages | Specifies the key used to publish messages on a channel. |
SubscribeKey *Type: stringDefault: n/a | Receive messages | Specifies the key used to subscribe to a channel. |
UserId *Type: stringDefault: n/a | n/a | Unique User ID that becomes your app's current user. It's a string of up to 92 characters that identifies a single client (end user, device, or server) that connects to PubNub. Based on User ID, PubNub calculates pricing for your apps' usage. User ID should be persisted and remain unchanged. If you don't set userId, you won't be able to connect to PubNub. |
AuthKeyType: stringDefault: n/a | Access Manager | Authentication key for Access Manager. Use it for all requests made to PubNub APIs to authenticate users in your application and grant them access to PubNub resources (other users' metadata and channels). |
Additional options (when using PNConfiguration)
| Parameter | Description |
|---|---|
webGLBuildModeType: boolDefault: false | Enables WebGL transport (sets httpTransportService to UnityWebGLHttpClientService). |
unityLoggingType: boolDefault: false | Enables Unity-specific logger (UnityPubNubLogger). |
PNConfigAsset + userId
| Parameter | Description |
|---|---|
configurationAsset *Type: PNConfigAssetDefault: n/a | Scriptable Object containing your PubNub keys and configuration. |
userId *Type: stringDefault: n/a | Client User ID used to initialize the PubNub instance created from the asset. |
Existing Pubnub instance
| Parameter | Description |
|---|---|
pubnub *Type: PubnubDefault: n/a | Existing PubNub client instance to use for the chat. |
Output parameters
| Type | Description |
|---|---|
ChatOperationResult<Chat> | Returns a new PubNub chat instance on success or a null with error data on failure. |
Next steps
After initialization, you can:
- Create channels and users
- Add features like messaging, typing indicators, and presence