Managing user permissions (deprecated)
Use Chat SDKs
This documentation is deprecated. Use any of our dedicated Chat SDKs to quickly implement chat functionality in your application.
Access Manager allows you to regulate clients' access to PubNub resources, such as channels, channel groups, and other users' metadata. For instance, you can make a one-to-one chat room private by only allowing one user to be able to read and write messages in this channel.
To use Access Manager, you must first enable it on the Admin Portal by navigating to your keyset and turning on the ACCESS MANAGER option under the CONFIGURATION tab. Once enabled, the server with the secretKey access needs to request PubNub to grant proper permissions to clients using the grant API. This way PubNub will accept only the requests made by an authorized client (authorizedUserId) and return requested results that fall within the limits of the permissions granted.
User ID / UUID
User ID is also referred to as UUID/uuid in some APIs and server responses but holds the value of the userId parameter you set during initialization.
Authorization Flow
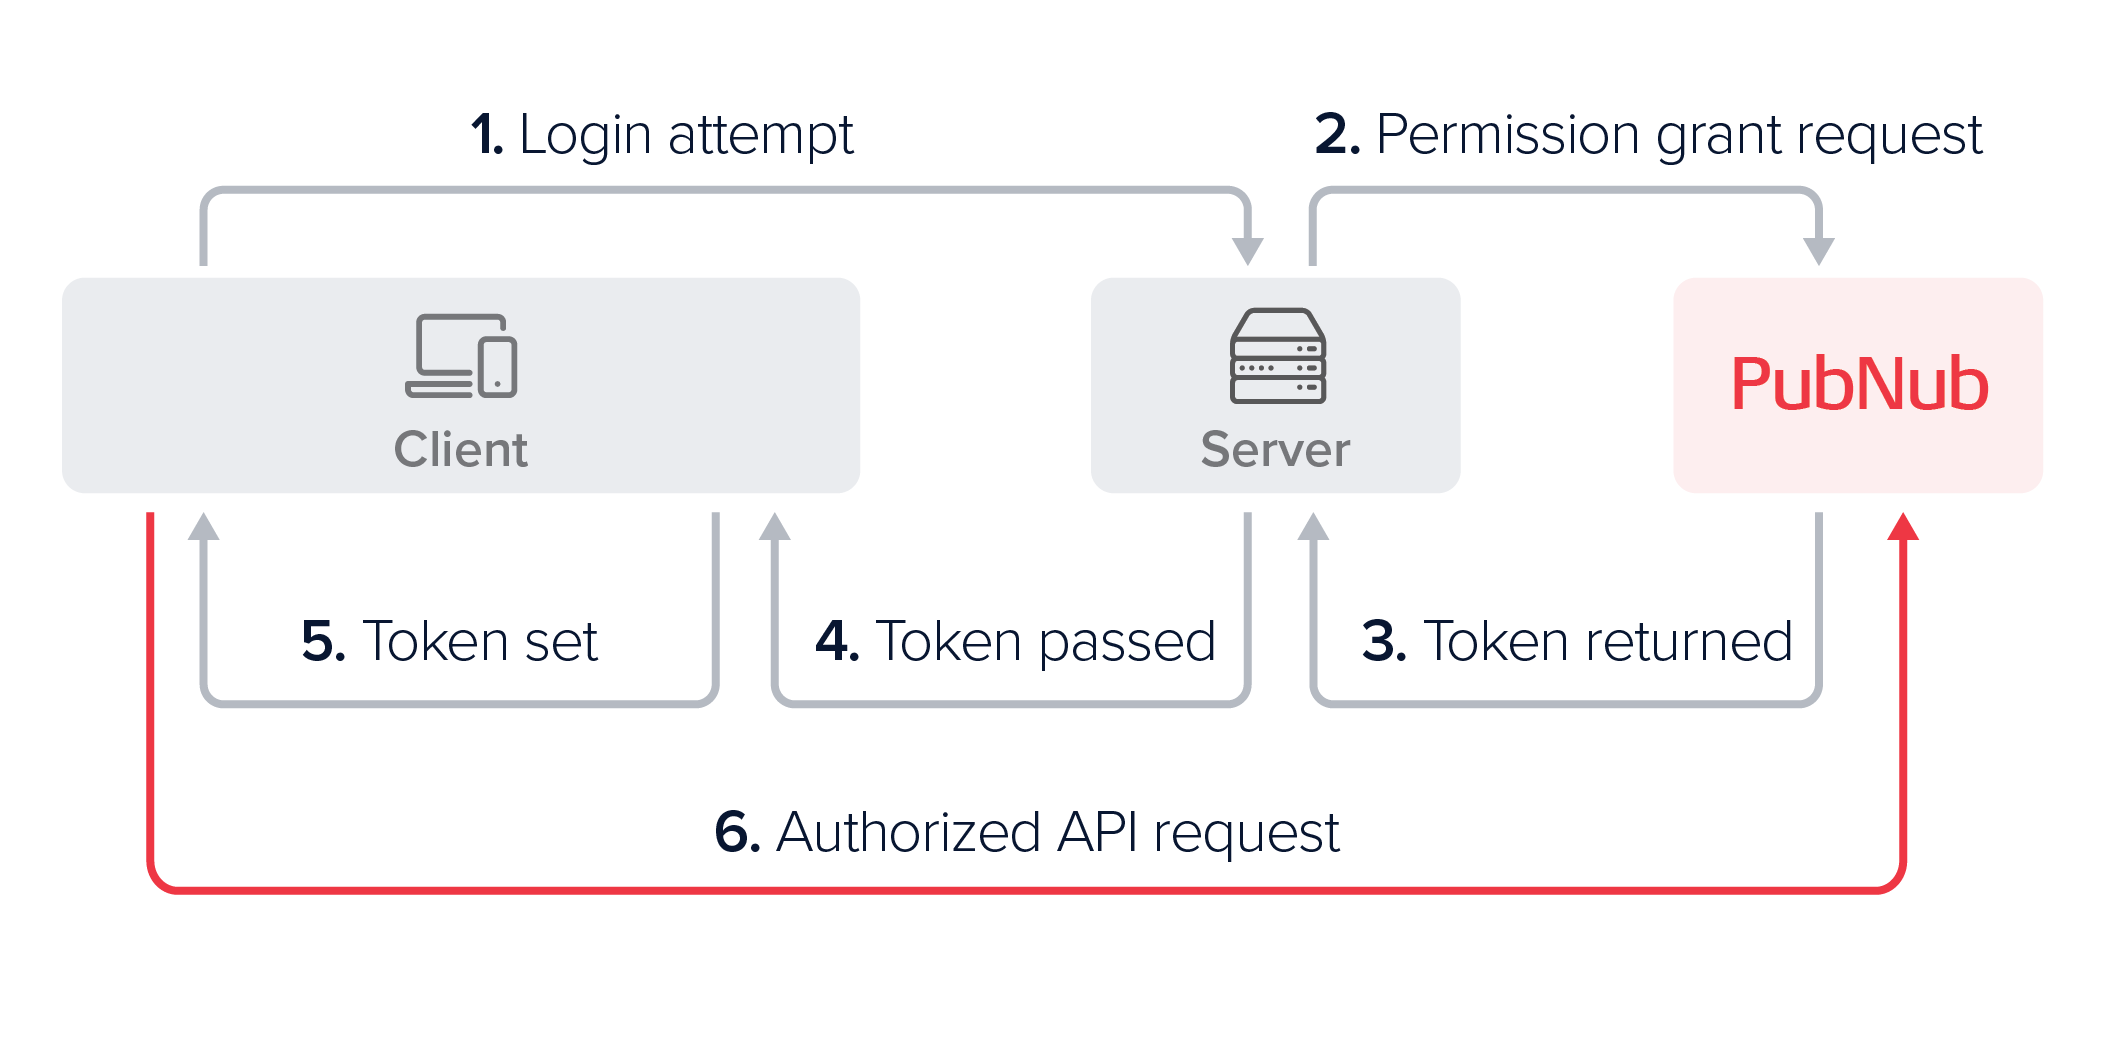
To understand how the communication between the client, server, and PubNub works, see an example of the authorization flow initiated by a client trying to access the PubNub network:
-
Upon login, the client device requests authorization to be able to send requests to PubNub.
-
The server issues a token request to PubNub by defining the permissions it needs to give to a specific authorized User ID.
-
PubNub reads these permissions and returns a signed, self-contained, and time-limited access token to the server.
-
The server passes the token to the client device as part of the login response.
-
The client device adds the token to the client's SDK configuration.
-
When the client device later makes PubNub API calls, the SDK passes the configured token. It can continue to do so until the token's
ttlexpires, at which point it needs to request a new token to be issued.
Connecting from a server
When a server connects to PubNub by including the secretKey during the PubNub object initialization, it operates in admin mode. In this mode, the server has unlimited access to all channels and can perform grant operations to manage channel permissions for users.
Secret key security
The secretKey should only be used within a secure server and never exposed to client devices. If the secretKey is ever compromised, it can be an extreme security risk to your application. If you suspect your secretKey has been compromised, you have the ability to regenerate a new secretKey for the existing PubNub keyset on the Admin Portal.
Granting permissions
The server can grant a user permissions for multiple channels, channel groups, or other users' metadata, like names or avatars. These grant requests can be issued:
- For a limited period of time (preferably between
10and60minutes). - By specifying permissions for a list of resources or resource patterns in the form of (regular expressions).
- For one user (called
authorizedUserId) that is later solely authorized to use the granted token to perform various operations on PubNub APIs. - In a single API request, even if permission levels differ (
readtochannel1andwritetochannel2).
The following request shows a grant request that gives user-1 the read and write permissions to channel-a and channel-b for a time limit of 15 minutes.
- JavaScript
- Python
- Java
- Kotlin
1pubnub.grantToken(
2 {
3 ttl: 15,
4 authorizedUserId: "user-1",
5 resources: {
6 spaces: {
7 "channel-a": {
8 read: true,
9 write: true
10 },
11 "channel-b": {
12 read: true,
13 write: true
14 }
15 }
1spaces = [
2    Space.id("channel-a").read().write(),
3    Space.id("channel-b").read().write()
4envelope = pubnub.grant_token()
5    .spaces(spaces)
6    .ttl(15)
7    .authorized_user("user-1")
8    .sync()
1pubnub.grantToken()
2    .ttl(15)
3    .authorizedUserId("user-1")
4        .spacesPermissions(Arrays.asList(
5                SpacePermissions.id(SpaceId("channel-a")).read().write(),
6                SpacePermissions.id(SpaceId("channel-b")).read().write()))
7    .async(result -> { /* check result */ });
1pubnub.grantToken(
2    ttl = 15,
3    authorizedUserId = "user-1",
4    spacesPermissions = listOf(
5        SpacePermissions.name(name = "channel-a", read = true, write = true),
6        SpacePermissions.name(name = "channel-b", read = true, write = true)
7    )
8)
9    .async { result, status ->
10        if (status.error) {
11            // Handle error
12        } else {
13            // Handle result
14        }
15    }
Revoking permissions
Enable token revoke
To revoke tokens, you must first enable this feature on the Admin Portal. To do that, navigate to your app's keyset and mark the Revoke v3 Token checkbox in the ACCESS MANAGER section.
Similar to the way your server requests PubNub to grant a token, your server can also request a token to be revoked. This is particularly useful when you want to block someone from accessing particular set of PubNub resources right way, for example in the event of banning a user.
By revoking a token, you are only blocking the given token from accessing PubNub resources. There may still be scenarios where the user may have older tokens that haven't expired yet. Hence, it's vital that you grant tokens with the optimal ttl needed for your use case.
Since permissions are embedded within a token, you revoke a token to remove the permissions. Revoking a token makes the token entirely unusable for any client. Note that you can only revoke a valid token and partial revokes aren't supported.
For more detailed information about revoking tokens, refer to the Access Manager document.
- JavaScript
- Python
- Java
- Kotlin
1try {
2    const token = await pubnub.revokeToken({
3        token: "p0AkFl043rhDdHRsple3KgQ3NwY6BDcENnctokenVzcqBDczaWdYIGOAeTyWGJI"
4    });
5} catch (status) {
6    console.log(status);
7}
1envelope = pubnub.revoke_token("p0thisAkFl043rhDdHRsCkNyZXisRGNoYW6hanNlY3JldAFDZ3Jwsample3KgQ3NwY6BDcGF0pERjaGFuoENnctokenV")
2    .sync()
1pubnub.revokeToken()
2    .token("p0thisAkFl043rhDdHRsCkNyZXisRGNoYW6hanNlY3JldAFDZ3Jwsample3KgQ3NwY6BDcGF0pERjaGFuoENnctokenVzcqBDc3BjoERtZXRhoENzaWdYIGOAeTyWGJI")
1pubnub.revokeToken("p0thisAkFl043rhDdHRsCkNyZXisRGNoYW6hanNlY3JldAFDZ3Jwsample3KgQ3NwY6BDcGF0pERjaGFuoENnctokenV")
Client-side operations
Upon receiving a token from the server, the client needs to update its configuration and set the new token with a setToken() method (name may vary). From then on, it needs to provide a valid token in every request made to the PubNub. When a client makes an API request using a token that has expired, PubNub API will respond with a 403 at which point the server needs to create another grant request for a new token to be generated. To debug any token issues or simply check privileges embedded in the token, use the parseToken() method.
Read more about both methods and all client-side operations in the Access Manager feature description.