How to Call Access Manager from PubNub Functions
PubNub makes it very easy to send real-time messages between users or devices. Before you launch to production, however, you want to ensure that only authorized users are able to view & send messages. Access Manager allows you to set rules that grant read & write access to specific channels and user metadata and define permissions for who can read, write, and modify that data. Access Manager (also referred to as access manager v3) uses the concept of tokens, which can be requested by and granted to client devices from a centralized server component.
The “typical” workflow for implementing Access Manager
Before discussing how to call the Access Manager from a PubNub function, it helps to understand the “typical” workflow to implement Access Manager for user authentication.
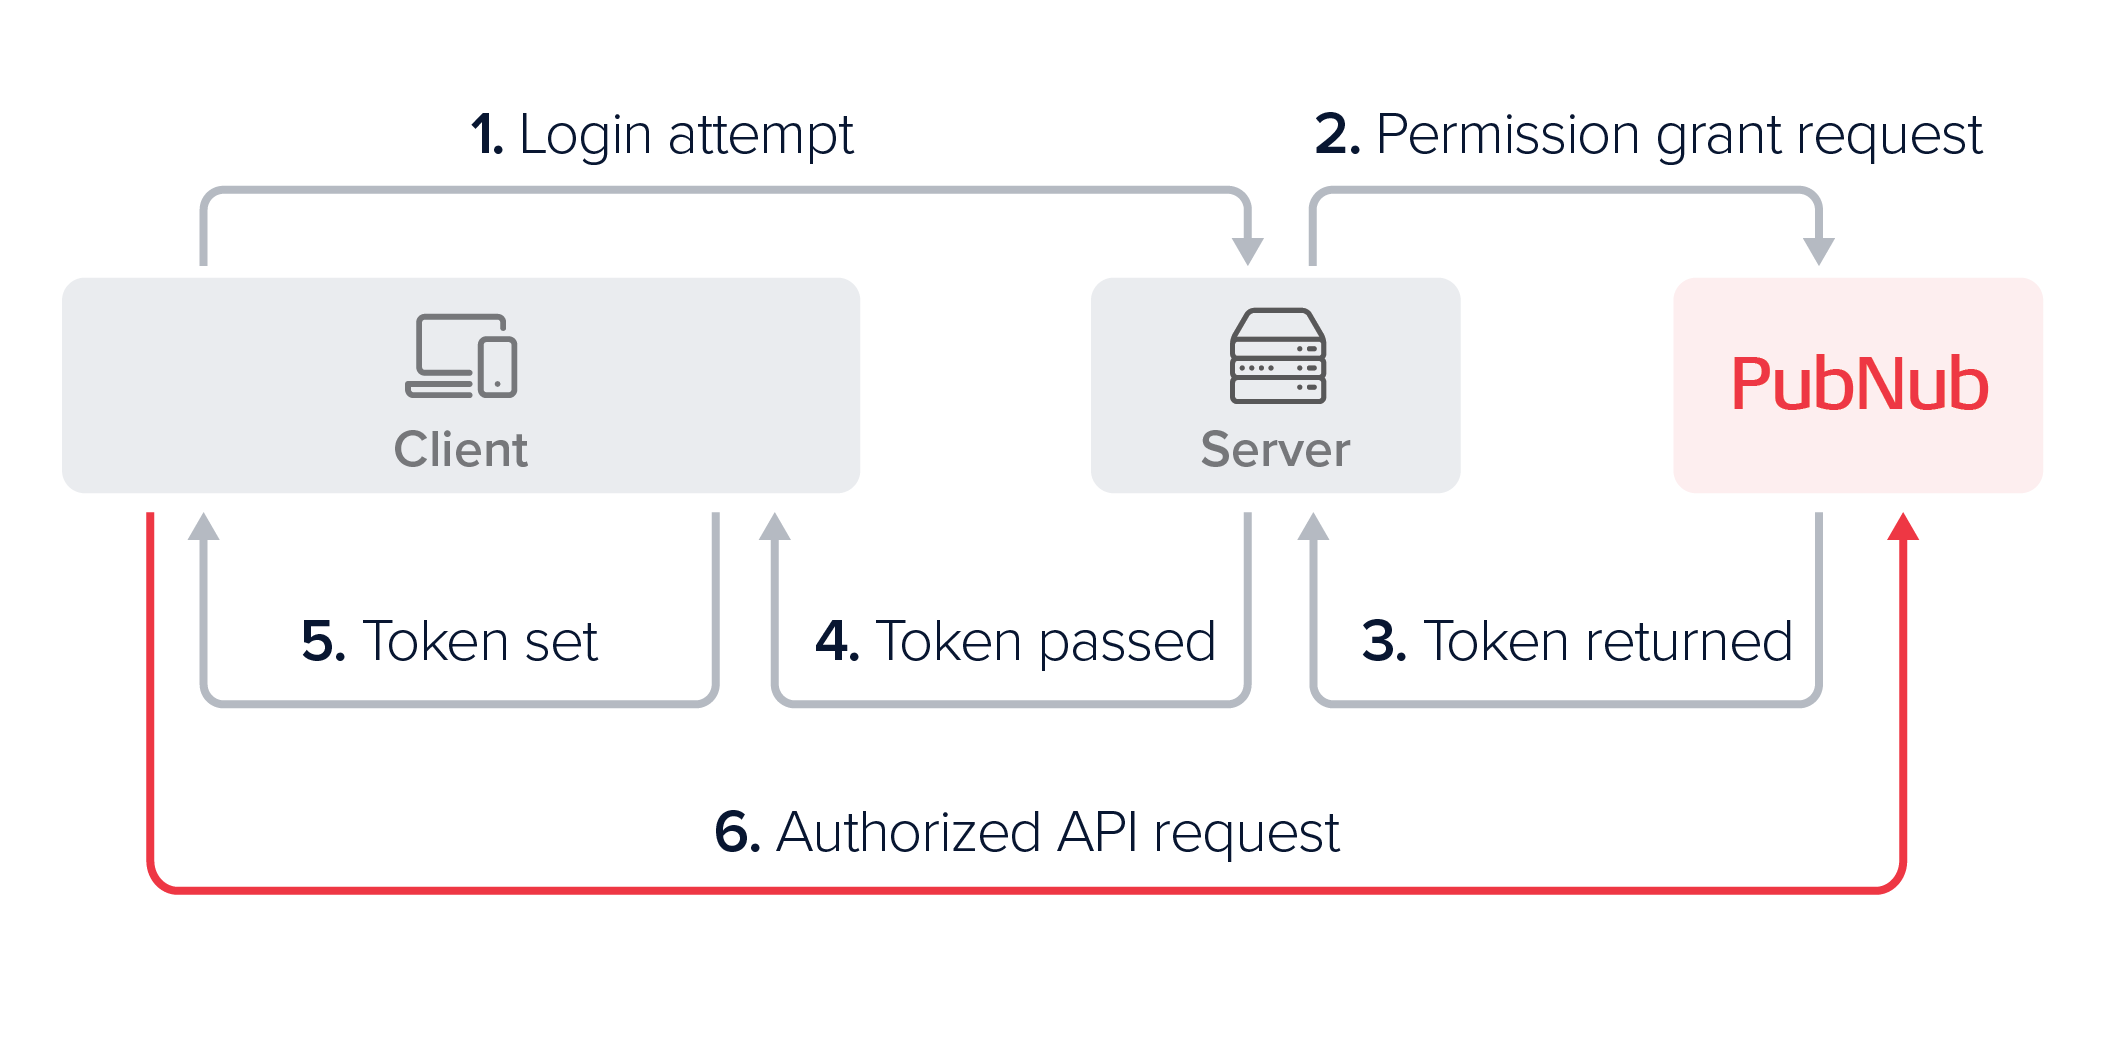
Per the Access Manager documentation, there are three actors involved as follows:
- Server - Client applications that use Access Manager require a centralized server application that keeps track of all interactions between the users and the PubNub resources they can access. The server should expose an API through which clients can request tokens, with the server being responsible for ensuring the tokens are configured with the correct access.
- Client device - A client representing a single device where a user logs in to perform an operation supported by PubNub. A client needs to request a token from the server before making PubNub API calls and attempting to access resources such as channels, channel groups, and User ID metadata. Clients also need logic to periodically refresh their user’s token before it expires.
- PubNub - The PubNub platform provides APIs to support both centralized server applications and client devices associated with a particular user. Server applications call the grant API to generate or revoke tokens. Clients access resources by passing these tokens in requests to PubNub APIs for validation.
The following diagram, also from the documentation, is helpful in understanding how the different components interact in the “typical” workflow to request and grant a token before PubNub resources are accessed:
What if I do not want to add Access Manager logic to my Server?
We always recommend that customers use access manager in production to prevent unintended access to their data and misuse of their PubNub auth keys; however, some customers do not want to modify their server to add the required logic for a number of potential reasons:
- IT headaches
- The client and server teams are separate
- They are experimenting with a trial roll-out
- Certification concerns
If you want to implement Access Manager without hosting the logic that would traditionally exist in the ‘Server’ component, you should use PubNub Functions to grant tokens with the required permissions.
An Aside: What are PubNub Functions?
Functions are PubNub’s serverless computing offering, allowing you to write code that will be executed when messages are sent or events occur so you can transform, re-route, augment, filter, or aggregate data at scale.
Most of our function deployments and examples deal with intercepting messages, for example, moderating a chat conversation to identify undesired behavior, inline language translation, or message aggregation. For more examples and ready-to-use integrations with third-party services, please check out our integrations catalog. These are powerful uses for Functions, but we also support ‘On Request’ Functions, which are invoked and run synchronously in response to a REST API call. The rest of this blog will exclusively focus on onRequst functions, which allow us to define some serverside logic that will be hosted by PubNub.
Workflow: Using PubNub Functions and Access Manager
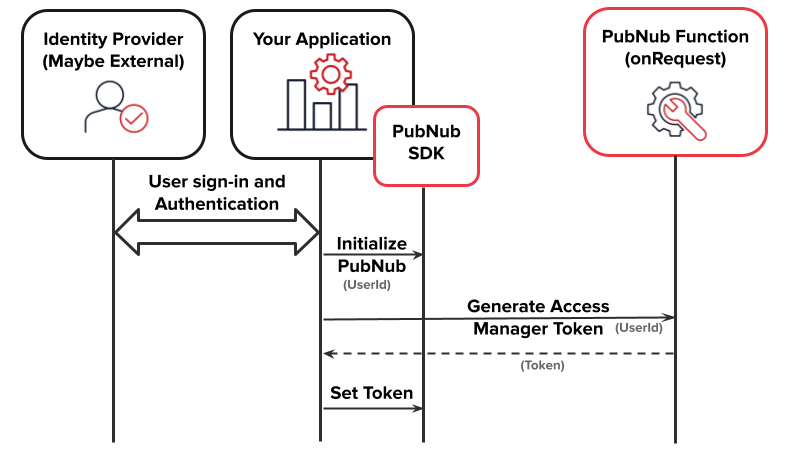
- The first thing a user of your application will do is sign in with an identity provider. This isn’t technically required, and you might be using an external identity provider such as Google sign-in or Azure identity management. After the user has logged in, you have some way of uniquely identifying them.
- Initialize PubNub. This requires a unique identifier for the user or device. You do not have to use the same ID generated by your identity provider so long as you can tie the PubNub ID to whichever value you use to identify the user within your application uniquely.
- Generate an Access Manager token by invoking a PubNub Function. Since the PubNub function will grant access to the resources the user requires, you need to provide all the information required for the function to complete its task. For this simple example, we will just provide the authorized user ID, but later in this blog, we will discuss how to assign permissions based on channel memberships.
- It is essential to understand which permissions your application needs to grant based on which PubNub features you use. The go-to reference for this information is the Permissions section in the documentation for Access Control.
- You can revoke permissions by revoking the token used to access the resources.
- Provide the access manager token to the SDK used by your application; for example, a JavaScript app would call pubnub.setToken(), a Kotlin app would call setToken(), etc.
A simple function to grant some hardcoded channel permissions to the specified user
Creating a PubNub function
- Login to the PubNub admin portal and select the application that will house your function
- Select ‘Functions’ from the left-hand menu under the ‘Build’ option.
- Select ‘+ Create New Module’ and give your module a name and description.
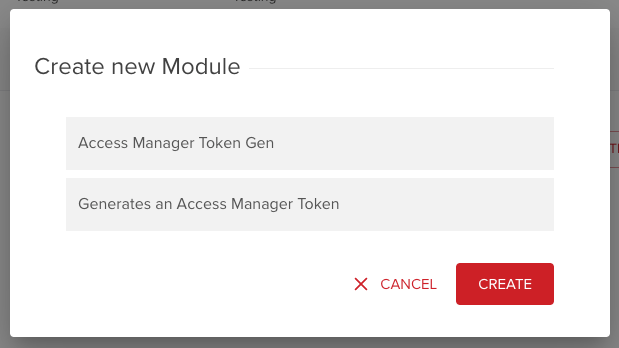
- Select the module you just created, then select ‘+ Create New Function’
- Provide a function name and select ‘On Request’ for the function type.
- Provide a name for your function, then ‘Create’ the function.
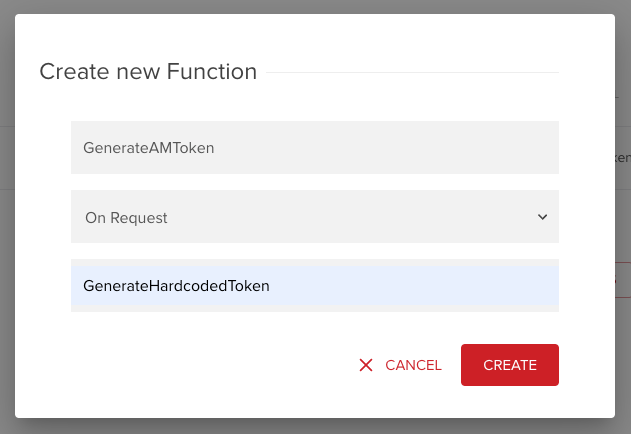
- You will be taken to the function editor. Most of the editor should be self-explanatory, but some points are worth bearing in mind:
- Make sure you start the function by pressing the ‘Start Module’ button in the top right.
- Pressing the ‘Copy URI’ button is the easiest way to generate the URI required to invoke your function. It will be in the format https://ps.pndsn.com/v1/blocks/sub-key/{Your App Subscribe Key}/{The URI You provided at the previous step}
- The editor will contain a default function that echos your payload back to you. You can test your function with the ‘Test Payload’ section in the bottom left
The code to grant some hardcoded permissions to the specified user
Replace your function’s code with the following block, then save and restart your module
1 2 3 4 5 6 7 8 9 10 11 12 13 14 15 16 17 18 19 20 21 22 23 24 25 26 27 28 29 30 31 32 33 34 35 36 37 38export default (request, response) => { const pubnub = require('pubnub'); return request.json().then((body) => { let userId = body.userId; if (userId == null) throw new Error ('User ID not specified'); response.status = 200; return pubnub.grantToken(generateConfig(userId)).then((accessToken) => { // note: async / await not available within functions console.log(accessToken.data.token) return response.send(accessToken); // success }); }).catch((err) => { console.log(err); return response.send("Malformed JSON body."); }); }; function generateConfig(userId) { let config = { ttl: 60, // minutes authorized_uuid: userId, resources: { channels: { 'example-channel-name': { read: true, // default is false } } }, patterns: { channels: { "example_channel_prefix.*": { read: true, } } } } return config; }
You can test your function by specifying the payload as:
1 2 3{ "userId": "01234567890" }
Select a 'POST' function, then press 'Make Request'. You should see the token output to the console:

You can also use curl as follows (replace the sub key with your own)
1curl https://ps.pndsn.com/v1/blocks/sub-key/sub-c-35518298-e707-48a1-ab47-7dc037416e03/GenerateHardcodedToken -d '{"userId":"12354567890"}'
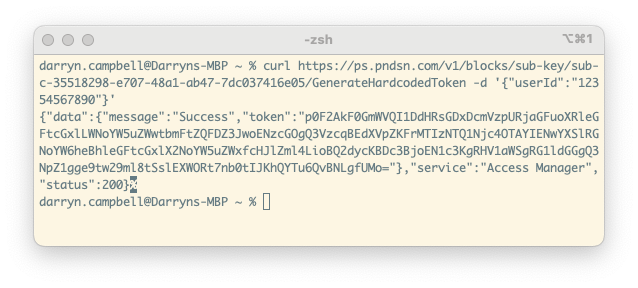
The key pieces of code to understand in the above snippet are:
1pubnub.grantToken(...)
This invokes the PubNub Functions Module API to grant the Access Manager token. Note that this PubNub instance has sufficient authority to approve the grant request since it has been automatically initialized with your secret key.
1function generateConfig(userId) {...}
This method generates a hard-coded configuration to grant:
- Read permission on the channel named ‘example-channel-name’
- Read permission on any channel that matches ‘example_channel_prefix.*’, regex pattern, following our documented channel naming conventions.
Note that the time to live is set to 60 minutes; this is the longest TTL we recommend in production, but you can extend this if needed.
Dynamically Generating a Configuration, Based on Channel Membership
Let’s consider a scenario where users join and leave channels as they participate in conversations or leave group chats. These associations between users and channels are typically managed by ‘Membership,’ which is part of PubNub’s App Context feature. As users join a channel, the ‘setMemberships’ API is invoked; the ‘removeMemberships’ API is invoked as they leave a channel. As users join or leave channels, events are fired so other chat participants know a change has occurred; additional custom metadata such as a description or ‘starred’ status can also be associated with a channel.
Different applications will use channel membership in different ways, but let’s consider the following common scenario:
- A user requests to join a group channel
- That request is approved by some arbitrator in your application
- The user subscribes to the group channel and receives messages on that channel.
There are two things going on here:
- Firstly, most applications will have some way of preventing users from joining groups they should not have access to; this arbitrator’s role is to grant permissions to users to allow resource access. For simplicity, let’s assume this arbitrator is some kind of superuser and already has the appropriate Access Manager permissions to set channel memberships.
- In the “typical” workflow for implementing Access Manager, this arbitrator will also be responsible for providing the user with an Access Manager token that grants them permission to receive messages on their desired channel. We would like to avoid this step and have the user get this token from a PubNub function without involving the arbitrator.
In Pseudocode, the Function code will work as follows:
FOREACH channel the specified user is a member of
DO Grant the user read permission for that channel
The PubNub Function code should be updated as follows:
1 2 3 4 5 6 7 8 9 10 11 12 13 14 15 16 17 18 19 20 21 22 23 24 25 26 27 28 29 30 31 32 33 34 35 36 37 38 39 40 41export default (request, response) => { const pubnub = require('pubnub'); return request.json().then((body) => { let userId = body.userId; if (userId == null) throw new Error ('User ID not specified'); response.status = 200; return pubnub.objects.getMemberships({ uuid: userId }).then((memberships) => { return pubnub.grantToken(generateConfig(userId, memberships)).then((accessToken) => { console.log(accessToken.data.token) //pubnub.parseToken(accessToken.data.token).then((parsedToken) => // console.log(parsedToken) //); return response.send(accessToken); }); }) }).catch((err) => { console.log(err); return response.send("Malformed JSON body."); }); }; function generateConfig(userId, memberships) { let config = { ttl: 60, // minutes authorized_uuid: userId, resources: { channels: { 'example-channel-name': { read: true, } } } } memberships.data.forEach(membership => { config.resources.channels[membership.channel.id] = {read: true} }) console.log(config) // For demo purposes / debug only return config; }
If you make a test request to the function as described earlier, you will see a list of memberships output to your console:

Note that I have used a keyset where the specified user ID is associated with 2 channels, 'my-channel' and 'my-other-channel'.
Note also that for simplicity, the above code sample ignores any paging logic, so would only handle a maximum of 100 memberships (the default limit); this is a limitation of the sample, NOT a limitation of PubNub.
The following code has been added to the sample:
1 2 3return pubnub.objects.getMemberships({ uuid: userId }).then((memberships) =>
This uses the PubNub Functions Module method to retrieve channel memberships and returns an array of those memberships.
As you start to add logic to your function that grants permissions, you can use the parseToken() API to ensure that tokens are generated as expected. This will return a JSON object defining all the granted permissions.
1 2 3pubnub.parseToken(accessToken.data.token).then((parsedToken) => console.log(parsedToken) );
Handling Token Expiry
Tokens are time-limited, and although you can configure the expiration time by setting the token’s ttl during token creation, you will need a strategy for handling what to do after expiration.
The documentation for token expiration lists three strategies, though only the second and third are appropriate when generating the token within a PubNub function:
“2. Client checks the ttl whenever it receives a token and sets a timer to make a refresh request. The server supports a refresh API.”
The PubNub client SDK exposes an API to parse the token you receive and determine the TTL; for example, the JavaScript function is parseToken(). You can start an internal timer based on that TTL value (specified in minutes) and the current timestamp. When that timer expires, you should make another request to the PubNub Function to generate a new Access Manager token and pass it as a parameter to pubnub.setToken().
“3. Client supports the logic that handles 403 responses, makes a just-in-time refresh request, updates the SDK upon getting a new token, and retries the failed request.”
Your application should already contain error handling when any of your calls to PubNub fail, and you should extend this logic to handle the 403 response and re-request a token when this occurs. In JavaScript, this will look as follows:
- Try/catch catches an error with 'error.statusCode' defined as '403'.
- Request a new token from your PubNub function
- Call pubnub.setToken(), providing the new token
- Retry the original request that first caused the error
Next Steps
This blog has described the principles for enabling Access Manager from a PubNub function, but it is impossible to cover every conceivable use case your application implements. Also, whilst this article has discussed some of the simple permissions, more complex use cases will require additional write permissions for all required resources.
If you need additional help with anything discussed here, please contact our support team or developer relations team, and we can help you secure your app for production to ensure a smooth and reliable rollout.