Android Mobile Push Notifications
PubNub Mobile Push Notifications bridges native message publishing with third‑party push services, including Apple Push Notification service (APNs) and Firebase Cloud Messaging (FCM). The examples below show how to register for remote notifications, receive the device token, register it on a PubNub channel, and publish a message.
Before you use Mobile Push Notifications with Firebase Cloud Messaging (FCM), configure both your Firebase and PubNub accounts for your app.
Step 1: Configure account settings
Before you use PubNub Mobile Push Notifications with Firebase Cloud Messaging (FCM), configure both your Firebase and PubNub accounts for your app.
Step 1a: Download a Firebase private key file
Update your keyset configuration
If you use the legacy HTTP FCM to send Mobile Push Notifications, you must migrate to the new HTTP v1 FCM before June 2024. Refer to the migration guide for details.
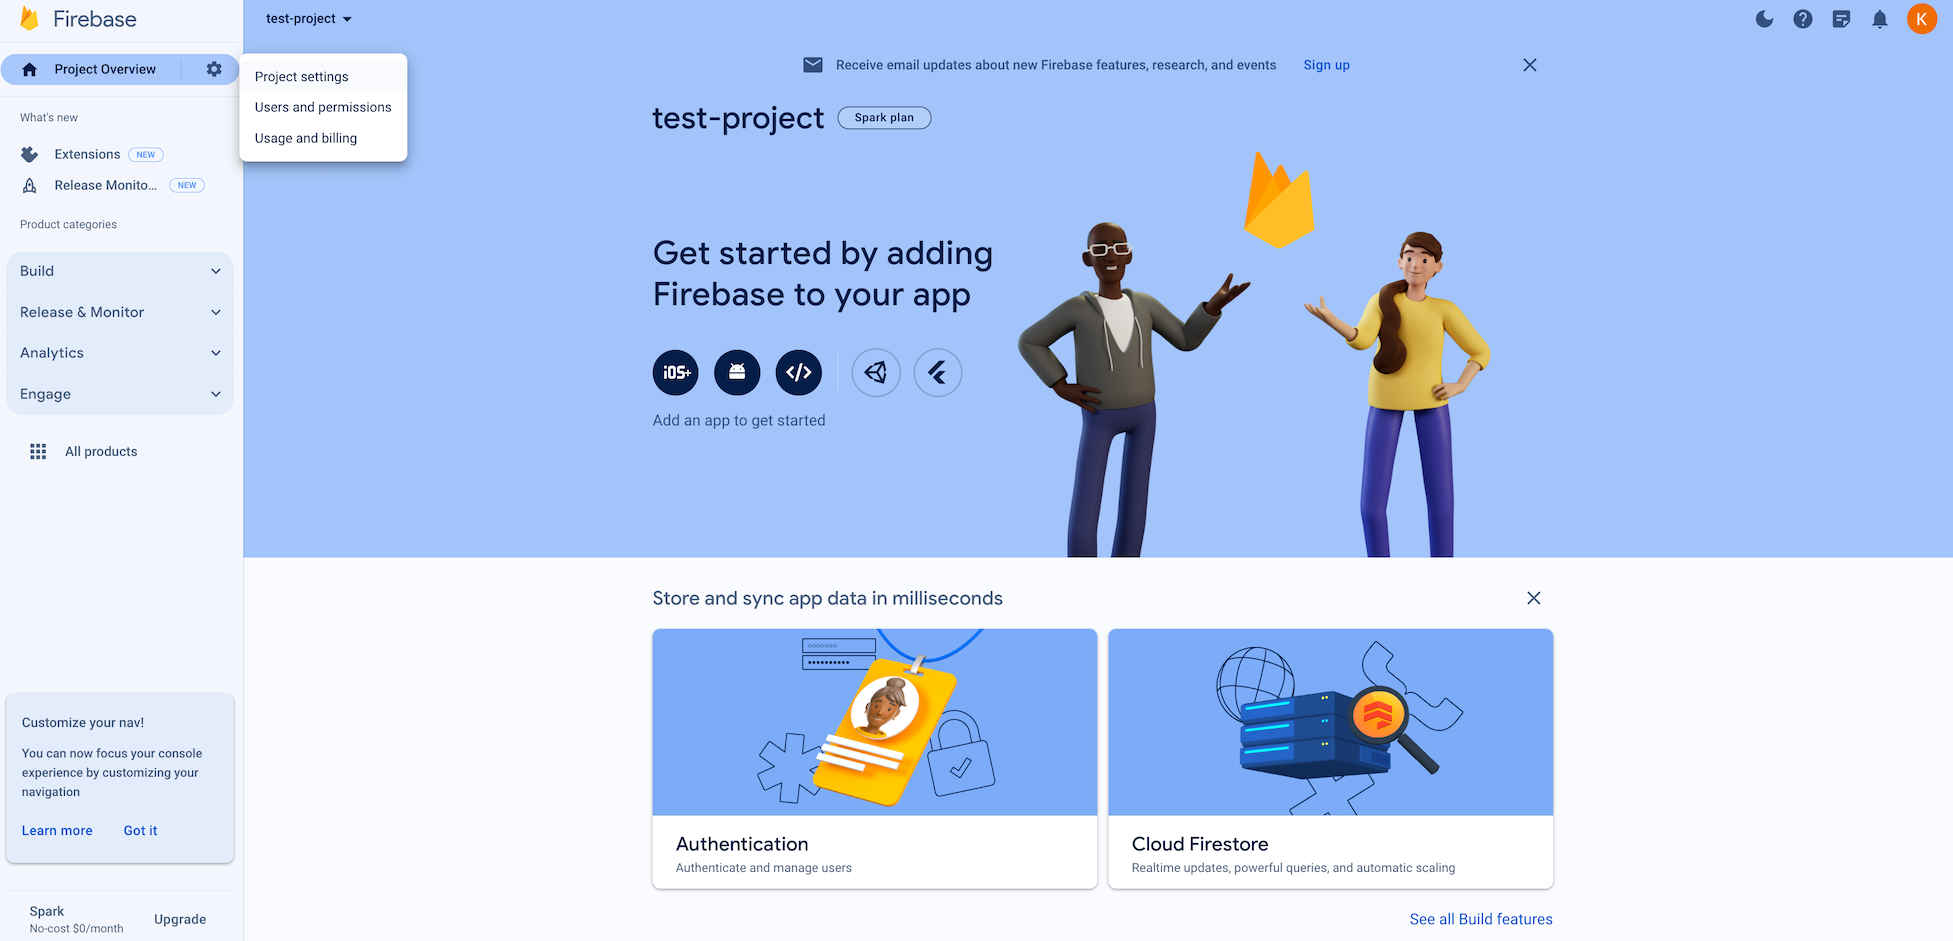
Log into the Firebase console. Click Create a project and follow the wizard.

Click the settings icon at the top left of your project overview page. Go to Project settings.
Switch to the Service accounts tab.
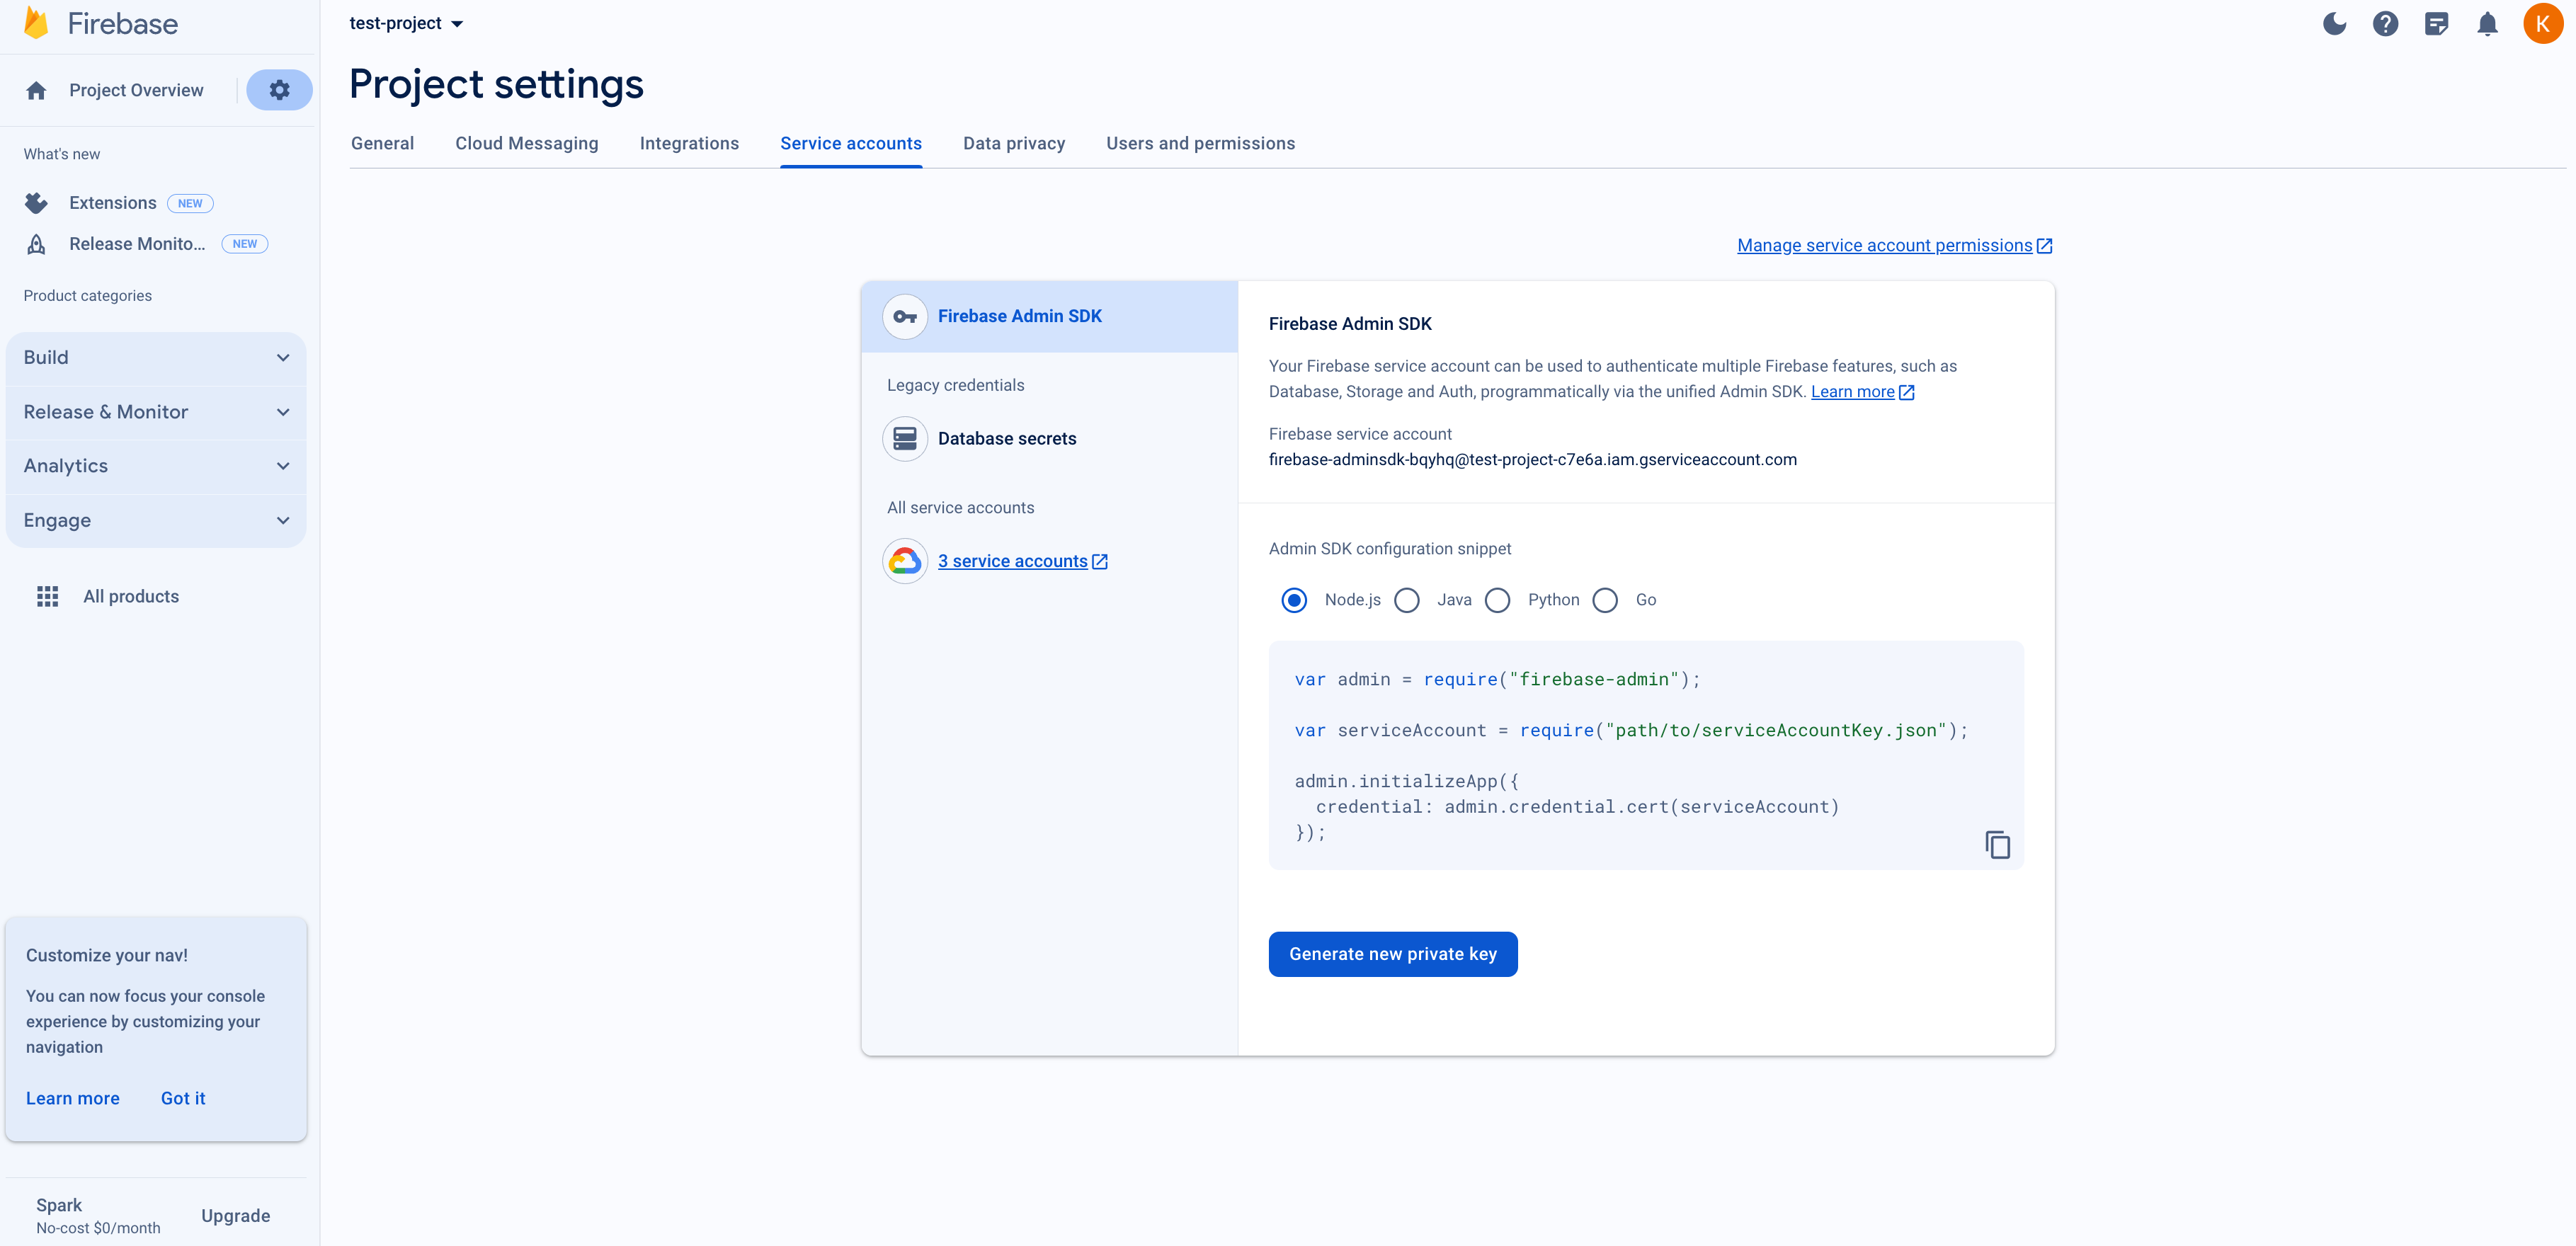
The default service account has nearly admin privileges for a customer’s entire Firebase project. PubNub requires access to only Firebase messaging to send notifications via FCM.
We recommend that you create a dedicated service account with minimal permissions (Firebase Cloud Messaging API Admin role) to limit access to only what’s needed for PubNub’s FCM use.
To create a service account, click the external link under All service accounts to open Google Cloud Platform.
Fill in the service account details. Select the Firebase Cloud Messaging API Admin role from the dropdown and click Done.
Back in the Firebase console, open the new service account. Click Generate new private key and download your FCM private key file.
Step 1b: Upload the Firebase private key file to your Admin Portal
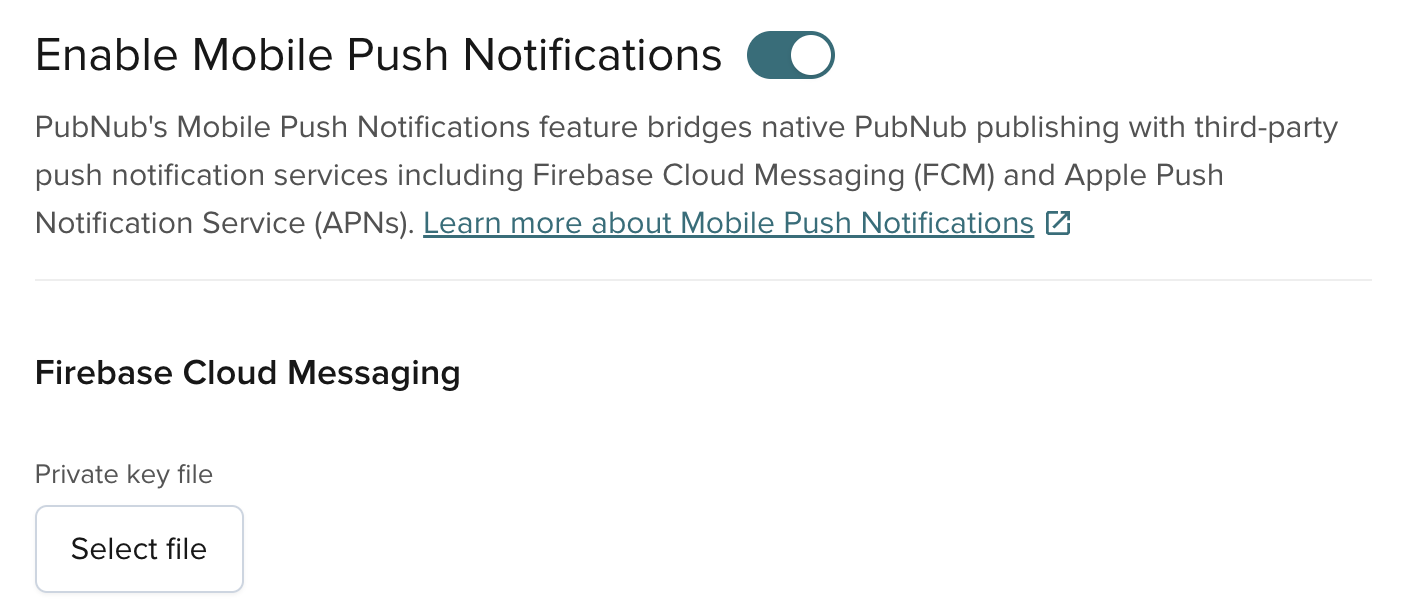
On the Admin Portal, go to the Mobile Push Notifications section on your app's keyset. Enable the feature and upload the file downloaded from Firebase through the Private key file option in the Firebase Cloud Messaging section.
Migrate from legacy FCM APIs to HTTP v1
The Legacy FCM APIs that used an API Key have been deprecated by Google, and will be removed in June 2024. The Admin Portal will continue supporting the legacy FCM API Keys until Google removes those deprecated APIs entirely. Still, it is strongly recommended that you configure FCM HTTP v1 following the steps described in this section.
Step 2: Request device token
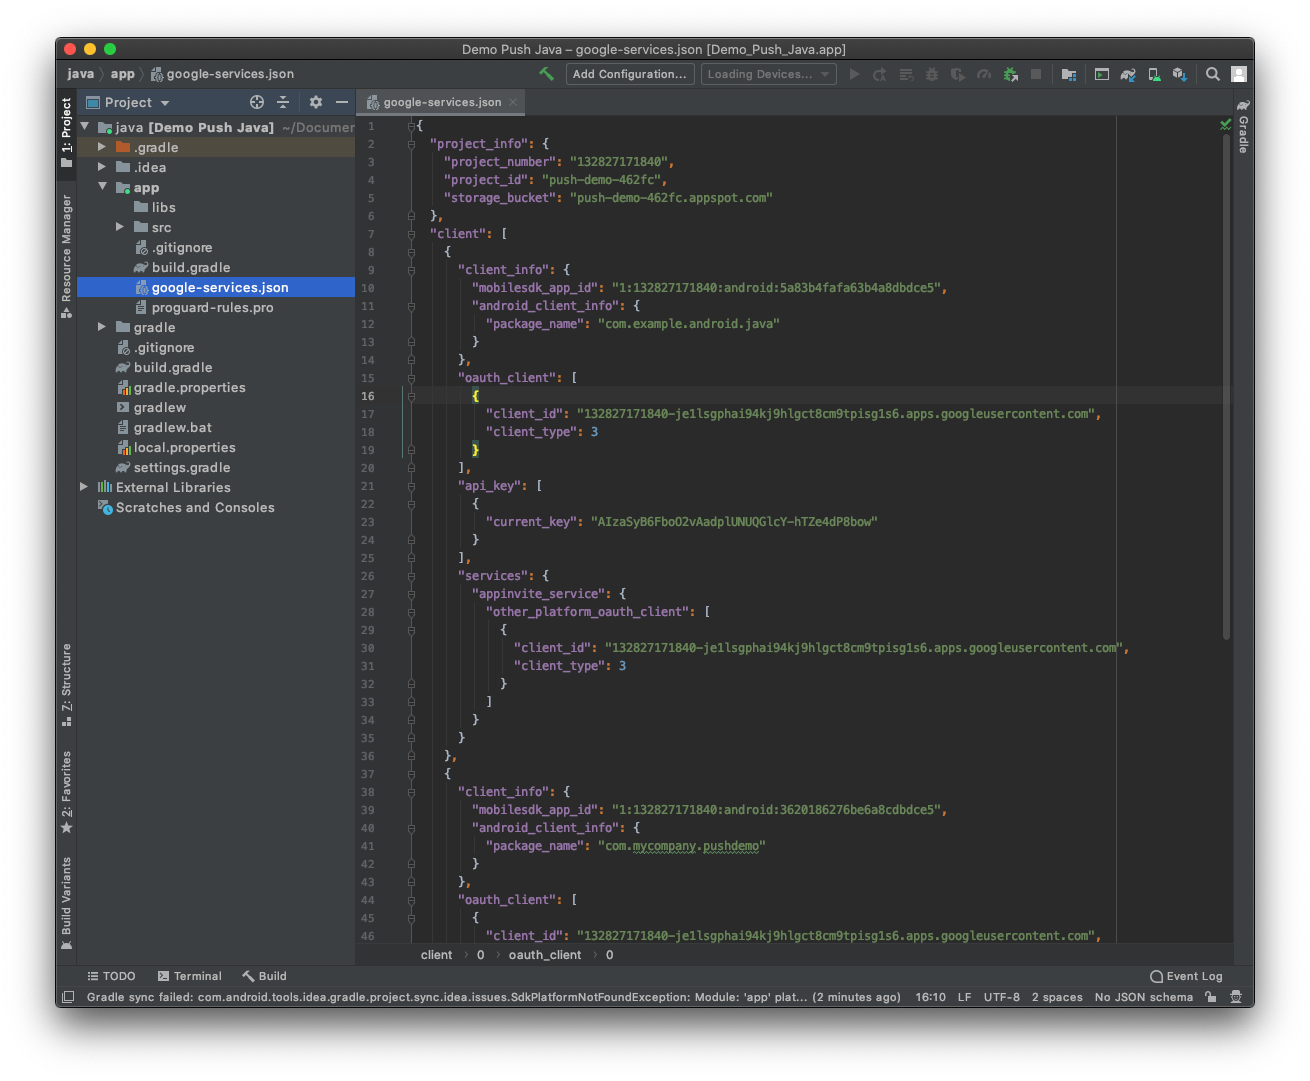
Open your Android Studio project and switch to the Project view. Add the google-services.json file (from Step 1) to your app module root directory.
Step 2a: Configure Gradle
Refer to the Google documentation for steps to configure your Gradle files to use the google-services plugin and add Firebase dependencies.
Step 2b: Firebase registration
The following example shows how to get a token from FirebaseMessaging. You can do this anywhere in the app. This example uses onCreate of AppCompatActivity so it always runs.
Read Firebase Docs for more details.
- Java
- Kotlin
1public class MainActivity extends AppCompatActivity {
2 @Override protected void onCreate(Bundle savedInstanceState) {
3 super.onCreate(savedInstanceState);
4 SharedPreferencesManager.init(getApplicationContext())
5
6 FirebaseMessaging.getInstance().getToken().addOnCompleteListener(new OnCompleteListener<String>() {
7 @Override public void onComplete(@NonNull Task<String> task) {
8 if (!task.isSuccessful()) {
9 Log.w(TAG, "Fetching FCM registration token failed", task.getException());
10 return;
11 }
12 Log.d(TAG, getString(R.string.msg_token_fmt, task.getResult()));
13 }
14 });
15 }
1class MainActivity : AppCompatActivity() {
2  override fun onCreate(savedInstanceState: Bundle?) {
3    super.onCreate(savedInstanceState)
4

5    Firebase.messaging.getToken().addOnCompleteListener(OnCompleteListener { task ->
6      if (!task.isSuccessful) {
7        Log.w(TAG, "Fetching FCM registration token failed", task.exception)
8        return@OnCompleteListener
9      }
10

11      Log.d(TAG, getString(R.string.msg_token_fmt, task.result))
12    })
13  }
14}
Step 3: Receive & monitor device token
To receive the device token (and updates) and mobile push notifications, create a class that extends FirebaseMessagingService.
The onNewToken callback fires whenever FCM generates a new token. After initial registration, FCM may deliver new tokens. Update your cached token and PubNub channel registrations when the token changes.
- Java
- Kotlin
1public class MyFirebaseMessagingService extends FirebaseMessagingService {
2  @Override  public void onNewToken(String token) {
3    String oldToken = SharedPreferencesManager.readDeviceToken();
4    if (token.equals(oldToken)) { return; }
5    SharedPreferencesManager.write(token);
6

7    updatePushNotificationsOnChannels(SharedPreferencesManager.readChannelList(), token, oldToken);
8  }
9}
1override fun onNewToken(token: String) {
2  val oldToken = SharedPreferencesManager.getInstance(applicationContext).readDeviceToken()
3  if (token == oldToken) { return  }
4  SharedPreferencesManager.getInstance(applicationContext).writeDeviceToken(token)
5

6  updatePushNotificationsOnChannels(
7    SharedPreferencesManager.getInstance(applicationContext).readChannelList(),
8    token,
9    oldToken
10  )
11}
Step 3a: Cache device token & registered channels
To ensure that an application can properly handle adding, updating, and removing registered push channels, there are two pieces of information that should be cached to avoid race-conditions: the Device Token and the list of registered channels. Not only will properly caching allow for easy access from anywhere inside the application, it will also prevent against race-conditions when multiple registration operations are queued at the same time.
SharedPreferences provides basic persistent storage, but can be replaced by more sophisticated storage as your use-case requires. The following code will ensure the accessing of the cached information will be thread-safe regardless of storage choice.
A new Device Token can be provided from the system at anytime, and should be stored whenever it's received. The list of registered channels should also be cached in a similar manner as the Device Token, and should be updated whenever registered channels are added or removed. Set is used for the convenience of ensuring there are no duplicate channels.
- Java
- Kotlin
1public class SharedPreferencesManager {
2 private static SharedPreferences sharedPref;
3 private SharedPreferencesManager() { }
4
5 public static void init(Context context) {
6 if(sharedPref == null)
7 sharedPref = context.getSharedPreferences(context.getPackageName(), Context.MODE_PRIVATE);
8 }
9
10 public static final String FCM_DEVICE_TOKEN = "PUBNUB_FCM_DEVICE_TOKEN";
11 public static @Nullable String readDeviceToken() {
12 return sharedPref.getString(FCM_DEVICE_TOKEN, null)
13 }
14 public static void writeDeviceToken(String value) {
15 SharedPreferences.Editor prefsEditor = sharedPref.edit();
1class SharedPreferencesManager private constructor() {
2 companion object {
3 private val sharePref = SharedPreferencesManager()
4 private lateinit var sharedPreferences: SharedPreferences
5
6 private val PLACE_OBJ = "place_obj"
7 private val FCM_DEVICE_TOKEN = "PUBNUB_FCM_DEVICE_TOKEN"
8 private val FCM_CHANNEL_LIST = "PUBNUB_FCM_CHANNEL_LIST"
9
10
11 fun getInstance(context: Context): SharedPreferencesManager {
12 if (!::sharedPreferences.isInitialized) {
13 synchronized(SharedPreferencesManager::class.java) {
14 if (!::sharedPreferences.isInitialized) {
15 sharedPreferences = context.getSharedPreferences(context.packageName, Context.MODE_PRIVATE)
Step 3b: Update existing registrations
A simple helper method can be created to consolidate the remove-then-add functionality when updating your existing registered channels.
- Java
- Kotlin
1public void updatePushNotificationsOnChannels(String[] channels, String deviceToken, String oldToken) {
2  if (oldToken != null) {
3    pubnub.removeAllPushNotificationsFromDeviceWithPushToken()
4      .pushType(PNPushType.FCM)
5      .deviceId(oldToken)
6      .async(result -> { /* check result */ });
7  }
8

9  pubnub.addPushNotificationsOnChannels()
10    .pushType(PNPushType.FCM)
11    .deviceId(deviceToken)
12    .channels(channels)
13    .async(result -> { /* check result */ });
14}
1fun updatePushNotificationsOnChannels(channels: List<String>, deviceToken: String, oldToken: String?) {
2 oldToken?.also { token ->
3 pubnub.removeAllPushNotificationsFromDeviceWithPushToken(
4 pushType = PNPushType.FCM,
5 deviceId = token
6 ).async { result, status -> }
7 }
8
9 pubnub.addPushNotificationsOnChannels(
10 pushType = PNPushType.FCM,
11 deviceId = deviceToken,
12 channels = channels
13 ).async { result, status ->
14 // Handle Response
15 }
Step 4: Manage device registrations
After you obtain a device token, register it with a list of channels to allow Mobile Push Notifications to be sent to the device. You can add or remove channels at any time. You can also view current registrations for a device token.
Step 4a: Register new channels
When adding channels, it's recommended to obtain the Device Token and List of Registered Channels from a cached source. After successfully registering channels, the newly registered channels should be added to the cached list.
- Java
- Kotlin
1String cachedToken = SharedPreferencesManager.readDeviceToken();
2

3pubnub.addPushNotificationsOnChannels()
4  .pushType(PNPushType.FCM)
5  .deviceId(cachedToken)
6  .channels(Arrays.asList("ch1", "ch2", "ch3"))
7  .async(result -> { /* check result */ });
1SharedPreferencesManager.getInstance(applicationContext).readDeviceToken()?.also { deviceToken ->
2  pubnub.addPushNotificationsOnChannels(
3    pushType = PNPushType.FCM,
4    deviceId = deviceToken,
5    channels = listOf("ch1", "ch2", "ch3")
6  ).async { result, status ->
7    // Handle Response
8  }
9}
Step 4b: List registered channels
Once device registrations are added, you can confirm the APNs registrations for the device by listing all channels that the device is registered with. Since the list on the server is the source-of-truth, we will update our cached list to reflect the channels currently registered on the server.
- Java
- Kotlin
1String cachedToken = SharedPreferencesManager.readDeviceToken();
2

3pubnub.auditPushChannelProvisions()
4  .pushType(PNPushType.FCM)
5  .deviceId(cachedToken)
6  .async(result -> { /* check result */ });
1SharedPreferencesManager.getInstance(applicationContext).readDeviceToken()?.also { deviceToken ->
2  pubnub.auditPushChannelProvisions(
3    pushType = PNPushType.FCM,
4    deviceId = deviceToken
5  ).async { result, status ->
6    // Handle Response
7  }
8}
Step 4c: Remove existing registrations
When removing channels it's recommended to obtain the Device Token and List of Registered Channels from a cached source. After removing registering channels, the channels that were removed should be also removed from the cached source.
- Java
- Kotlin
1String cachedToken = SharedPreferencesManager.readDeviceToken();
2

3pubnub.removePushNotificationsFromChannels()
4  .pushType(PNPushType.FCM)
5  .deviceId(cachedToken)
6  .channels(Arrays.asList("ch1", "ch2", "ch3"))
7  .async(result -> { /* check result */ });
1SharedPreferencesManager.getInstance(applicationContext).readDeviceToken()?.also { deviceToken ->
2  pubnub.removePushNotificationsFromChannels(
3    pushType = PNPushType.FCM,
4    deviceId = deviceToken,
5    channels = listOf("ch1", "ch2", "ch3")
6  ).async { result, status ->
7    // Handle Response
8  }
9}
Step 5: Construct the push payload
To send a push notification, include the appropriate push notification payload for FCM when you publish a message and PubNub will appropriately parse the message.
FCM mobile push notification payload structure
The structure of the pn_fcm payload is as follows:
1{
2 "pn_fcm": {
3 "notification": {
4 "title": "My Title",
5 "body": "message notification text"
6 },
7 "android": {
8 "collapse_key": "group",
9 "data": {
10 "age": "10"
11 },
12 "ttl": "30s"
13 },
14 "webpush": {
15 // FCM Webpush config
| Field | Type | Required | Description |
|---|---|---|---|
pn_fcm | Object | Yes | Container for Firebase Cloud Messaging (FCM) payload. The specification is compatible with FCM message payload structure to ensure PubNub processes the message correctly when delivering it to FCM. |
> notification | Object | No | Basic notification template to use across all platforms. This part is platform-agnostic, but within the context of pn_fcm, it's being prepared for FCM parsing. It can take several optional parameters, like title, body, or image. Check official Firebase docs for the full list of available parameters. |
> android | Object | No | Android-specific options for messages sent through FCM connection server. Specifies how messages should be handled on Android devices. It can take several optional parameters, like collapse_key, data, or ttl.Check official Firebase docs for the full list of available parameters. |
> pn_exceptions | [String] | No | A list of Device Tokens that should be excluded from receiving the notification. |
pn_debug | boolean | No | A flag that enables push debugging info to the pndebug channel. For more information, refer to Mobile Push Troubleshooting. |
pn_dry_run | boolean | No | A flag that allows developers to test a request without actually sending a message. |
Don't specify topic, token, and condition
Don't specify the token, topic, or condition targets in the payload on your own as PubNub provides a mechanism to target only the devices registered to PubNub channels.
If you include a topic field in your payload, FCM throws an error when spotting more than one target field.
1FCM JSON payload error: Invalid value at 'message.data[0].value' (TYPE_STRING), 1234
2Invalid JSON payload received. Unknown name "nick" at 'message.data[1].value': Cannot find field.
3Invalid value at 'message' (oneof), oneof field 'target' is already set. Cannot set 'token'
Metadata in message payloads
Add metadata to pass custom information to the app. For FCM, include key‑value pairs in the data field.
{
  "data": {
    "userId": "12345",
    "action": "openProfile"
  }
}
Prevent self-notifications
Exclude the sender’s device token to avoid a push for the sender. Add the token(s) to pn_fcm.pn_exceptions:
1{
2  "pn_fcm": {
3    "notification": {
4      "title": "Chat Invitation",
5      "body": "John invited you to chat"
6    },
7    "pn_exceptions": [
8      "<sender_fcm_token>",
9      "<optional_other_device_token>"
10    ]
11  }
12}
Examples
Certain PubNub SDKs use helper methods to create a valid FCM payload.
- Example payload
- Java
- Kotlin
- Swift
- Objective-C
- JavaScript
Read Firebase Docs for more details.
1{
2  "pn_fcm": {
3    "notification": {
4      "title": "Chat Invitation",
5      "body": "John invited you to chat"
6    },
7      "pn_exceptions" : ["device-token1", "device-token2"]
8    }
9}
1import com.pubnub.api.models.consumer.push.payload.PushPayloadHelper;
2import com.pubnub.api.models.consumer.push.payload.PushPayloadHelper.FCMPayloadV2;
3import com.pubnub.api.models.consumer.push.payload.PushPayloadHelper.FCMPayloadV2.Notification;
4
5// Create the notification object
6PushPayloadHelper.FCMPayloadV2.Notification notification = new PushPayloadHelper.FCMPayloadV2.Notification();
7 notification.setTitle("Chat Invitation");
8 notification.setBody("John invited you to chat");
9
10// Create the FCM v2 payload
11 PushPayloadHelper.FCMPayloadV2 fcmPayloadV2 = new PushPayloadHelper.FCMPayloadV2();
12 fcmPayloadV2.setNotification(notification);
13
14// Use the PushPayloadHelper to build the final payload
15 PushPayloadHelper payloadHelper = new PushPayloadHelper();
1import com.pubnub.api.models.consumer.push.payload.PushPayloadHelper
2import com.pubnub.api.models.consumer.push.payload.PushPayloadHelper.FCMPayloadV2
3import com.pubnub.api.models.consumer.push.payload.PushPayloadHelper.FCMPayloadV2.Notification
4
5val notification = Notification().apply {
6 title = "Chat Invitation"
7 body = "John invited you to chat"
8}
9
10// Create the FCM v2 payload
11val fcmPayloadV2 = FCMPayloadV2().apply {
12 this.notification = notification
13}
14
15// Use the PushPayloadHelper to deep merge the FCM v2 payload and the common payload
1let notification = [
2  "title": "Chat invitation",
3  "body": "John invited you to chat"
4]
5

6let pnFcmDict = [
7  "pn_fcm": ["notification": notification],
8  "pn_exceptions": ["device-token1", "device-token2"]
9] as [String : Any]
1NSString* title = @"Chat Invitation";
2NSString* body = @"John invited you to chat";
3PNNotificationsPayload* builder = [PNNotificationsPayload payloadsWithNotificationTitle: title body: body];
4

5NSMutableDictionary* dictRepresentation = [[builder dictionaryRepresentationFor:PNFCMPush] mutableCopy];
6dictRepresentation[@"pn_exceptions"] = @[@"device-token1", @"device-token2"];
1const builder = PubNub.notificationPayload('Chat Invitation', 'John invited you to chat');
2const payload = builder.buildPayload(['fcm']);
3payload['pn_gcm']['notification']['pn_exceptions'] = ['device-token1', 'device-token2'];
Step 6: Publish the push notification
When your push payload is ready, call publish to send the message on a channel. If the message contains pn_fcm, PubNub retrieves device tokens registered on the target channel and forwards a push request to FCM.
- Java
- Kotlin
- Swift
- Objective-C
- JavaScript
1pubnub.publish()
2  .channel("ch1")
3  .message(pushPayload)
4  .async(result -> { /* check result */ });
1pubnub.publish(
2  channel = "ch1",
3  message = pushPayload
4).async { result ->
5  // Handle Response
6}
1let notification = [
2 "title": "Chat invitation",
3 "body": "John invited you to chat"
4]
5
6let pnFcmDict = [
7 "pn_fcm": ["notification": notification],
8 "pn_exceptions": ["device-token1", "device-token2"]
9] as [String : Any]
10
11pubnub.publish(channel: "channel", message: AnyJSON(pnFcmDict)) {
12 switch $0 {
13 case .success(let timetoken):
14 debugPrint("Message has been successfully published at \(timetoken) timetoken")
15 case .failure(let error):
1NSString* title = @"Chat Invitation";
2NSString* body = @"John invited you to chat";
3PNNotificationsPayload* builder = [PNNotificationsPayload payloadsWithNotificationTitle: title body: body];
4

5NSMutableDictionary* dictRepresentation = [[builder dictionaryRepresentationFor:PNFCMPush] mutableCopy];
6dictRepresentation[@"pn_exceptions"] = @[@"device-token1", @"device-token2"];
7

8[self.client publish:dictRepresentation toChannel:@"test-channel" withCompletion:^(PNPublishStatus* status) {
9  NSLog(@"Did publish a message with status %@", status);
10}];
1//publish on channel
2pubnub.publish(
3  {
4    channel: "ch1"
5    message: pushPayload
6  },
7  function (status, response) {
8    // Handle Response
9  }
10);
For more information about push troubleshooting, refer to Mobile Push Troubleshooting.