Sending iOS Push Notifications via APNS in JavaScript

We’ve updated our SDKs, and this code is now deprecated.
Learn more in our Mobile Push Notification Overview, Swift Docs or Objective-C Docs.
Previously, I covered this same topic for Android push notifications using Google Cloud Messaging (GCM). Today, I am going to show you a step-by-step tutorial how to send and receive iOS push notifications for devices via APNS.
Prerequisites
You need to be familiar with PhoneGap Command Line Interface, or its open-source version, Cordova. For the first time PhoneGap developer, you should begin with the previous article, Converting Your JavaScript App to an iOS App w/ PhoneGap. You need an actual iDevices, like iPhone and iPad. Push notification is not supported on emulators.
Also, I expect you to have a lot of patience. Setting up all the requirements from Apple may not be as smooth as you expect.
iOS Push Notifications Demo
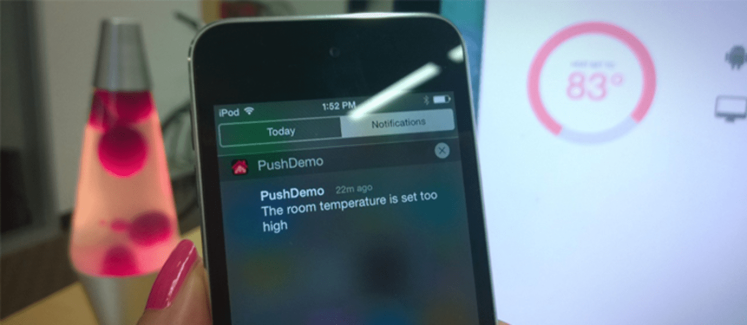
I have created this demo, which simulates an Internet of Things desktop controller that lets you change the room temperature setting. When you set it over 80°F, it sends your iOS device a push notification.
Unfortunately due to lack of openness, I cannot distribute ad hoc iOS apk easily. If you have an Android device, try the demo on Android.
Using Apple Push Notification Service for iOS Push Notifications
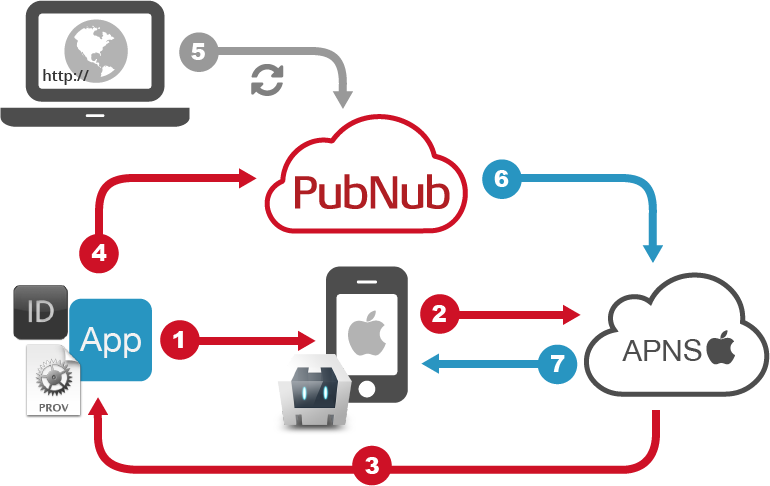
Apple Push NotificationService (APNs) is a service for iOS devices to send and receive push notification messages. The typical flow looks like:
- An App requests iOS for push notification
- iOS sends the request to APNs
- APNs sends back a device token
- The client app sends the toke to the 3rd party server (in this case, you don’t need your own server because you are going to use PubNub network!)
To send a mobile push notification:
- The server (well, PubNub!) sends a payload to APNs with the token
- APNs sends a push notification to the device
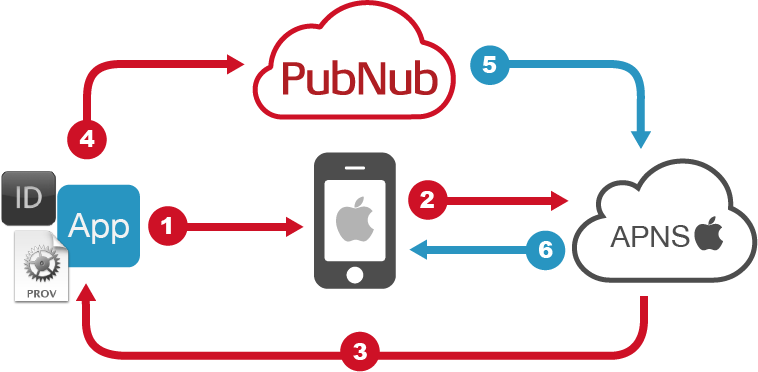
How APNs works
1. App ID Configurations and Certificates
To developer and distribute your iOS app, you need to create an SSL certificate associated to an App ID and a provisioning profile.
This step is not going to be fun, but you must complete to be able to start developing for iOS. It is more complicated than I described in the last article, so I am going to use .gif animations to show you exactly what you are going to do.
1.1. Issuing a Certificate Signing Request
To create an SSL certificate for a push notifications, first you need to generate a Certificate Signing Request (CSR).
- On your Mac, open Keychain Access
- From the top menu, select Keychain Access > Certificate Assistant > Request a Certificate From a Certificate Authority…
- Fill out your email address, common name
- Check Save to disk
- Press Continue and save the the .certSigningRequest file somewhere
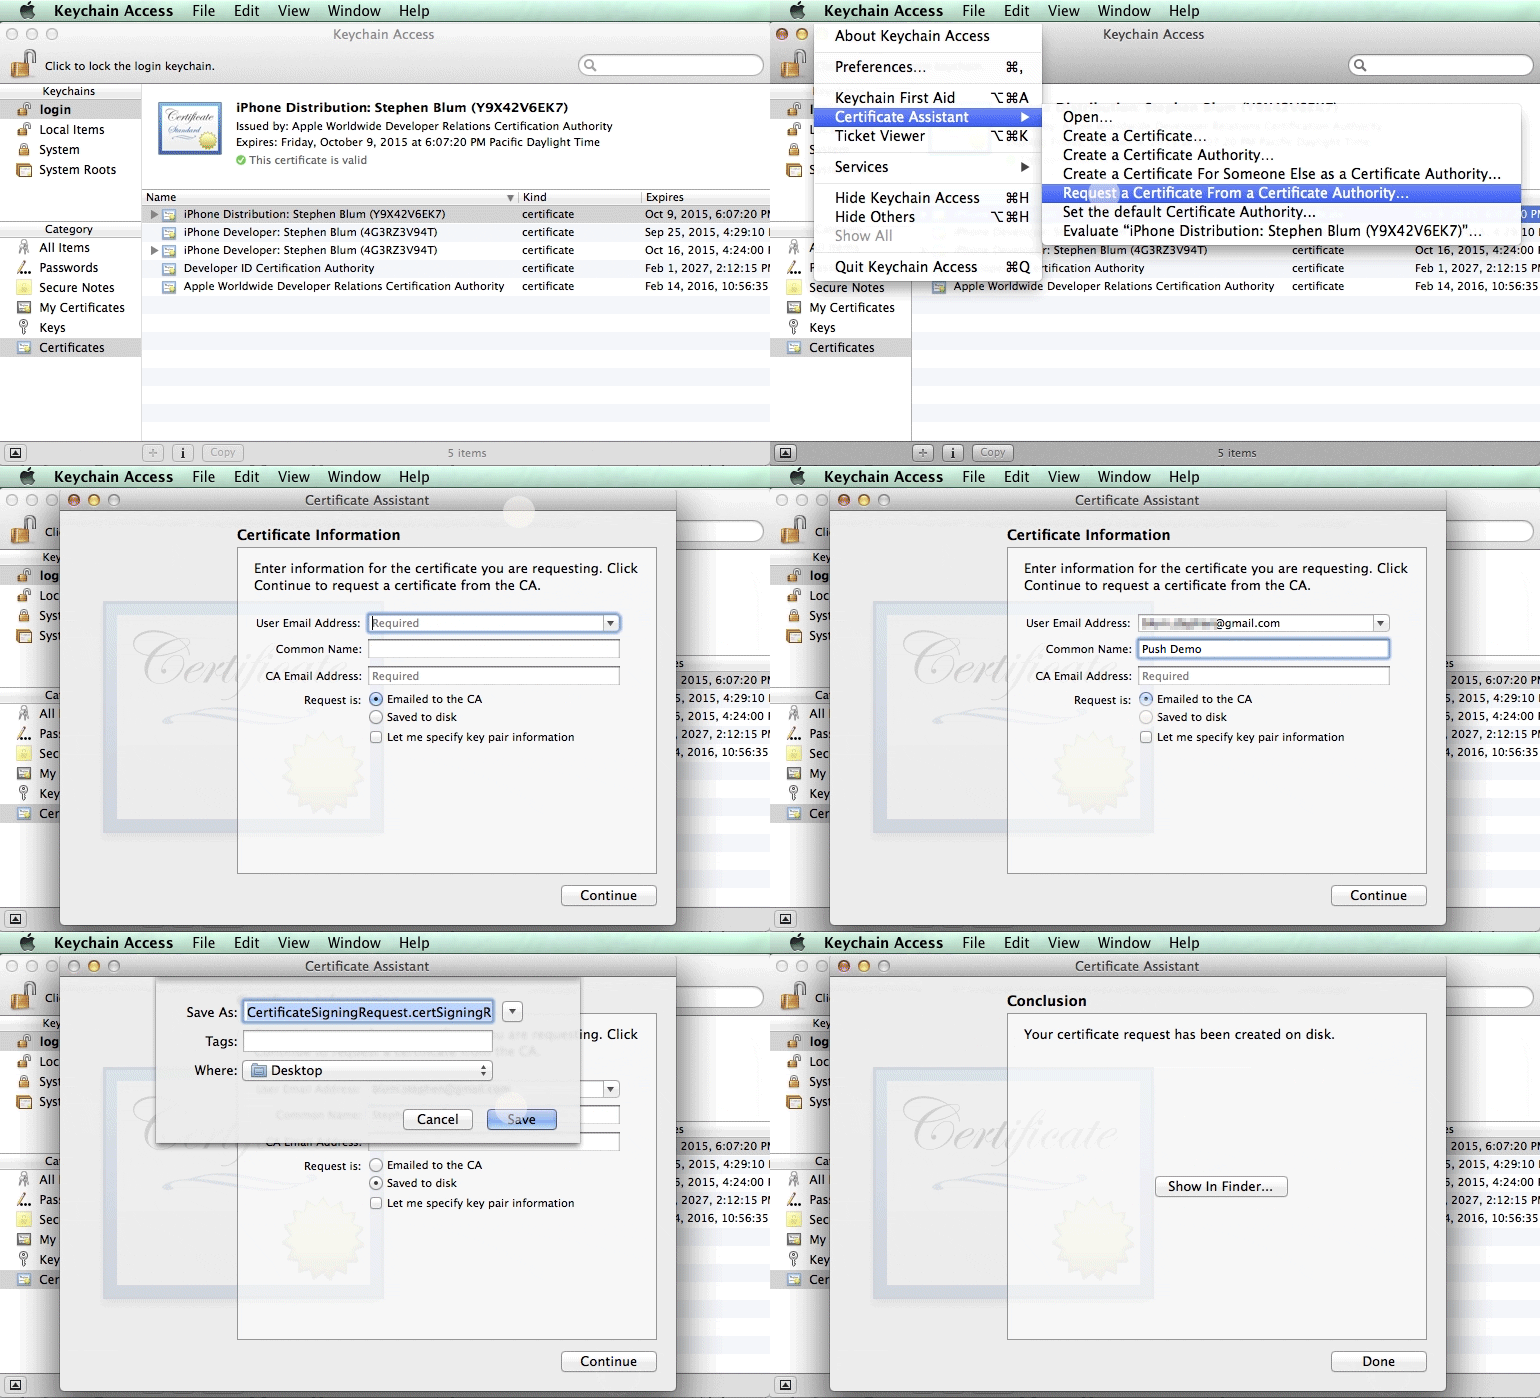
Issuing a Certificate Signing Request
1.2. Creating an App ID
You are going to create a unique App ID.
- On web browser, Apple Developer portal and navigate to Identifiers where you should see a list of your apps
- Click + button at the top right to add a new app
- At Registering an App ID, enter the name of your app, enter an ID, such as com.yourdomain.pushApp (Do not select Wildcard App ID), check Push Notifications
- Click Continue then Submit
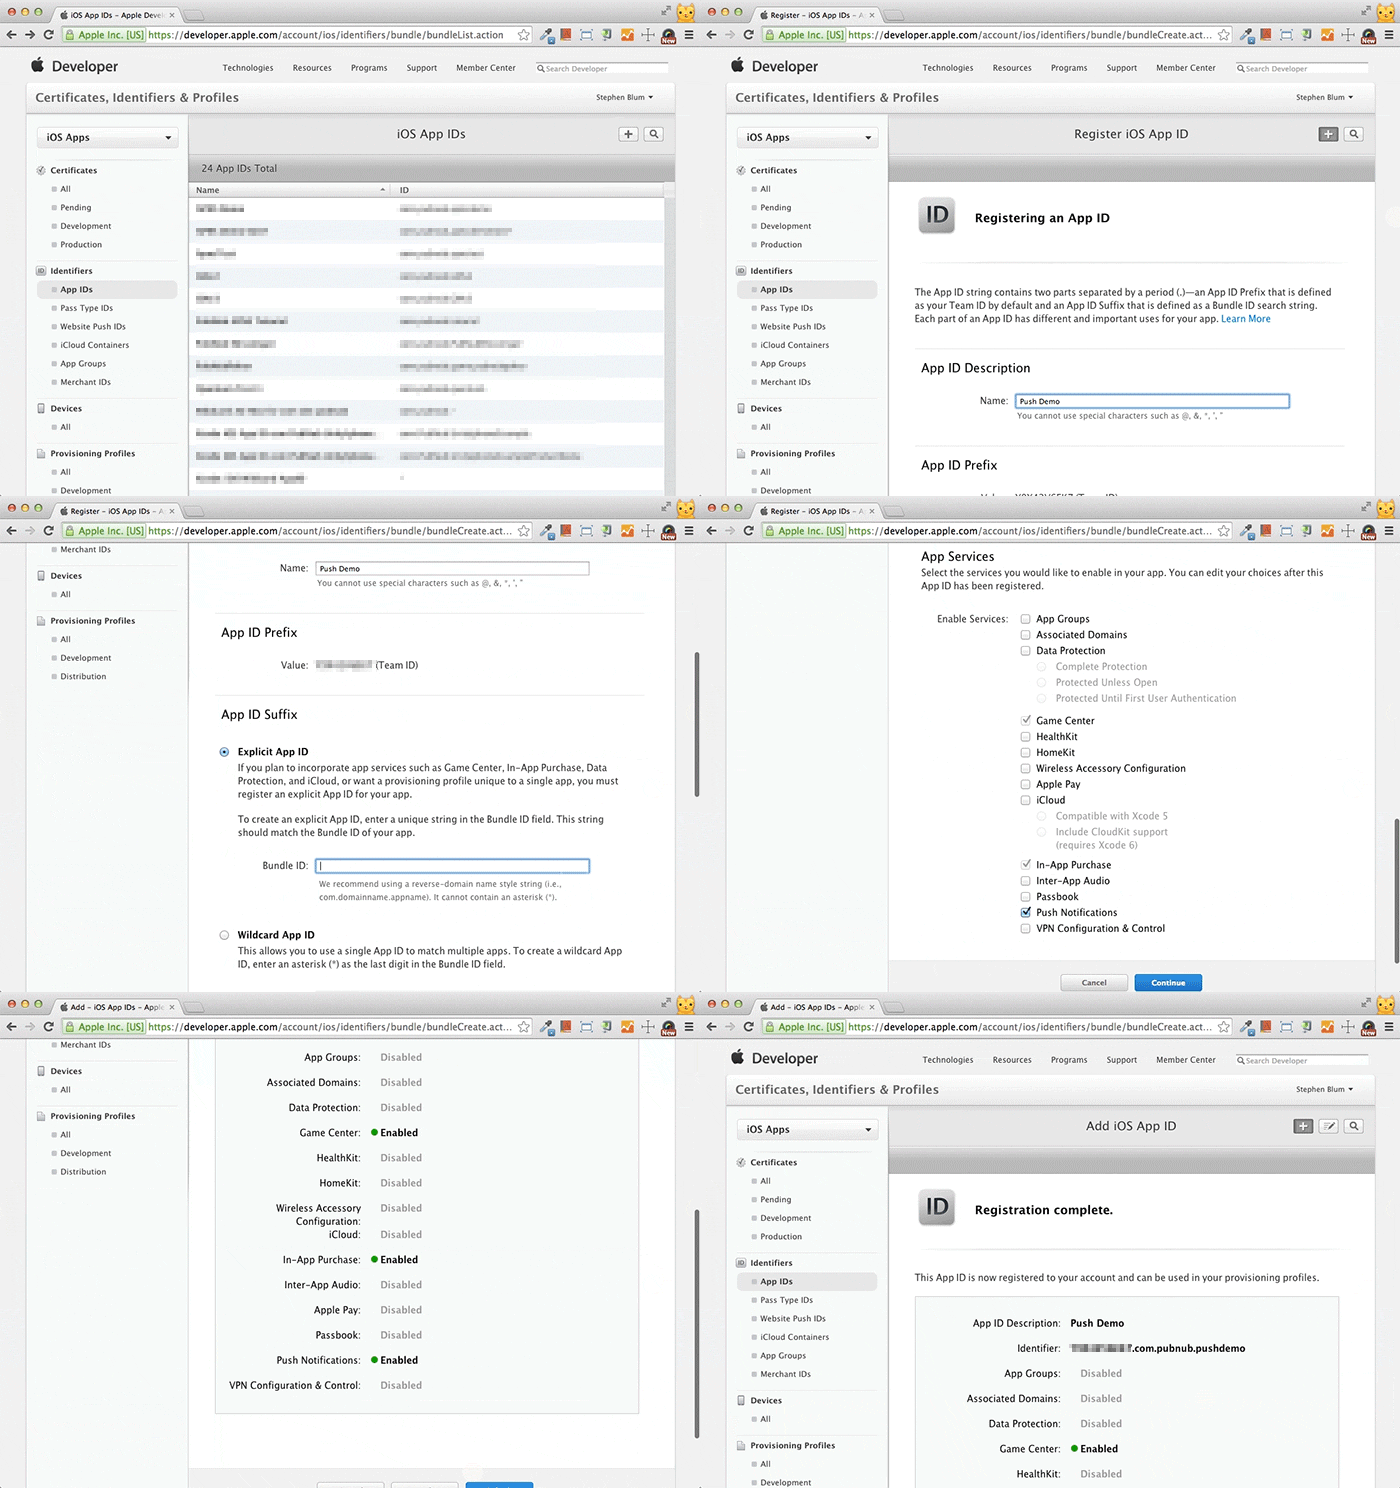
Creating an App ID
1.3. Configuring Push Notifications for the App ID
Once the APP ID registration is completed, you need to configure it to make to work with push notification.
- Select the App ID you just created, and click Edit
- At Push Notifications, click Create Certificate then **Continue
- Click Choose File… and upload the .certSigningRequest file you have generated and saved on your Mac earlier. Click Generate.
- Once the certificate was generated, download it onto your Mac
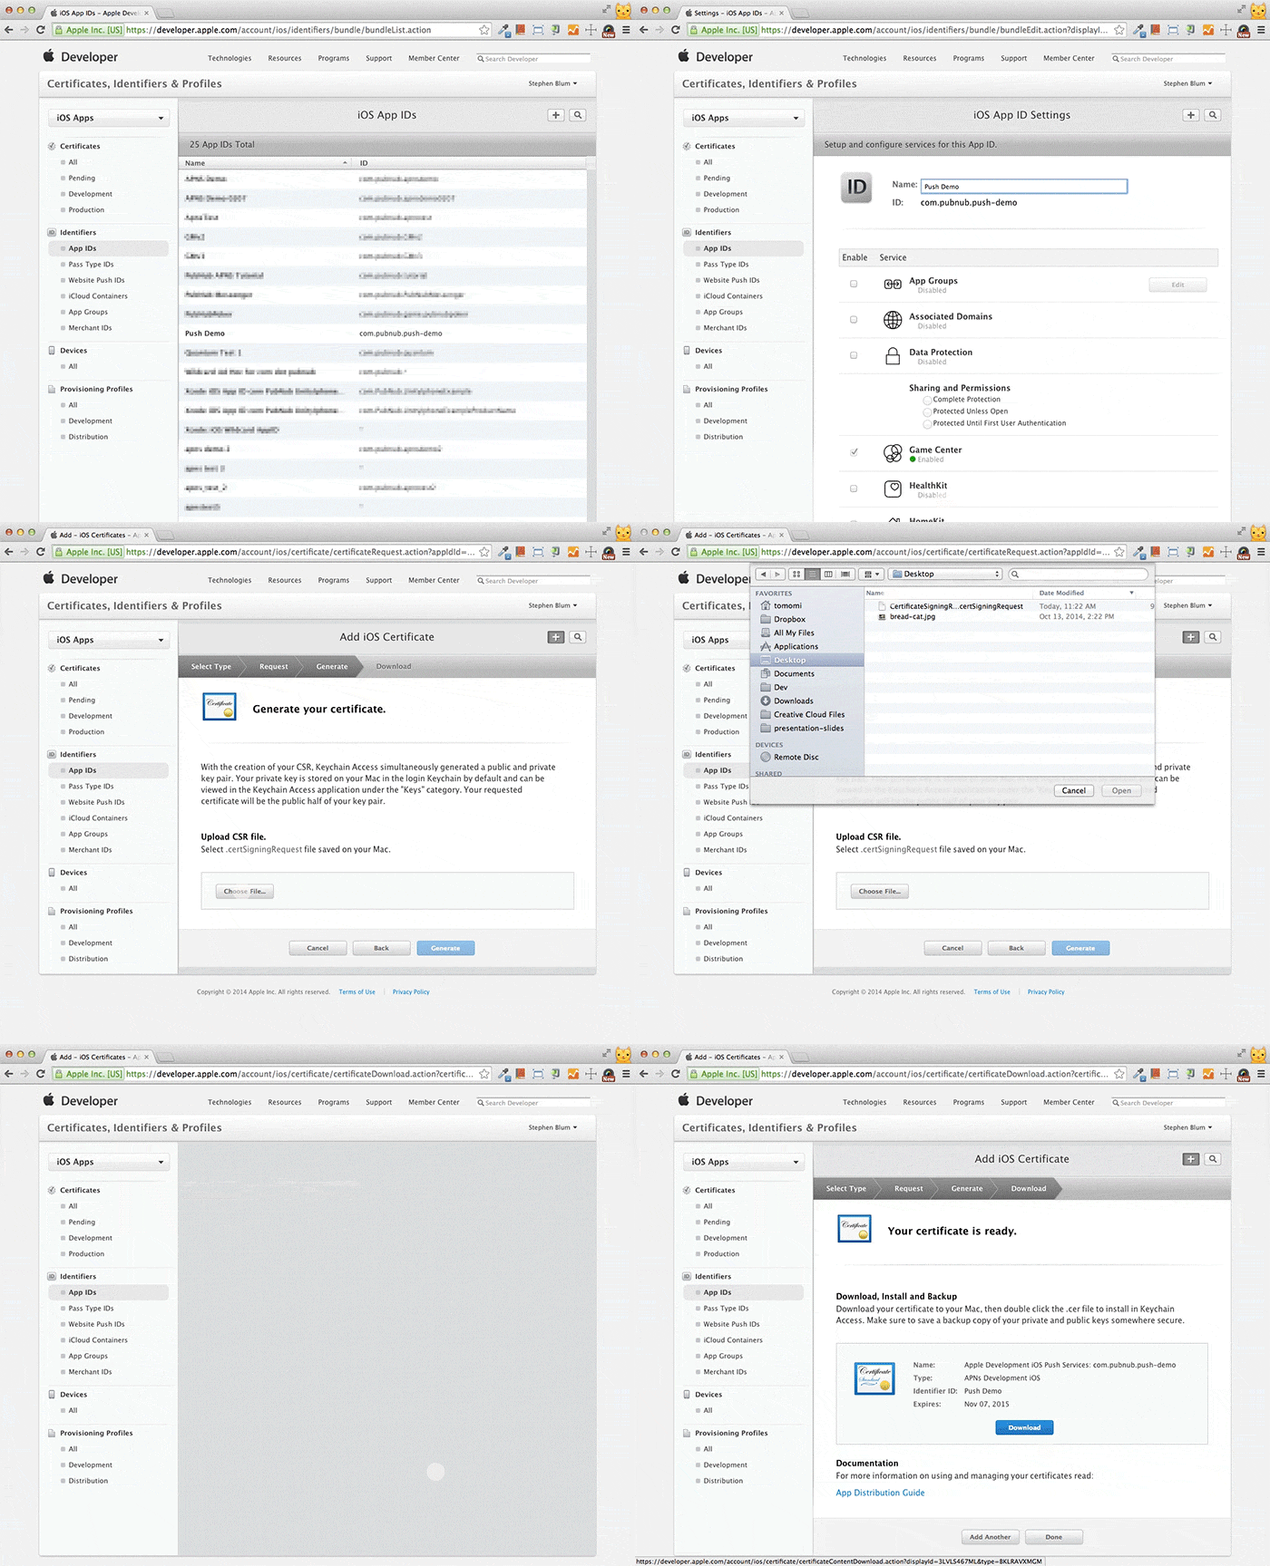
Configuring Push Notifications for the App ID
1.4 Creating a Private Key
Now you are going to create a private key from the downloaded certificate.
- Double-click the downloaded file. It should opens in Keychain Access
- Select My Certificates at left. You should find the certificated you just added.
- Control-click the certificate, and select Export “Apple Development IOS Push Services:…”…
- Save it as ..p12 file, by selecting File Format as Personal Information Exchange (.p12) in the Save As dialog
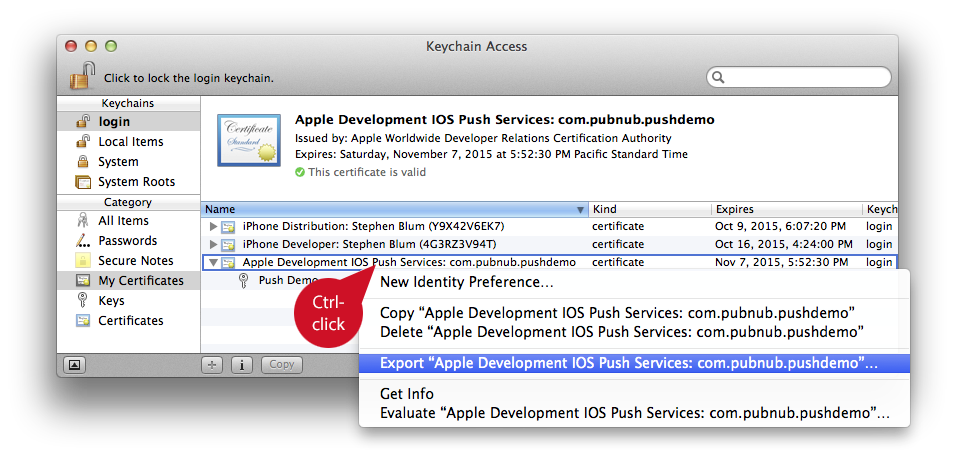
Creating a Private Key
1.5 Creating a Provisioning Profile
- On Apple Developer portal, go to Provisioning Profiles
- Click + to create a new provisioning file
- Select iOS App Development, then Continue
- Select a correct App ID from the dropdown list, then Continue
- Select a correct certificate from the list, then Continue
- Select devices you are going to develop with, the Continue
- Enter a name for the provisioning profile, then Generate
- Download the file
- Double-click open the file in Xcode. The profile now should be added to Xcode.
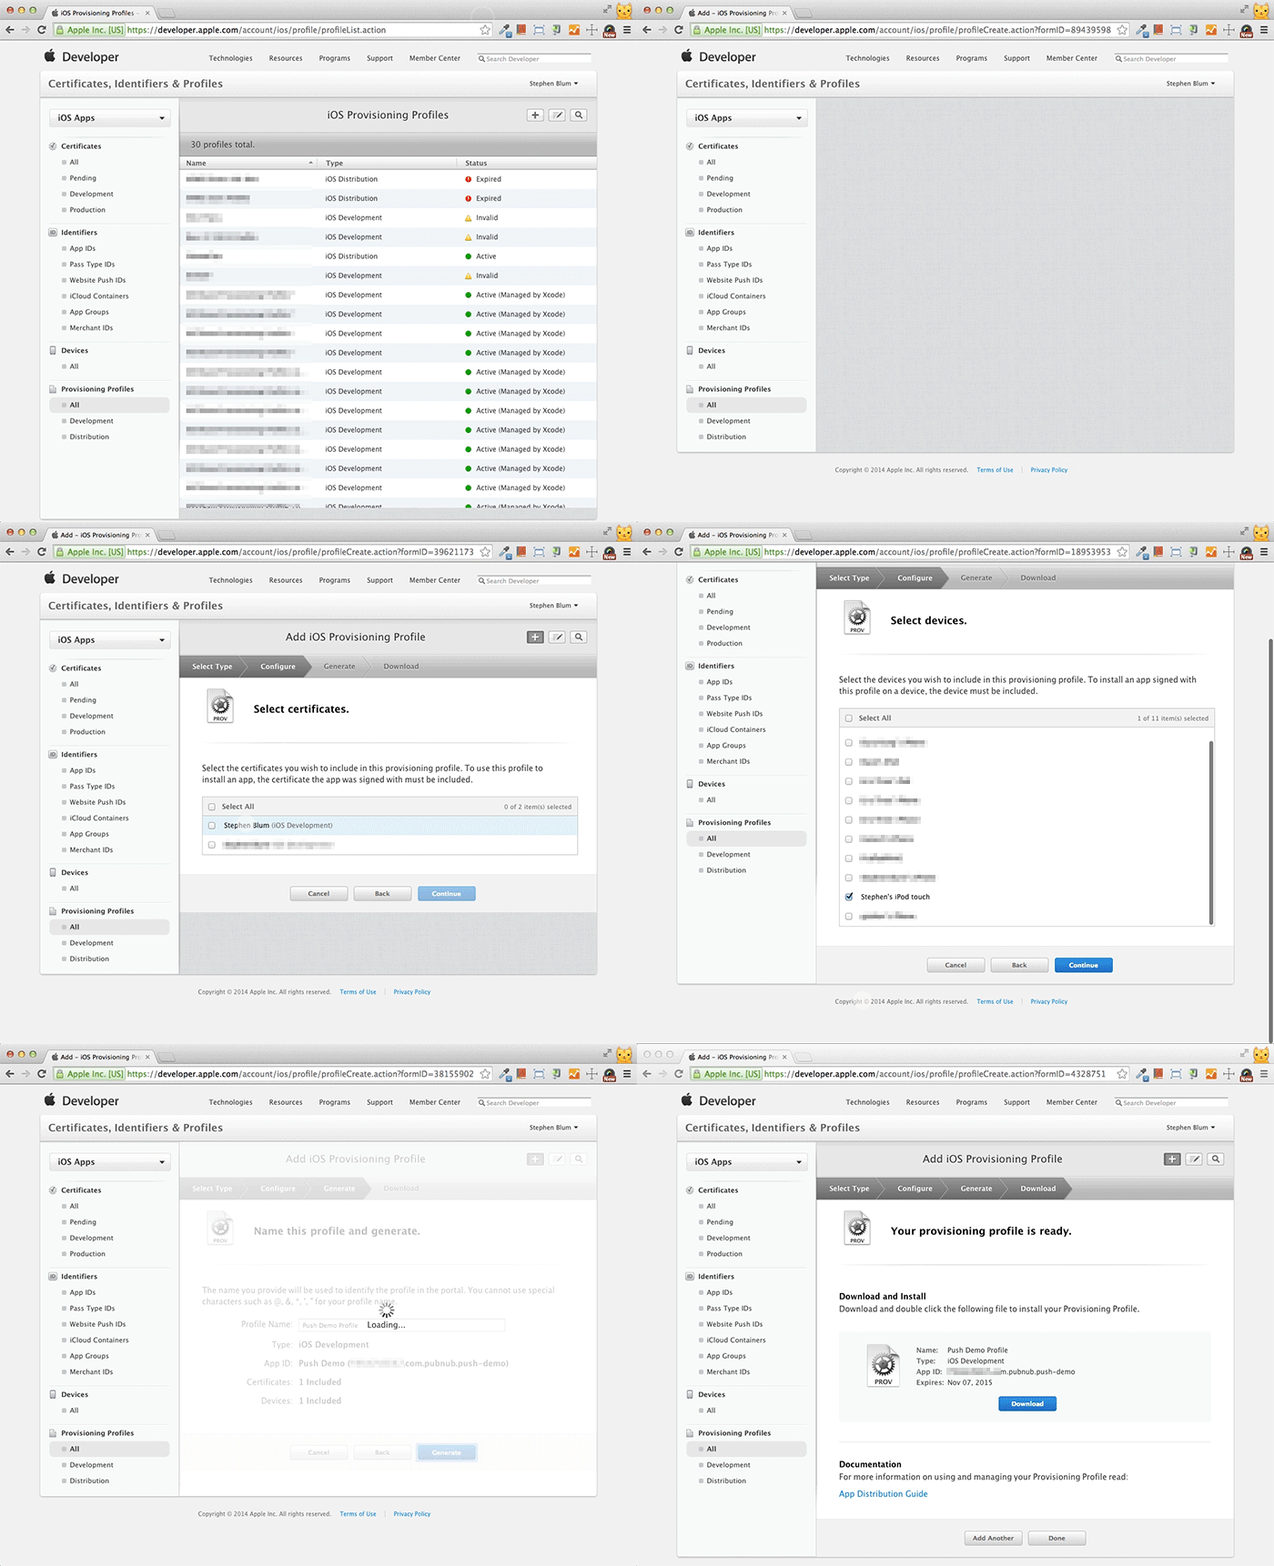
Creating a Provisioning Profile
2. Developing iOS App with Cordova Push Plugin
Phew, I hope you survived the process. You are now finally going to write some code.
In this example, I am using PhoneGap’s open-sourced sibling, Cordova. First, create a project using Cordova CLI.
$ cordova create push-demo com.mydomain.push PushDemo
$ cd push-demo
$ cordova platform add ios
If you already have created the push-demo project at the previous tutorial for Android, skip the first two lines and just add an iOS platform to your Cordova project. Also, skip the next section.
2.1. Installing Cordova Push Plugin
Cordova Push Plugin allows your application to receive push notifications on Android, as well as Amazon Fire OS, iOS, Windows Phone and Windows8 devices.
The plugin can be automatically installed via the Cordova CLI:
$ cordova plugin add https://github.com/phonegap-build/PushPlugin.git
This will install PushNotification.js file under /plugins directory, and you need to copy this to somewhere under /www, where you will be working.
2.2. Using APNS with Cordova
Include the PushNotification.js and pubnub.js in /www/index.html
In this tutorial, you will be writing an iOS app to register a device to obtain an unique token ID, so your JavaScript web app can send it push notifications from desktop.
When you created a new project template, you should already have an /www/index.js with a few functions that PhoneGap uses have already filled in. Where the addEventListener method registers for deviceready event type, change the name of the listener to the starting point of your app, let’s say init. And in your init function, create a plugin instance, then register the device as follows:
To support both Android (GCM) and iOS (APNs), install a Cordova Device plugin:
$ cordova plugin add https://git-wip-us.apache.org/repos/asf/cordova-plugin-device.git
and separate each platform, using device.platform API method:
When tokenHandler callback is called, you should successfully be able to obtain the device token.
To test APNs push notifications, you must test on your actual device. This feature is not supported on emulators.
When you are ready, try alert(result) instead of console.log to view the device’s token in an alert popup on device.
The token should look something like: 24c99cd5c39b283c58b554509c999999937aadb7b4bxxx0043cb363af6…
In the next step, I am using the static token value, however in reality, you probably want to store the value in PubNub and get the value from client to send a message to a targeted iOS device.
3. Sending Push Notifications from Web Site
Now your iOS device is ready to receive iOS push notifications via APNs, so let’s create a desktop web to send messages.
This diagram below is the same as the diagram shown at the intro before Section 1, plus a user-flow from a desktop browser is included to describe the demo for this tutorial. The desktop is where a user changes room temperature, as publishing the information to PubNub service (step 5 in gray). If the room temperature setting is above 80F, PubNub connects to APNS (step 6) to send a push notification to the registered device (step 7).
Normally, to be able to send messages to APNs, you need to set up your server. However, with using PubNub Mobile Push Gateway, you can can instantly deliver platform specific push notifications by just write front-end JavaScript and even run it on places like GitHub pages. It really eliminates the burden of developing an additional server side component!
3.1. Creating a Web Page
From now on, you no longer use Cordova. Just ceate a new web page with HTML, CSS and JavaScript. Don’t forget to include pubnub.js to your index.html, then initialize PubNub.
In the demo app, I am simulating an Internet of Things user interface with a fake temperature controller. Once a user sets the temperature too high, let’s say, 80°F, it sends your device a push notification via APNs. This is a simplified code to handle the user interaction:
3.2. Using PubNub Mobile Push Gateway
To use the feature, you need to activate the feature at Admin portal.
- Previously at Section 1.4. you have created a private key .p12 file. Convert it to *.pem. using terminal as follows:
$ openssl pkcs12 -in CertificateName.p12 -out CertificateName.pem -nodes
- On PubNub Admin portal, click Add to enable Push Notifications
- Drag the .pem file into the box below APNS PEM Cert, and click OK

3.3. Sending Messages to Your Phone Using PubNub APIs
There are two step to send a message via APNS:
- Register a device to PubNub channel
- Send a message to APNS service
To register a device to a channel, use mobile_gw_provision API. The basic usage is as follows:
Note: In the code, I used a static value for the gcm_regid to simplify the code sample, however in a real scenario, you are handling multiple devices. You should take advantage of PubNub Storage/Playback Service – store a registration ID from Cordova app, and grab the ID from web!
Once the device is registered to PubNub, it calls the callback that sends a message payload to APNs service. Use a PubNub message object, PNmessage, then use apns to set the GCM message object.
Now you should be able to send iOS push notifications to your iOS device from a web browser without setting up your own server! Awesome!
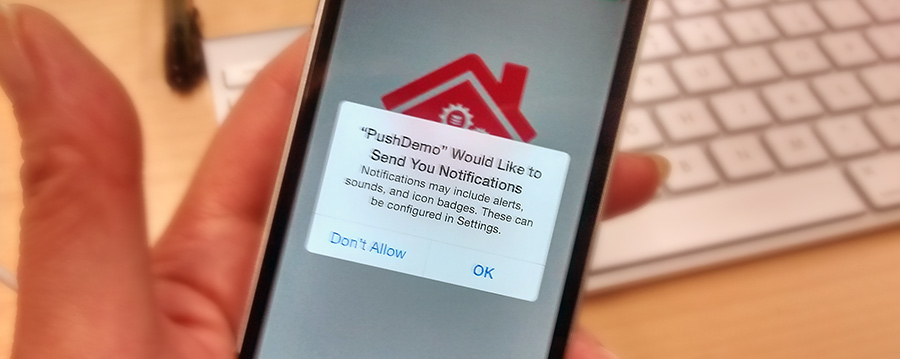
I used a simplified code sample to keep the tutorial easier to follow, but if you wish for the entire source code of the web app demo, you can view it on GitHub, and the source code for index.js in Cordova app is on Gist.
I hope you enjoyed this tutorial!
 |
Source code: The source code is available in the github repository |
